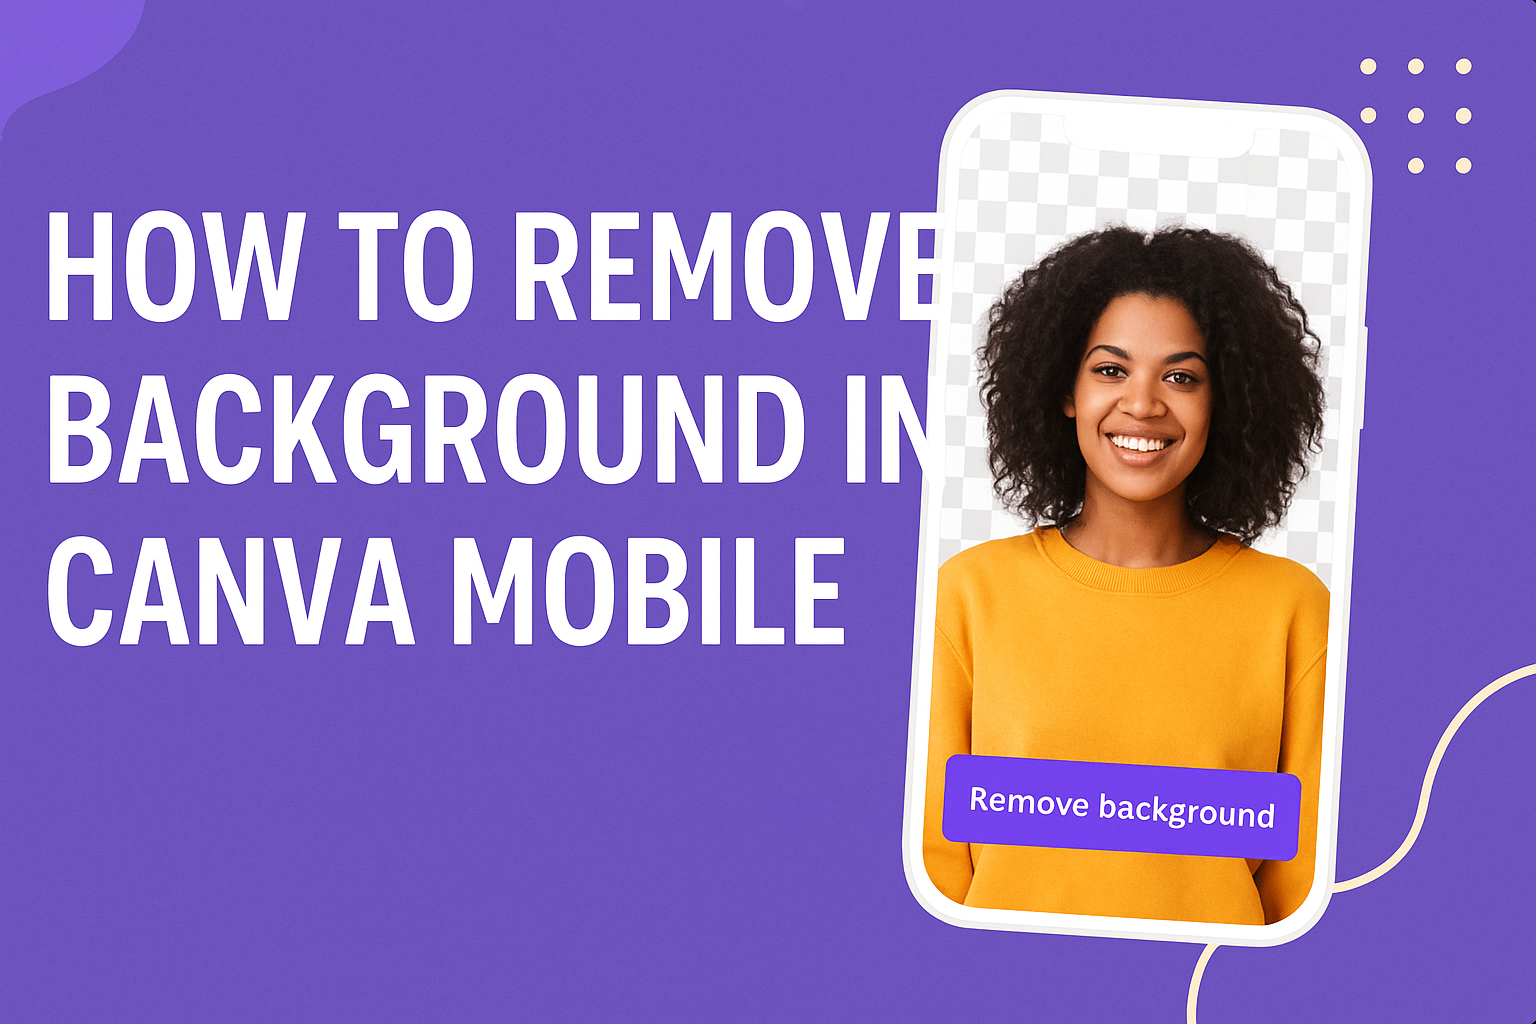
Removing a busy background can make any photo look clean and professional, even on a phone. With Canva Mobile, the process is quick and simple. To remove background in Canva Mobile, just select the image, tap “Effects,” and use the Background Remover tool—available with Canva Pro.
This feature helps anyone highlight the main subject of a photo without needing advanced editing skills. It works well for product shots, profile pictures, or social media posts where a polished look matters.
The rest of this guide walks through how Canva Mobile works, what the Background Remover tool can do, and step-by-step directions to make edits. It also shares creative ways to use background removal, plus tips for customizing images after the background is gone.
Getting Started With Canva Mobile
Canva Mobile makes it simple for anyone to create and edit designs right from a phone. It allows users to install the app quickly, explore its menus with ease, and access projects across devices through a connected account.
Downloading and Installing the Canva App
The Canva app is available on both the App Store for iOS and the Google Play Store for Android. Users can search for Canva: Design, Photo & Video and download it for free. The download size is moderate, so it works on most modern smartphones without taking up too much space.
After installation, the app requires a login. They can sign in with an existing email, Google, or Facebook account. This step ensures that all designs link to their account for easy access later.
The app offers both a free version and a Canva Pro subscription. Free users get access to thousands of templates, while Pro users unlock premium tools like the Background Remover. Choosing the right plan depends on how often they plan to use advanced features.
Navigating the Canva Mobile Interface
The Canva mobile interface uses a clean layout to make design work simple. The bottom menu bar holds the main functions: Home, Projects, Templates, and Menu. Each section helps users move quickly between browsing, editing, and managing designs.
When editing a project, tools appear along the bottom of the screen. These include Text, Elements, Uploads, and Effects. Tapping each option opens more features, such as adding shapes, adjusting fonts, or applying filters.
A helpful feature is the search bar at the top. It allows users to type keywords like “flyer” or “Instagram post” to find ready-made templates. This saves time and keeps the design process organized.
Accessing Your Designs on Mobile
All designs created in Canva automatically save to the cloud. This means users can start a project on a computer and continue editing it later on the Canva mobile app. They only need to log in with the same account.
The Projects tab shows folders, recent files, and shared designs. This makes it easy to keep work organized, especially for those handling multiple projects.
Files can also be downloaded directly to the phone in formats like PNG, JPG, or PDF. This is useful for quickly sharing on social media or sending final drafts to clients without needing a computer.
Understanding the Background Remover Tool
The Background Remover in Canva helps users clean up images by separating the subject from its background. It works with just a few taps and is designed to save time while creating professional-looking designs.
What Is the Background Remover Tool?
The Background Remover tool is a feature in Canva that automatically detects and removes the background of a photo. Users don’t need advanced editing skills because the tool processes the image in seconds.
It uses built-in AI to identify the main subject and erase surrounding areas. After the initial removal, users can fine-tune the results with Erase and Restore brushes, which allow precise control over small details.
This tool is especially helpful for product shots, profile photos, and marketing graphics. It eliminates the need for third-party apps or complex desktop software. With simple taps, anyone can create a clean cutout that blends smoothly into new designs.
Background Remover Availability in Canva Pro
The Background Remover is not available in Canva’s free plan, except for a one-time trial. To use it regularly, users need access through Canva Pro, Canva Teams, Canva Education, or Canva for Nonprofits.
Canva Pro subscribers can remove backgrounds from both photos and videos. According to the Canva Help Center, the video option only works on clips up to 10 minutes long. For photos, users can remove up to 500 backgrounds every 24 hours.
This makes Canva Pro a practical choice for small businesses, content creators, and educators who need frequent background edits. The feature is built directly into the mobile app, so users can edit on the go without switching devices.
Supported Image Types and Limitations
The Background Remover tool works best with standard photo formats under 9MB in size. Images larger than 10MP are automatically downscaled to 10MP after background removal. Vector images are not supported.
For videos, the tool only supports clips uploaded through the Uploads tab in the Canva mobile app. Files imported directly from the phone’s gallery or camera roll may not work.
Users should also note that the tool requires a stable internet connection since the processing happens online. If the background is complex, manual adjustments with the Erase and Restore brushes may be needed for a cleaner result.
Step-by-Step Guide to Remove Background in Canva Mobile
The Canva mobile app makes it simple to remove an image background with just a few taps. Users can upload photos, apply the background remover, adjust details with editing tools, and then save the finished design directly to their device.
Uploading or Selecting an Image
To start, they need to open the Canva mobile app and tap the plus (+) button on the home screen. This launches a new project where they can choose any design format, such as an Instagram post or YouTube thumbnail.
From the bottom menu, they can either upload a photo from their phone’s gallery or select one from Canva’s built-in photo library. The uploaded or selected image will appear on the canvas, ready for editing.
It’s best to use a high-resolution photo because the background remover works more accurately with clear edges and details. This ensures fewer mistakes when the tool processes the image.
Applying the Background Remover Tool
Once the photo is on the canvas, they should tap directly on the image to open the editing menu. From there, they need to select Effects, then choose the Background Remover option.
The background remover is only available with a Canva Pro account, so free users will see the tool but cannot use it without upgrading. After tapping the tool, Canva automatically processes the image and removes the background within seconds.
This step is automated, but the results depend on the complexity of the photo. Clear subjects with defined edges usually give the cleanest results, while complex shapes like hair or fur may need more editing.
Fine-Tuning With Erase and Restore
After the initial background removal, some areas may still need adjustments. Canva provides Erase and Restore brushes to fix these details.
The Erase tool lets users remove leftover background pieces that were not cut out. The Restore tool brings back parts of the image that Canva may have removed by mistake.
Zooming in is important for precision, especially around fine details like hair strands, jewelry, or textured edges. Users can adjust brush size for better control, making the cutout look more natural and polished.
Saving and Exporting Your Edited Image
When the background looks clean, the final step is saving the work. Tapping the download button in the top-right corner opens file format options such as PNG, JPG, or PDF.
For transparent backgrounds, choosing PNG with a transparent option is the best choice. This is especially useful for product images or logos that need to be placed on different backgrounds.
They can save the file directly to their device or share it to platforms like Instagram, TikTok, or Facebook. According to NechEmpire’s guide, Canva also saves all edits in the user’s account, making it easy to re-edit or re-download later.
Creative Ways to Use Background Removal
Removing a background in Canva makes it easier to highlight the main subject of an image. It helps people create cleaner designs, improve focus, and adapt photos for different uses without needing advanced graphic design tools.
Designing Social Media Graphics
Social media posts often rely on visuals to catch attention. By using Canva’s background remover, a person can isolate a subject and place it on a new background that matches their brand colors or style. This keeps posts consistent and recognizable.
They can also add text overlays, stickers, or icons without distractions from the original photo. For example, a cut-out portrait can be placed on a bold gradient or pattern to make a profile picture or story stand out.
Many creators use this feature for quick YouTube thumbnails, Instagram stories, or Facebook ads. The ability to remove background clutter ensures the main subject looks sharp and professional. Guides like this one on creative uses of Canva’s background remover show how small edits can make a big difference.
Creating E-Commerce Product Photos
Online shops need clean product images. With Canva, sellers can remove the background and replace it with a solid color or neutral backdrop. This makes the item look more professional and keeps the focus on the product itself.
A simple white or light gray background works best for marketplaces like Amazon or Etsy. It avoids distractions and gives the page a uniform look. Sellers can also add text labels or pricing details directly on the design.
For lifestyle shots, they may place the product on a new digital background, such as a desk, shelf, or outdoor scene. This approach saves time and money compared to arranging a full photo shoot. A step-by-step guide on removing backgrounds in Canva mobile shows how easy it is to make these edits.
Making Custom Invitations and Posters
Background removal also helps when creating personal or event designs. Someone can cut out a photo of a couple, child, or graduate and place it onto a themed poster or invitation template in Canva.
This makes the subject blend naturally with decorative elements like borders, patterns, or event details. For example, a birthday invitation might feature a child’s photo layered over balloons or confetti graphics.
Users can also combine multiple cut-outs for a collage effect. This works well for wedding invitations, graduation posters, or family event flyers. Canva’s drag-and-drop tools make it simple to resize, align, and style the images once the background is removed.
Editing and Customizing After Background Removal
Once the background is removed, users can refine their images by adding new backdrops, layering design elements, and using ready-made creative assets. These tools in the Canva app make it simple to adjust photos for social posts, presentations, or marketing designs.
Adding New Backgrounds and Colors
After removing the background, users often replace it with a solid color, gradient, or custom image. The Canva app includes a wide range of preset colors and textures that can be applied with one tap.
They can also upload their own photos or choose from libraries like Creative Fabrica or Envato Elements to add high-quality backgrounds. This is useful when creating product images, profile photos, or branded graphics.
A quick way to test different looks is to use the Backgrounds tab. From there, users can apply patterns, abstract designs, or even nature scenes. Adjusting transparency and brightness helps the subject stand out without overwhelming the image.
Layering Graphics, Text, and Elements
Layering is one of the most powerful features of this graphic design tool. After the background is cleared, users can place stickers, icons, or illustrations directly behind or in front of the subject.
The Canva app makes it easy to move elements forward or backward with the Position option. This helps create depth and balance in the design. For example, a product photo can be placed over a shape while text appears on top.
Adding text is straightforward with a wide range of fonts. Bold headings, captions, or call-to-action phrases can be styled with shadows, outlines, or spacing adjustments. Lists, tables, and charts also layer well when designing social media posts or ads.
Using Templates and Creative Assets
Templates save time by giving users a ready-made layout. Canva offers thousands of templates for social media, business cards, posters, and more. Once a background is removed, users can drop the subject into a template and adjust the design to fit.
Creative assets from Envato Elements or Creative Fabrica can be imported into Canva for more customization. These include stock photos, vector graphics, and design bundles that expand creative options.
Users can mix and match Canva’s built-in assets with external resources. For example, they might use a Canva template but replace the background with a premium texture from Envato Elements.
Tips, Tricks, and Common Mistakes to Avoid
Users often struggle with rough cutouts, blurry exports, or crowded layouts when editing images on Canva Mobile.
Ensuring Clean Edges and Details
The Background Remover on Canva Mobile works best with clear subjects and high-contrast backgrounds. When the subject blends into the background, the tool may leave jagged edges. To fix this, users can zoom in and use the Erase and Restore brushes for more control.
A common mistake is using a brush that is too large. This can remove important parts of the subject. Choosing a smaller brush size allows for more precise edits, especially around hair, hands, or thin objects.
Lighting also plays a big role. Images with even lighting and minimal shadows give the background remover cleaner data to work with.
Optimizing Image Quality for Export
After removing the background, exporting the image at the right size keeps it sharp. Canva Mobile automatically downscales very large files, so users should check resolution before saving. Photos over 10MP may be reduced, which can affect detail.
To avoid blurry exports, it helps to download in PNG format when transparency is needed. JPEG works well for social posts but can compress details. Users should also avoid stretching small images into larger frames, since this lowers clarity.
Another mistake is forgetting to preview the design on different screens. What looks sharp on a phone may appear pixelated on a desktop. Testing the file before publishing ensures the final design keeps its quality.
Balancing Design Elements on Mobile
Removing a background is only one step in graphic design. Once the subject is isolated, placing it within the layout matters just as much. On Canva Mobile, it’s easy to overcrowd the canvas with text, icons, and photos.
A helpful approach is to use white space to give the subject room to stand out. Aligning objects with Canva’s grid lines also keeps the design balanced.
Users often make the mistake of layering too many effects, like shadows or filters. This can distract from the main subject.
For more guidance on avoiding errors, Canva provides tips on common mistakes with background removers.