Setting up bleed, slug, and crop marks is essential for achieving professional-looking printed materials. Creating these elements helps ensure that the final product has the desired appearance without unwanted borders or cut-off images.
By following the right steps, anyone can prepare their designs for print with confidence.
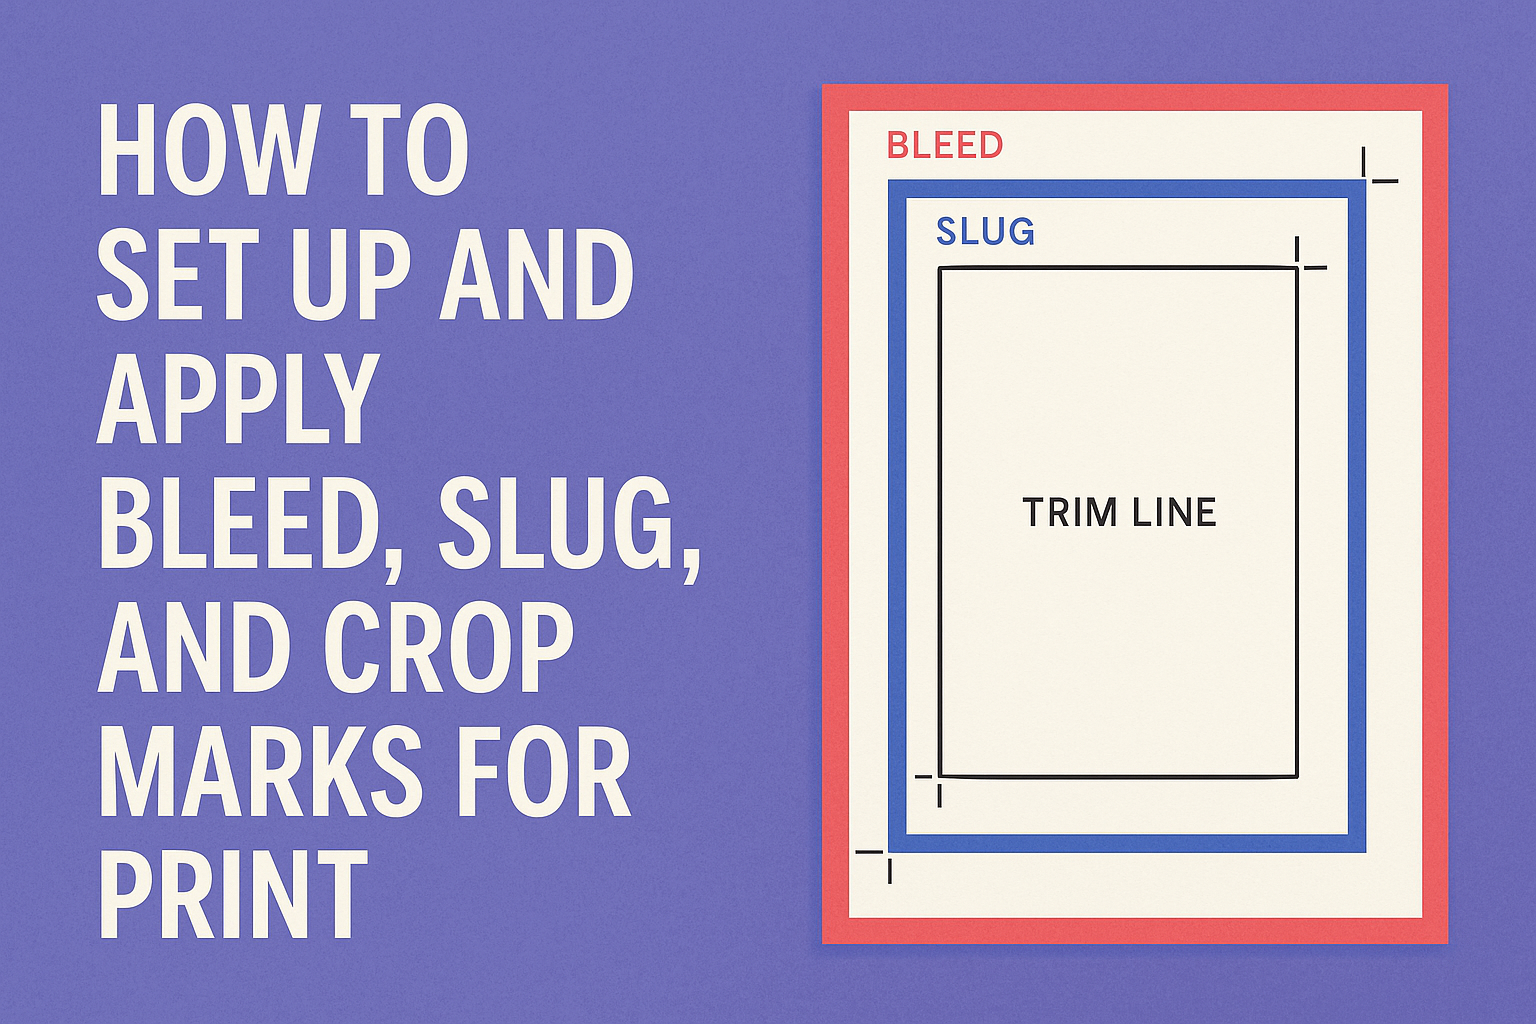
Bleed is the area that extends beyond the trim line, allowing for a more polished look. The slug area is helpful for notes or additional information that won’t be printed, while crop marks guide the printer on where to cut.
Knowing how to set these elements up correctly can make a big difference in the final output of any project.
For those new to design or print production, understanding these terms can feel overwhelming. However, with a little practice and the right guidance, it becomes an easy task.
This article will provide clear instructions to help anyone tackle their printing projects successfully.
Understanding Bleed, Slug, and Crop Marks
Bleed, slug, and crop marks are important terms in print design. Each plays a key role in ensuring the final printed product looks professional and polished. Here’s a closer look at each one.
Defining Bleed in Print Design
Bleed refers to the area of a printed document that extends beyond the final trim size. When designs include images or colors that reach the edge of the paper, bleed prevents any unintended white margins after trimming.
A common measurement for bleed is 0.125 inches (3 mm) beyond the trim line. This small allowance ensures that any slight misalignment during printing won’t ruin the look of the product.
Designers should set this up from the start to avoid issues later.
Purpose of Slug Areas
Slug areas are additional spaces outside the trim area meant for notes and instructions. They often contain information like registration marks, color settings, or notes for the printer.
This area is not included in the final print, but it helps communicate necessary information about the project. Having a slug area can streamline the workflow, making it easier for printers to understand specific requirements.
Importance of Crop Marks
Crop marks, or trim marks, indicate where the printed piece should be cut. They help ensure that images and text line up correctly after trimming.
Typically located at the corners, these marks are drawn outside the bleed line. They guide the printer in cutting the paper accurately to the desired size, ensuring that no part of the design is unintentionally cut off. Using crop marks is essential for a polished final product.
Setting Up Your Document
When preparing a document for print, it’s essential to set up features like bleed, slug, and crop marks correctly. Each step contributes to achieving a polished final product that meets professional standards.
Choosing the Right Software
Selecting the correct design software is crucial. Popular options include Adobe InDesign, Illustrator, and even Microsoft Publisher for simpler projects.
Each program has its own tools for setting bleed and slug, so he should choose based on comfort and project complexity.
InDesign is often favored due to its robust features, especially for multi-page layouts. Users need to familiarize themselves with the bleed settings specific to their chosen software. Understanding these tools helps streamline the setup process and avoid common pitfalls.
Document Size and Orientation
Before starting, she must choose the right document size and orientation. This depends on the final print product, such as brochures, flyers, or posters.
Standard paper sizes include A4, Letter, and Legal. Knowing the dimensions needed allows for proper setup from the start.
Orientation matters too. For instance, a landscape layout may be ideal for a flyer, while portrait works best for a booklet. He can find standardized sizes and orientations based on the print requirements for consistency throughout the project.
Setting the Bleed Area
The bleed area is the part of the design that extends beyond the final cut line. It prevents unwanted white edges in the printed piece.
A common standard for bleed is 0.125 inches (3 mm) on all sides, but some projects may require more.
He should navigate to the document setup menu in their chosen software and enter the bleed values.
For example, in Adobe InDesign, this can be done under File > Document Setup. Setting the bleed correctly helps ensure color and images extend to the edge after trimming.
Adding Slug Space
Slug space is a helpful area outside the final document size used for notes or printer instructions. It doesn’t appear in the final print but can be useful for communicating with the printer.
A common slug space is about 0.5 inches or more, depending on the project’s needs.
To add slug space, he should go to the document setup options and specify the slug area.
This can be particularly helpful in complex projects, as it keeps design elements tidy and organized. The additional space allows for any notes to the printer, ensuring that all important details are clear.
Applying Crop Marks
Crop marks are essential in print design as they guide the printer on where to cut the paper. Understanding how to apply them correctly ensures the final product looks polished and professional.
There are two main methods to apply these marks: manually or automatically, and adjustments might be needed based on the specific print method used.
Manual vs. Automatic Crop Marks
Manual crop marks are added directly in the design software. This approach allows for full control over their placement.
Designers can create simple lines at each corner of the artwork. To do this, select the line tool and draw short lines outside the document area.
Automatic crop marks can usually be enabled easily through print settings in software like Adobe InDesign or Photoshop.
Designers can check options like “Crop Marks” when preparing files for print. This method ensures accurate placement with one click. It’s often faster and reduces the risk of error during setup.
Adjustments for Different Print Methods
Different print methods may require specific adjustments for crop marks. For instance, digital printers might work best with standard crop marks. These typically appear on all four corners, providing a clear guide for cutting.
Offset printing can require additional crop marks or registration marks for alignment. Such marks help ensure colors align properly during the printing process.
Designers should also consider the type of paper used, as thicker paper may expand or contract, potentially affecting the final cut line.
Adjusting to the print method ensures the finished product meets quality standards and looks its best.
Prepress Checklist and Review
A prepress checklist is essential for ensuring design files are ready for print. It helps catch mistakes before printing begins.
Here’s a simple checklist to follow:
- Check Dimensions: Ensure the document size is correct for the final product.
- Set Bleed and Margins: Include a 0.125 in (1/8 inch) bleed and ensure margins are adequate.
- Color Settings: Verify all blacks are set to CMYK (0, 0, 0, 100%), not Registration.
Review the file carefully. Pay attention to the following:
- Crop Marks: Make sure crop marks are included to guide cutting.
- Resolution: Confirm the images are high-resolution (at least 300 DPI).
- Fonts: All fonts should be embedded or converted to outlines.
It’s vital to double-check for any spelling or layout errors. A fresh set of eyes can help catch issues that may have been missed.
Before sending the files to print, create a PDF version. This format is widely used and easier for printers to handle.