Mastering creative tools like CorelDRAW’s PowerClip can truly elevate artwork by making images pop through visual effects. The PowerClip feature lets users place vector objects and bitmaps inside other shapes or text, creating stunning designs. This powerful tool gives any project a polished and professional look, making it a go-to for designers seeking to enhance their work.
By placing photos or designs within other objects, artists can easily add layers and depth to their artwork. For example, embedding an image inside text can turn ordinary letters into eye-catching statements. Such techniques not only improve visual appeal but also highlight the artist’s ability to use design tools effectively.
Many tutorials and guides can help enthusiasts gain confidence in using this feature. Whether crafting complex compositions or simple designs, learning to use PowerClip offers endless creative possibilities. Those eager to expand their design skills will find this tool intuitive and rewarding as they experiment with different effects and styles.
Understanding the PowerClip Feature
PowerClip in CorelDRAW is a powerful tool that allows designers to insert images or vectors into shapes, creating unique effects. It offers creative opportunities through flexible applications like filling text with images or creating intricate designs.
What Is PowerClip?
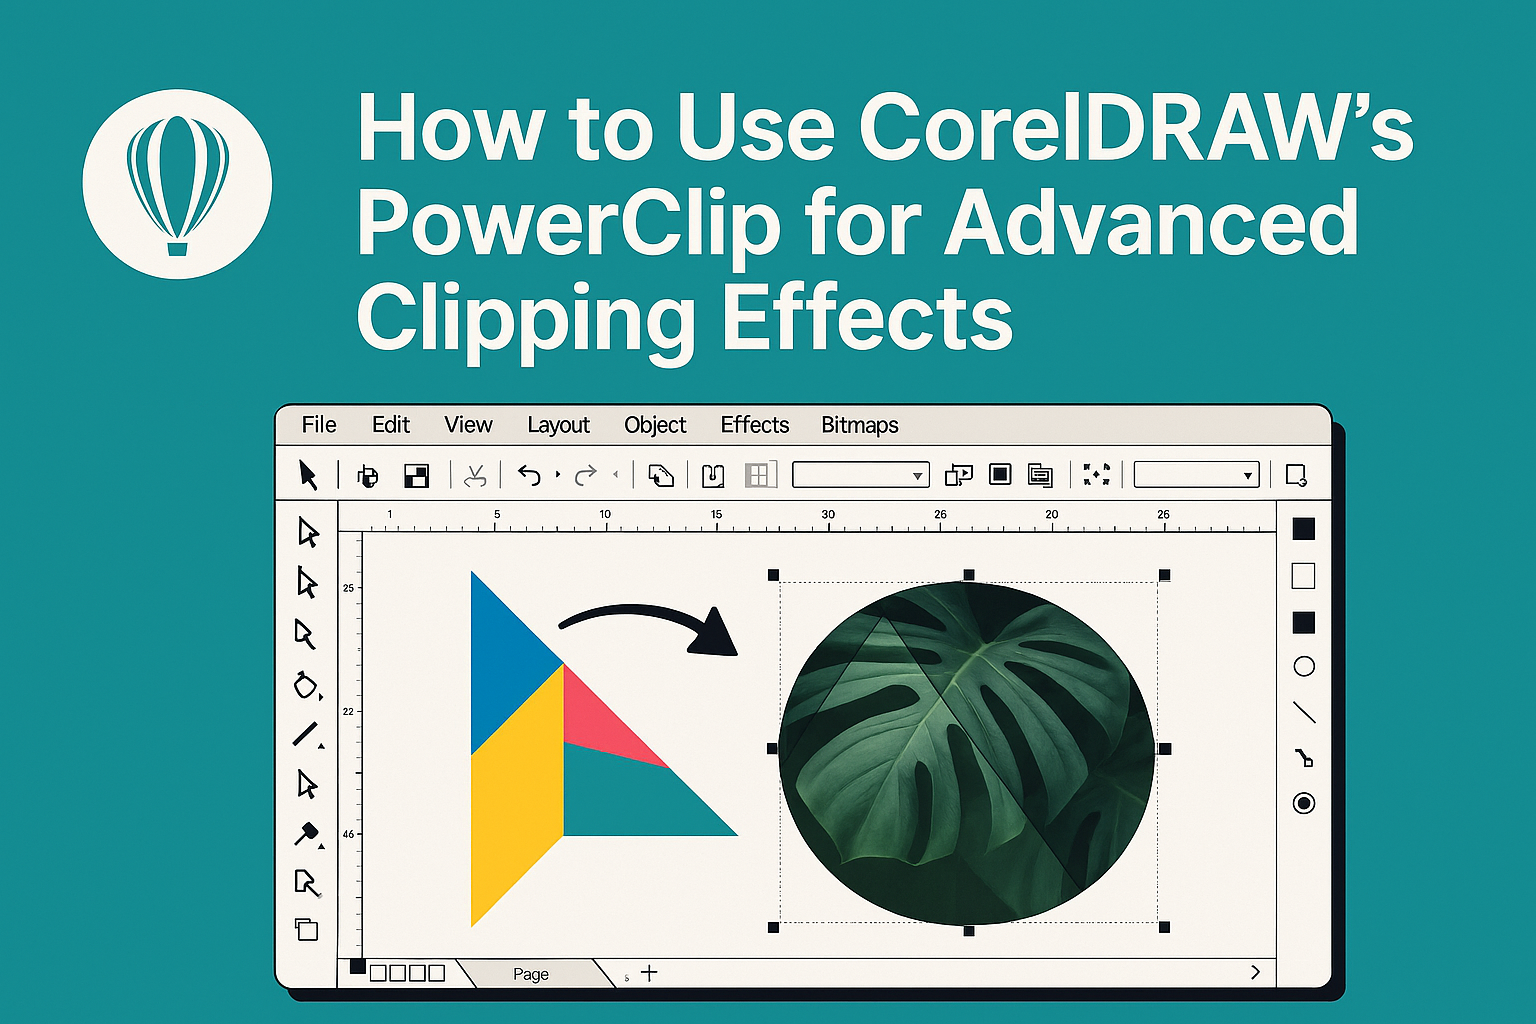
PowerClip is a feature in CorelDRAW that enables users to place any image or vector inside another object, called a “container.” This can be a simple shape, like a rectangle, or something more complex, like artistic text. PowerClip helps in creating effects that are otherwise difficult to achieve, like filling letters with an image or trimming a photo to fit within a specific shape.
The tool is known for its ease of use. Users can simply drag an object into a container with the PowerClip option, making it accessible even to beginners. It allows designers to explore more creative design possibilities without needing advanced skills.
Applications of PowerClip
PowerClip has various uses in design. One common application is placing a photo inside text, which enhances visual interest and draws attention. Designers often use it to add textures or patterns to shapes that would otherwise be flat and plain.
Additionally, PowerClip can be used in creating complex layouts for advertisements and promotional materials. For instance, designers can easily fit multiple images into predefined shapes on a page, making the final design more organized and aesthetically pleasing. It’s a helpful feature for those looking to elevate their design work effectively and efficiently.
Getting Started with PowerClip
PowerClip in CorelDRAW is a versatile tool that allows users to embed images and vectors within other objects, creating eye-catching designs. This section will guide users through accessing PowerClip and selecting the primary tool effectively.
Accessing PowerClip in CorelDRAW
To begin using PowerClip, first, open CorelDRAW on your computer. The PowerClip tool is part of the toolbox found on the left side of the screen. It allows users to place one object inside another seamlessly. Once you have your design open, select the object you want to clip.
Go to the “Effects” menu at the top. Here, you will find the “PowerClip” option, which will give you several choices. Choose “Place Inside Container” to start the process of embedding your object within another shape or frame.
Every CorelDRAW version may vary slightly, so familiarize yourself with the interface if using a different one. Knowing where to find these options is crucial to effectively using PowerClip. For more details and a step-by-step guide, consider visiting tutorials like “Clipping objects into other objects with PowerClip”.
Primary Tool Selection
Selecting the right tool for your specific needs is important when working with PowerClip. The primary tool within PowerClip is the arrow cursor, which helps in adjusting and positioning your clipped object. After placing the object within the frame, use the “Edit PowerClip” button that appears, allowing you to refine the position.
Users can further adjust by clicking directly on the clipped object with the selection tool, moving or resizing as needed to fit the frame perfectly. To maintain high quality, use high-resolution images or vectors, as PowerClip will not enhance resolution on its own. Remember to save changes often, ensuring the work is not lost during adjustments.
Creating Basic Clipping Effects
When using CorelDRAW’s PowerClip tool, users can easily create captivating effects by placing images inside other shapes. This technique is great for designing objects like custom text or unique shapes, allowing for creative and precise artwork editing.
Preparing Your Artwork
Start by selecting the artwork you want to use. This could be a shape, text, or another image. It’s important to choose clean, well-defined objects as containers for the clipping effect.
You might want to use a simple shape like a rectangle or circle. Simplifying shapes helps with precision. If working with text, make sure it is converted to curves to function as a PowerClip container.
Create the object or shape where you’ll place your image. This is often referred to as the frame. The frame’s size and shape will influence how the clipped content appears, so consider the design carefully.
Placing an Image inside an Object
To place an image inside a frame, first select the object that will serve as the frame. Go to ‘Effects’ on the menu, then select ‘PowerClip,’ and choose ‘Place Inside Frame.’ This action allows you to click on the image or content you want to clip.
Click the frame object where you want the image to be contained. The image will now appear inside the frame. You can adjust the size and position by clicking on the PowerClip object and using the frame’s handles to resize or reposition your content. This enables more precise placement and customization of your design.
Editing the Contents Inside PowerClip
Once your content is inside the frame, you might need to make adjustments. Right-click on the PowerClip frame and select ‘Edit PowerClip.’ This will allow you to make changes to the image or vector inside the frame without affecting the outer design.
Use this mode to move, scale, or adjust the content further. Once satisfied with the adjustments, right-click again and choose ‘Finish Editing This Level’ or click on the finish button. This will finalize the changes and show the clipped content within its frame, allowing for additional creative control.
Advanced Clipping Techniques
CorelDRAW’s PowerClip feature offers powerful methods to achieve stunning visual effects. Users can work with intricate shapes and apply unique effects to clipped objects. These techniques provide endless possibilities for creativity in design projects.
Working with Complex Shapes
Using PowerClip with complex shapes can transform designs dramatically. To start, select the shape you want to use as a frame, which can be any vector object. This flexibility allows designers to clip inside custom shapes, including logos or intricate designs.
After selecting your frame, place the object you want to clip. Use the PowerClip Inside option to enclose the object within the frame. This technique is great for integrating photos into detailed designs. It enables seamless blending of elements, adding depth and focus to projects.
For more precision, use nodes to adjust how the clipped object fits within the shape. Experimenting with node manipulation can help achieve the perfect alignment, enhancing the overall design. Users can create more dynamic graphics when working with complex outlines.
Applying Effects to Clipped Objects
Applying effects to clipped objects enhances visual interest. Start by clipping your object into a frame. Once the object is enclosed, you can apply various effects like transparency or shadows. These effects add dimension and make the object pop out more.
Experimenting with color adjustments inside a clipped object can produce striking results. For existing images or vectors, consider using filters or color changes to highlight particular features.
Moreover, combining effects like blending modes or drop shadows can further elevate the design. By applying these effects, designers can draw attention to specific elements, making them stand out within the overall layout. This method brings a rich, layered feel to any graphic project.
Customizing PowerClip Effects
Customizing PowerClip effects in CorelDRAW provides users with creative flexibility. By adjusting properties and combining multiple PowerClips, designers can achieve unique and professional results. Below, each technique is explained in detail to help users maximize their design potential.
Adjusting Properties
Adjusting the properties of PowerClip objects allows users to refine their designs with precision. Users can start by selecting the PowerClip object and navigating to the object’s properties. They can change fill types, adjust outlines, or alter transparency levels to match the design needs.
To further customize, users can modify the frame’s size and shape. This enables precise control over how the content fits within it. This is especially useful for ensuring that the clipped content appears cohesive with the overall design.
The CorelDRAW interface makes it easy to manage these adjustments quickly. Use features like snap-to guides for added accuracy and efficiency. Artistic text frames are particularly effective here, as they adapt well to different types of content.
Combining Multiple PowerClips
For more complex designs, combining multiple PowerClips can add depth and interest to artwork. Users can place a PowerClip within another, allowing for nested or layered effects. This technique can be useful in creating intricate designs with multiple layers of visual elements.
Start by creating the first PowerClip as usual. Then, take another object and use the PowerClip function to place it inside the first PowerClip. This creates a sophisticated effect that can enhance any design project.
Maintaining control over visibility and interaction between layers is key. Adjust each layer’s position and transparency to ensure a balanced composition. Using the Object Manager helps keep track of all elements and makes editing easier as the design complexity increases. This technique is excellent for achieving custom effects and textures.
Best Practices for PowerClip Usage
Using PowerClip in CorelDRAW can greatly enhance your designs by allowing you to clip and embed images or shapes into other elements. To make the most of this tool, it’s vital to have an organized workspace and maintain the ability to edit your PowerClip creations.
Organizing Your Workspace
Having a neat and accessible workspace is crucial when working with PowerClip. Begin by arranging your layers logically. Keep the base object and clipped items on separate layers. This helps in easily selecting and modifying each element. Also, use guides and grids for precision placement.
Toolbars can be customized for quick access to frequently used tools. This reduces time spent searching for features. Set up keyboard shortcuts for commands like PowerClip Inside or Edit PowerClip for even faster workflow.
Consider saving workspace layouts if you work on different types of projects. This way, switching between tasks becomes seamless. A well-organized environment boosts creativity and efficiency, allowing for smooth design transitions.
Maintaining Editability
Preserving editability in PowerClip designs ensures flexibility. Once you’ve placed an item inside a container, use the Edit PowerClip mode to make adjustments. This mode lets you move, resize, or alter the clipped object without affecting the outer frame.
It’s wise to keep original files separate. Always save a version that remains untouched by PowerClip actions. This serves as a backup should you need to revert or start over.
Convert text to curves only when absolutely necessary. Keeping text editable allows for last-minute changes without doubling work. When working with photos, use bitmaps sparingly to maintain file size efficiency. A strategic approach to editing keeps designs adaptable and easy to refine.
Troubleshooting Common PowerClip Issues
Using CorelDRAW’s PowerClip can sometimes lead to challenges such as placement errors and performance slowdowns. Addressing these concerns requires attention to detail and some clever solutions.
Resolving Placement Errors
Placement errors in PowerClip occur when objects do not position correctly within the frame. Users often find that the clipped content looks misaligned or not as expected. To tackle this, double-check alignment settings before applying PowerClip. Ensure objects are centered or aligned as desired by using guidelines or the alignment toolbox.
Another tip is to adjust the PowerClip content by right-clicking and selecting “Edit PowerClip.” This option allows users to manually reposition objects within the frame. Using this feature helps avoid unexpected results.
For visual precision, turning on snap-to features can be incredibly helpful. These include grids or guide snaps that ensure each object snaps into its correct place. This step ensures accuracy during clipping and prevents frustrating placement errors.
Tips for Performance Improvement
Performance issues while using PowerClip can slow down workflow significantly. Large or complex images within PowerClip can cause this slowdown. Simplifying these images by reducing node count or file size can be beneficial. Try converting high-resolution images to a more manageable size before clipping them.
Keeping the CorelDRAW software updated can also enhance performance. Software updates often include optimizations that fix known issues and improve stability.
Consider organizing your work by using layers to separate different elements. This not only improves performance but also helps in managing complex designs. Grouping and locking unnecessary elements can free up memory and speed up processing times.