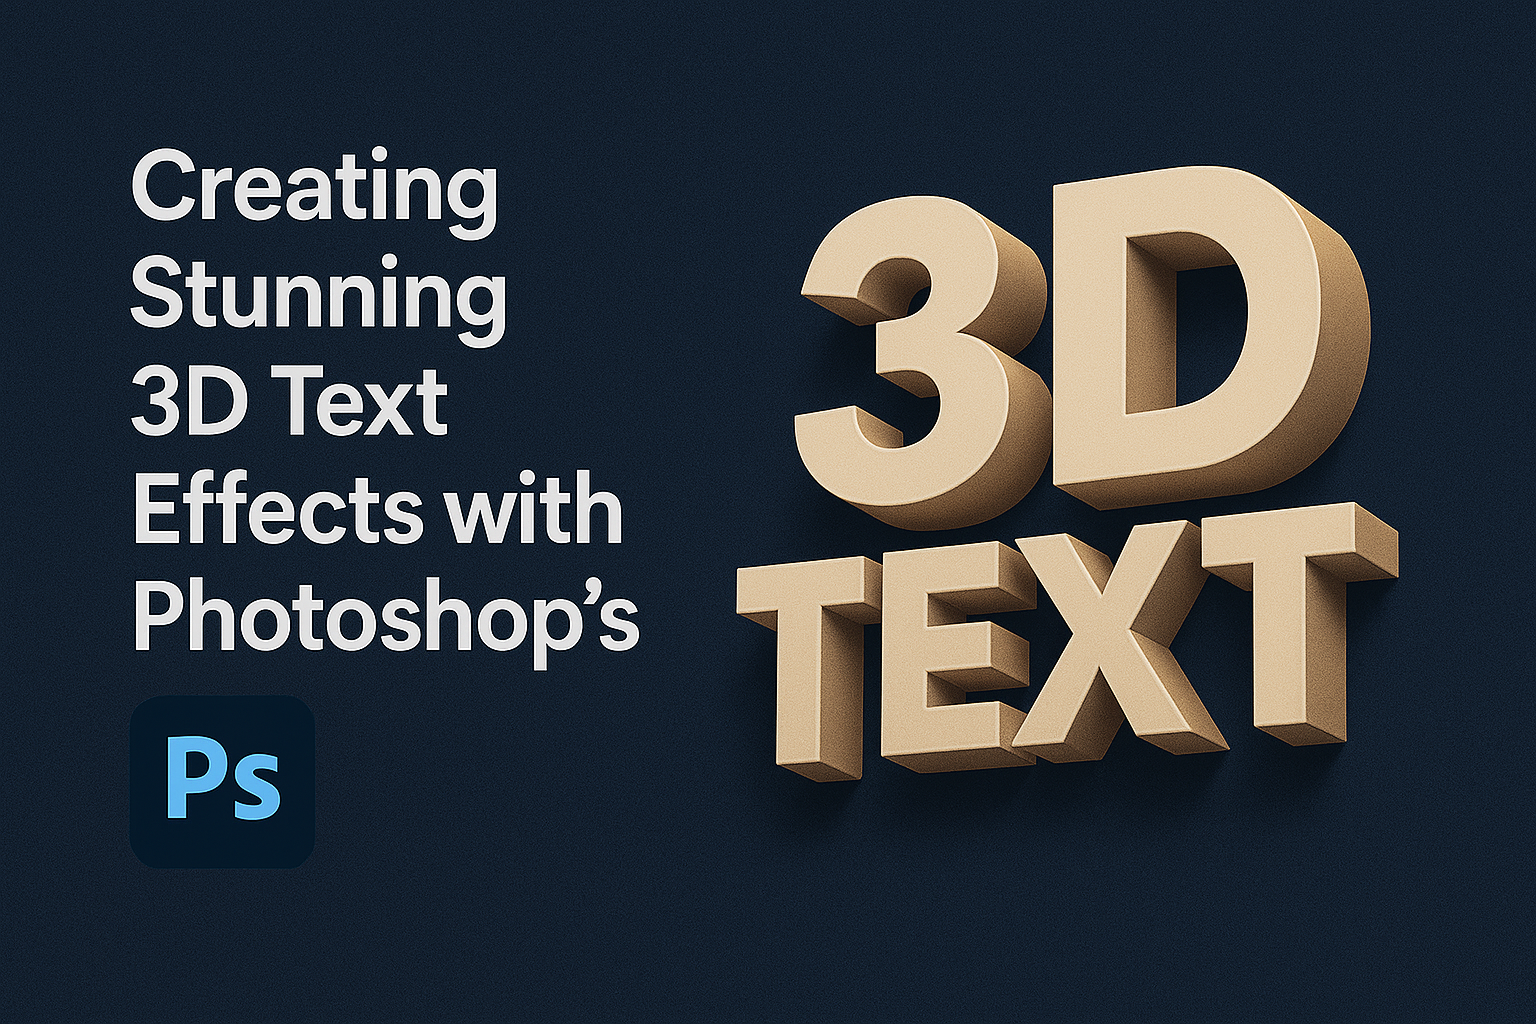
Creating eye-catching 3D text effects in Photoshop is a skill that can transform ordinary designs into stunning visuals. With Photoshop’s powerful tools, anyone can achieve impressive 3D effects that add depth and creativity to their projects. Whether for a headline in graphics or a fun logo, these effects help your work stand out.
Photoshop offers a range of features to help you create these effects, including layer styles and 3D extrusion options. With step-by-step guidance, like those found in tutorials from Creative Bloq, even beginners can master these techniques.
Exploring resources such as video tutorials on YouTube or collections from Creative Nerds expands your skills with diverse styles and effects. Whether you are a seasoned designer or just starting, learning to create 3D text effects opens up exciting possibilities in digital design.
Getting Started with Photoshop
Starting with Photoshop can seem overwhelming at first, but breaking it down into steps helps. Focus on understanding the interface, setting up your document correctly, and familiarizing yourself with essential tools.
Understanding the Photoshop Interface
For beginners, the Photoshop interface may appear complicated. It consists of the menu bar, toolbox, and panels. The menu bar at the top provides access to various functions, such as file management and editing options.
The toolbox on the left contains essential tools like selection, painting, and editing tools. Panels like Layers, Properties, and History are crucial for managing your work and tracking changes. A basic grasp of the interface makes navigation smoother.
Customizing the workspace can also improve efficiency. Users can rearrange panels to suit their workflow, hide unnecessary tools, and even save their preferred layouts.
Setting Up Your Document for 3D Work
When starting a project for 3D text, document setup is vital. Begin by creating a new document through the File menu. It’s important to select the correct size and resolution, as these factors will impact the final output quality.
For example, use a higher resolution, such as 300 DPI, for print projects. When setting the color mode, choose RGB for digital and CMYK for print.
After creating the document, select a bold, readable font for the text. Bold fonts often create a more impressive 3D effect. You can explore this process in more detail on Mister Clipping Paths.
Essential Tools and Panels for 3D Text Design
Creating 3D text requires the right tools. The Type Tool is central for adding and formatting text. Once your text is ready, the 3D Panel transforms it by extruding the layer into a 3D space.
For adjusting lighting and shadows, the Properties Panel is useful. It offers options to modify material settings and environmental effects. The Layers Panel helps organize and manipulate different elements in your design.
Understanding these tools enhances the design process, making it smoother and more efficient. Familiarity with these features also helps in producing higher-quality 3D text effects.
Creating Your First 3D Text Effect
Creating 3D text in Photoshop can give your designs a striking look. By choosing the right font and adjusting layer styles, you can achieve impressive effects. Follow along to master the process.
Choosing the Right Font for 3D
Selecting the right font is crucial for creating impactful 3D text. Fonts with bold, clear lines are ideal as they enhance the depth effect. Thick and sans-serif fonts are recommended since they maintain their readability when transformed into 3D.
It’s also beneficial to consider the style of project you’re working on. For instance, a sleek, modern project may benefit from using a minimalist font. Experimentation is key. Set up a new document in Photoshop to test different fonts and visualize how they will look once extruded.
Adding Depth to Text with Layers and Paths
Depth is a central feature of 3D text. Begin by creating a base text layer in Photoshop. Duplicate this layer to add shadows or highlights. Layer styles such as bevel and emboss can give the text a more pronounced 3D appearance.
Paths can be used to guide the viewer’s eyes and create a smoother 3D look. This involves selecting paths that can define the edges or curves of the text, helping to enhance its dimensional quality. Using the layers and paths together can make the text appear to pop out from the background.
Applying 3D Extrusion
3D extrusion is where the magic happens. Once your text layer is ready, use Photoshop’s 3D Extrusion feature to bring it to life. Select the layer and navigate to 3D > New 3D Extrusion from Selected Layer.
Adjust the extrusion depth settings to add thickness to your text. Tweak the angles to give your design a unique perspective. Exploring the Materials tab allows you to add colors and textures that suit your project’s theme. Mastering these techniques will enrich your 3D designs, making them truly stand out.
Working with Lighting and Perspective
Understanding how to use light and perspective can elevate 3D text effects in Photoshop. By adjusting lighting for realism, setting the scene with global illumination, and manipulating perspective, designers create visually captivating results.
Adjusting 3D Lighting for Realism
Lighting plays a crucial role in making 3D text appear realistic. In Photoshop, users can adjust the intensity, angle, and color of lights. By experimenting with these settings, the texture and depth of the text can be highlighted effectively.
Using multiple light sources can add dimension. For example, a combination of ambient light and spotlights can create dynamic effects. This setup mimics real-world lighting scenarios, giving the text a more lifelike appearance.
Shadows are also important. Adjusting shadow softness and direction can lead to more believable results. Designers should consider how light interacts with surfaces, ensuring shadows align correctly with the light source.
Setting the Scene with Global Illumination
Global Illumination is another tool for realistic rendering. It simulates how light bounces off surfaces. By activating this feature, details like reflective surfaces and subtle text shading become more vivid.
To start, users should navigate to the 3D panel and select the Scene properties. Here, activating global illumination can enhance the lighting setup. This step is crucial for achieving a unified look across the text.
Balancing light levels is key. Too much brightness can wash out text, while too little can make it appear flat. Adjust ambient light levels carefully to maintain the text’s vividness without overpowering other elements.
Manipulating Perspective and Vanishing Points
Perspective ensures text integrates naturally into its environment. In Photoshop, users can modify the vanishing points to create a sense of depth. By setting these points wisely, text can seamlessly fit into scenes, mimicking real-life angles.
The Perspective Warp tool in Photoshop provides flexibility. It allows users to bend and skew text, aligning it with other objects in the scene. Adjusting these points can transform flat text into dynamic compositions.
Keeping consistent lines is critical. Align the 3D text with existing lines in the background. This practice reinforces realism, ensuring the text looks like part of the entire composition rather than an isolated element.
Enhancing 3D Text with Textures and Materials
Boosting the appearance of 3D text with textures and materials can significantly improve its impact. By carefully applying textures, users can achieve realistic effects, while customizing materials adds a unique touch to the design.
Applying Textures to 3D Text
Textures bring 3D text to life by adding depth and detail. To start, users can choose textures that match the theme of their project. For instance, a metallic texture may suit a futuristic design, while a wooden texture might fit a rustic look.
In Photoshop, users can apply textures by placing a texture layer over the 3D text. They can then clip the texture to the text layer, allowing the design to show through. Adjusting the texture’s opacity and blending mode helps to blend it seamlessly with the text.
For a more realistic result, users might experiment with different textures to find the best fit. The step-by-step guide on Creative Bloq explains how to work with textures in more detail.
Customizing Materials for a Unique Look
Customizing materials in 3D text designs offers endless possibilities. By choosing different materials, designers can change the text’s feel and make it stand out. For example, using glossy materials adds shine, while matte materials give a softer appearance.
In Photoshop, adjusting materials involves working with the 3D panel. Users can modify properties such as color, glossiness, and metallic effects. This allows the creation of diverse looks without needing new designs each time.
Experimenting with materials lets designers find the perfect combination of color and texture. For those looking to explore more, this guide can help deepen their understanding of material customization.
Adding Special Effects
When creating 3D text effects in Photoshop, adding special effects can greatly enhance the overall look. Reflection and refraction can add realism, while bevels and emboss layers can introduce depth and shine to text.
Incorporating Reflection and Refraction
To incorporate reflection and refraction, it’s vital to consider light and shiny surfaces. Reflection involves mirroring text onto a surface, which can be done by duplicating the text layer, flipping it vertically, and lowering the opacity. This creates a mirrored illusion underneath the original text. Refraction can be simulated by slightly distorting parts of the text to mimic the bending of light through materials like glass or water.
Using Photoshop’s Warp and Liquify tools, designers can adjust and tweak the text to reflect light as if passing through different mediums. This adds a layer of complexity and realism. Careful use of opacity and blending modes like “Overlay” or “Soft Light” can make these effects look more natural.
Using Bevels and Emboss to Enhance Text
Bevels and emboss are crucial for giving text a three-dimensional appearance. They create shadows and highlights on the text edges, simulating light hitting the surface. To apply these, users can access the Layer Style panel and select Bevel & Emboss. This option allows them to control depth, angle, and size, which determines how pronounced the effect appears.
Modulating the Gloss Contour can add intricate lighting effects to the text surface. Contour settings adjust the sharpness of this effect, making the text appear either smooth or sharp-edged. By experimenting with different angles and slopes, designers can achieve a wide range of textures and finishes, from metallic to soft, tailored to the project’s needs.
Animating 3D Text
Animating 3D text in Photoshop involves using the timeline panel to sequence movements and create engaging effects. By mastering basic timeline functionalities and focusing on simple animations, users can bring text to life with dynamic transitions and transformations.
Timeline Basics for Text Animation
The timeline in Photoshop is a powerful tool for animating 3D text. It allows for frame-by-frame control and handles complex movements with ease. To start, users should open the timeline panel by going to Window > Timeline. Once opened, clicking “Create Video Timeline” will set the stage for animation.
Users can then move between frames to adjust the position and rotation of 3D text. Keyframes play a vital role as they mark the start and end points of any motion. By setting keyframes at different points, they control how the text moves between these key moments.
With the timeline, users can leverage properties like opacity, rotation, and scale to their advantage. This provides opportunities to create unique effects. Simple adjustments, such as a gentle rotation or fade-in effect, can significantly enhance the overall presentation of the 3D text.
Creating Simple 3D Text Animations
Simple 3D text animations can add great visual interest without being overwhelming. To begin, users can experiment with basic transformations such as rotating or scaling text. Applying these changes over time creates a sense of depth and motion.
For instance, a basic animation might involve rotating text along the Y-axis. This gives the illusion of text turning towards the viewer. Another option is scaling text to appear as if it’s coming closer or receding.
Additionally, users can explore effects like fade-ins or fade-outs by modifying the opacity keyframes. Altering the speed and timing of these changes affects how smooth or dynamic the animation appears.
By combining these simple transformations, text can be made to move in exciting ways. These basics lay the groundwork for more advanced animations in the future.
Advanced Techniques
Creating 3D text effects with Photoshop can be taken to the next level by integrating them into photos and videos or by using multiple text layers for complex scenes. These advanced techniques offer exciting possibilities for design projects.
Integrating 3D Text into Photos and Videos
Incorporating 3D text into photos or videos can make visuals more dynamic and engaging. To do this, designers often use layer masks and blending modes to ensure the text fits seamlessly into its environment. Matching the lighting and perspective of the text with the background is crucial for realism.
Designers may use Adobe After Effects alongside Photoshop for video projects. A common approach is to create the 3D text in Photoshop and then import it into After Effects for animation. This allows for smooth transitions and effects that make the text appear as though it is part of the video.
Consider using glowing edges or reflections to enhance the integration further. These techniques help 3D text pop against backgrounds, drawing attention and emphasizing key parts of the scene. This can be particularly useful for marketing materials or creative presentations.
Complex 3D Scenes and Effects with Multiple Text Layers
Creating complex scenes involves layering multiple 3D texts with varying effects. This adds depth and interest to the design. By experimenting with different textures and materials, designers can achieve unique looks that stand out.
Using Photoshop’s 3D Extrusion feature, different layers can be manipulated with distinct lighting sources. This adds more dimensions to the scene. Coloring each layer differently or adding gradient effects can also create a vibrant, eye-catching design.
Grouping text layers with different styles can simulate scenes like cityscapes or abstract art. These complex setups might include elements like shadow casting or reflections, achieved through Photoshop’s advanced layer settings. This technique enhances the storytelling aspect of the design, making it visually compelling and layered with meaning.
Optimizing and Exporting Your 3D Text
When your 3D text creation is finished, focusing on proper rendering and choosing the best formats is crucial for clarity and impact. Knowing how to render and which formats to use can elevate the final display across different platforms.
Rendering 3D Text for Final Output
Rendering involves processing your 3D text to create the final image or animation. It’s important to adjust settings like resolution and lighting for quality results. In Photoshop, ensure that your lighting sources are adjusted to prevent shadows that can obscure text details.
Using a higher resolution will provide a sharper image. However, balance is key, as higher resolution increases file size and rendering time. Preview your render to spot any necessary adjustments before the final export, saving both time and potential frustration.
Best Formats for Various Platforms
Exporting in the right format is essential to maintain the integrity of your 3D text. For web use, JPEG and PNG are popular due to wide compatibility and good quality-to-size balance. PNG is ideal when you need transparency in your image.
For print, TIFF offers lossless compression, ensuring the highest quality. If your text will be part of a video, consider formats like MP4 for a good balance of quality and file size. Each platform may have specific format needs, so tailor your choices accordingly to ensure the best presentation of your work.