Creating eye-catching designs in Canva is easy, especially with effects like the smoke text effect. This trendy design style adds a unique touch to any project and can be applied quickly.
To create a smoke text effect, simply select your text, click the “Effects” button, and choose the smoke option to customize it to your preference.
Many users appreciate how this effect can enhance their graphics, making them stand out on social media, presentations, or posters. With just a few adjustments, the smoke effect can bring a dynamic look to text.
It’s a fun way to express creativity and captivate an audience.
Whether someone is a beginner or more experienced with design, they will find that using the smoke text effect is simple and rewarding. Learning how to master this effect opens up more possibilities for stunning visuals.
By following the right steps, anyone can add this impressive element to their Canva designs.
Getting Started with Canva
Canva is a user-friendly graphic design tool that allows anyone to create beautiful designs easily. Understanding how to start a new project and navigate the dashboard is essential for working effectively in Canva.
Creating a New Design
To create a new design in Canva, the user must first log into their account. On the homepage, they will see a button labeled “Create a design.” This button allows them to choose from various design types, such as social media posts, presentations, and flyers.
Users can either select a template or start with a blank canvas.
For a smoke text effect, selecting a background type that complements the text is crucial.
After choosing the design type, the user can enter their specific dimensions if they prefer something custom.
Canva provides various options, making it simple to create visually appealing content.
Navigating the Canva Dashboard
Navigating the Canva dashboard is straightforward. The left sidebar features several tools for designing. It includes “Templates,” “Elements,” “Uploads,” and “Text.”
Users can easily access these sections to find graphics or add text to their design. The “Text” section allows for various font styles, making it easy to select the perfect text for the smoke effect.
At the top of the dashboard, there are options for saving, sharing, and downloading the design.
Familiarizing oneself with these features enhances the design experience.
With just a bit of exploration, users can feel comfortable using Canva’s features.
Designing Your Smoke Text
Creating stunning smoke text in Canva involves selecting a suitable font, adding the text, and applying the smoke effect. Each step is essential for achieving a unique and captivating design.
Selecting the Right Font
Choosing the right font is key to making an effective smoke text effect. A bold and thick font works best since it provides enough surface area for the smoke effect to stand out. Fonts with rounded edges or a slightly playful style can add a dynamic touch to the design.
Canva has a wide range of fonts available. Some popular options include Montserrat, Poppins, or even Lobster for a more stylized look.
It’s advisable to experiment with different fonts to see which one complements the overall design.
Using a font that matches the theme of the project will enhance the final appearance of the smoke text.
Adding the Text
Once the font is selected, the next step is to add the text to the design. Start by clicking on the text tool in Canva, then type in the desired words.
Position the text where it will be most effective. Centered text typically works well, but try various placements to see what looks best.
Adjust the font size larger to ensure it is eye-catching.
Additionally, incorporating color that contrasts with the background can enhance visibility. Choosing white or light colors for dark backgrounds helps the text pop.
It’s important to keep the text simple; less clutter allows the smoke effect to shine.
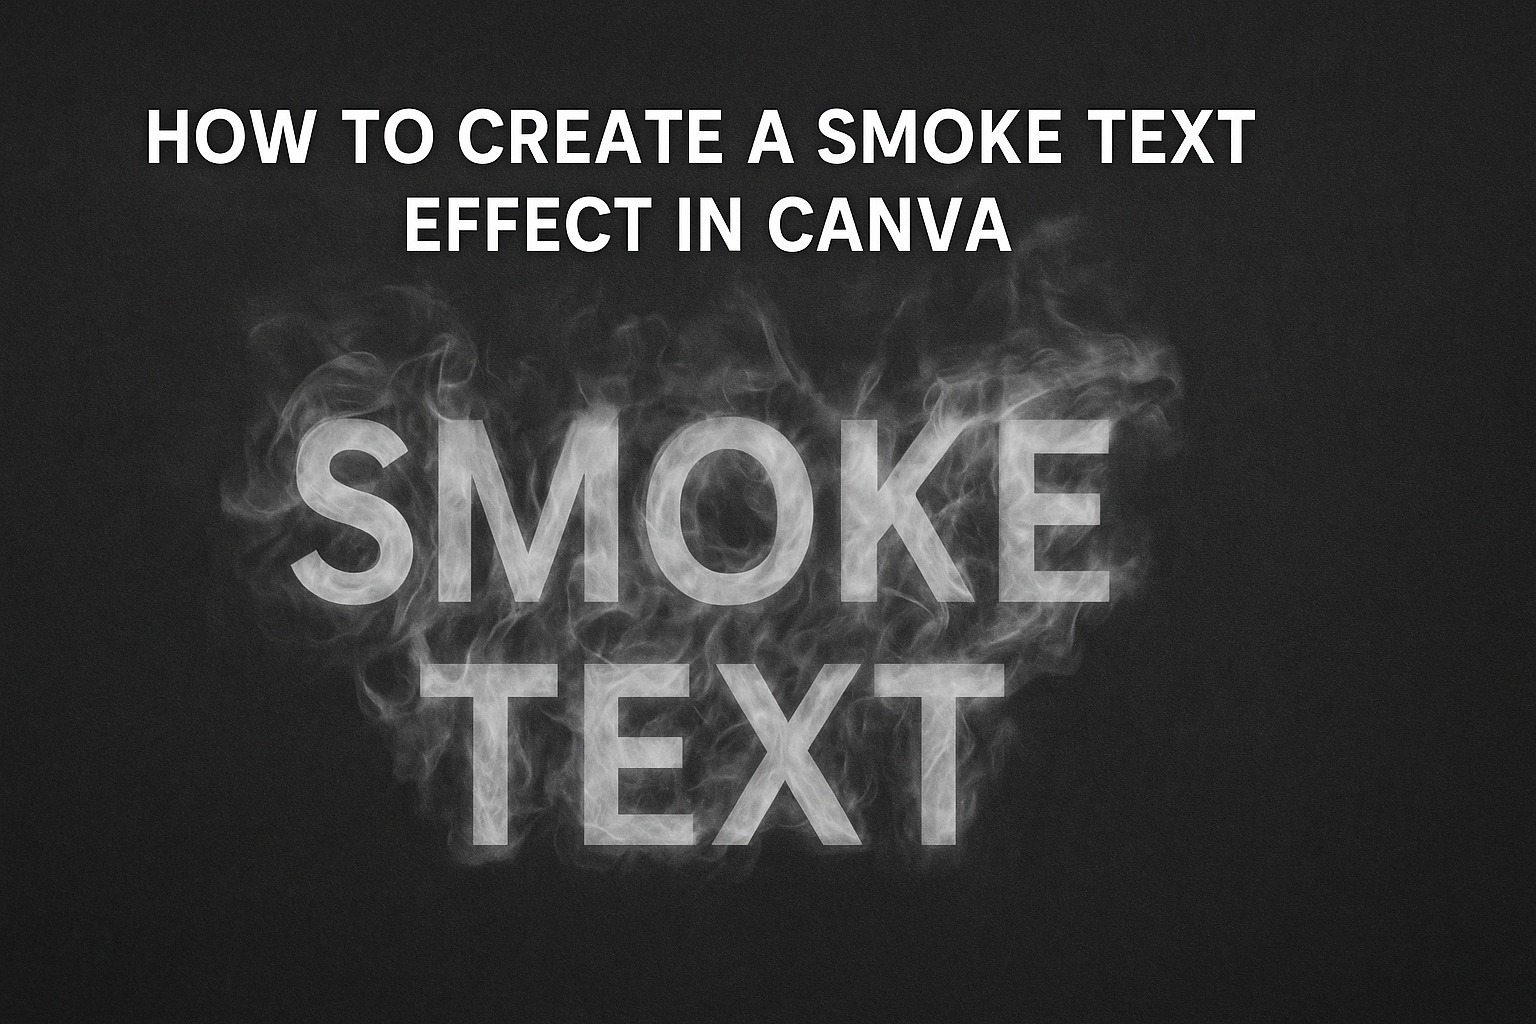
Applying the Smoke Effect
To apply the smoke effect, select the text and find the “Effects” button in Canva’s top menu. Click on this, and locate the “Smoke” option. This effect will create a wispy, cloud-like appearance around the text.
Adjust the opacity and size settings to get the desired look. Higher opacity adds density to the smoke, while size controls how far the effect extends.
Customizing the color and shape of the smoke can also bring more personality to the design.
Explore different styles by varying these settings, allowing the smoke text to feel more unique and fitting to the project’s theme.
Customizing Your Design
Customizing a smoke text effect in Canva makes a design truly unique. Readers will learn how to adjust colors, transparency, and modify text spacing and alignment for a more personalized touch.
Adjusting Colors and Transparency
To make the smoke text pop, adjusting colors and transparency is key.
First, select the text box where the smoke effect has been applied. Then, click on the “Effects” button in the menu.
Next, choose the smoke effect. A color palette will appear. Users can pick a color that fits their design.
For a softer look, adjusting the transparency can help. This can usually be done by moving a slider or entering a value. A lower opacity allows the background to show through, creating a more ethereal effect.
Using contrasting colors can add depth, while similar colors can create a subtle blend.
Modifying Text Spacing and Alignment
Fine-tuning text spacing and alignment enhances the overall look.
Start by selecting the text layer. Use the spacing tools to adjust letter spacing, line height, and more.
Increasing letter spacing can give the text a more airy feel, which can complement the smoke effect. On the other hand, tighter spacing can make the text seem bolder.
After spacing adjustments, aligning the text is essential.
Canva offers options like left, center, and right alignment. Users can also vertically align text for perfect placement in their design.
This step helps ensure that the text feels cohesive within the overall graphic.
Finalizing and Exporting Your Artwork
After creating a stunning smoke text effect in Canva, the next important steps are previewing the design and downloading the final image. This ensures that everything looks just as intended before sharing or using the artwork.
Previewing Your Design
Before downloading, it’s wise to preview the design. This helps catch any adjustments needed.
To do this, click on the “Preview” button in the top right corner of Canva. This feature shows how your work will look once exported.
Make sure to zoom in and check the smoke effect and text clarity.
Additionally, it’s good practice to check for any alignment issues. If elements seem off, return to the edit mode. Adjust sizes, positions, or colors as necessary.
A clear and appealing design is essential for the best results.
Downloading the Final Image
Once satisfied with the preview, it’s time to download the final image.
This is a straightforward process. Click the “Download” button in the top right corner.
Choose the image format that suits your needs—PNG or JPEG are popular options. If transparency is needed, opt for PNG.
Before hitting “Download,” adjust settings like size and quality. Higher quality settings work best for print, while lower settings are fine for web use.
After selecting preferences, click “Download” again to save the image to your device.
This completed artwork is now ready for sharing or printing.