Creating a double exposure effect in GIMP can transform ordinary photos into striking pieces of art. This technique combines two images, typically a portrait and a landscape, to create a unique and layered look. By using layer masks and different blending modes, anyone can achieve this impressive effect in GIMP.
This effect mimics traditional film photography, where two photos are exposed onto the same piece of film. GIMP makes it easy to recreate this look digitally, providing tools like the Foreground Select Tool and layer masks. These features allow users to blend images seamlessly, highlighting the creativity and depth of the double exposure style.
With a bit of practice in GIMP, users can see how versatile this effect can be, enhancing not only portraits but many other types of images. Whether aiming to express an emotional story or just experimenting with new styles, anyone can enjoy the art of double exposure. For detailed guidance, tutorials like those found at Davies Media Design are a helpful resource.
Understanding Double Exposure
Double exposure is a fascinating technique in photography that has captivated artists and photographers for years. This effect involves combining two images to create a unique and sometimes surreal outcome.
Defining the Double Exposure Effect
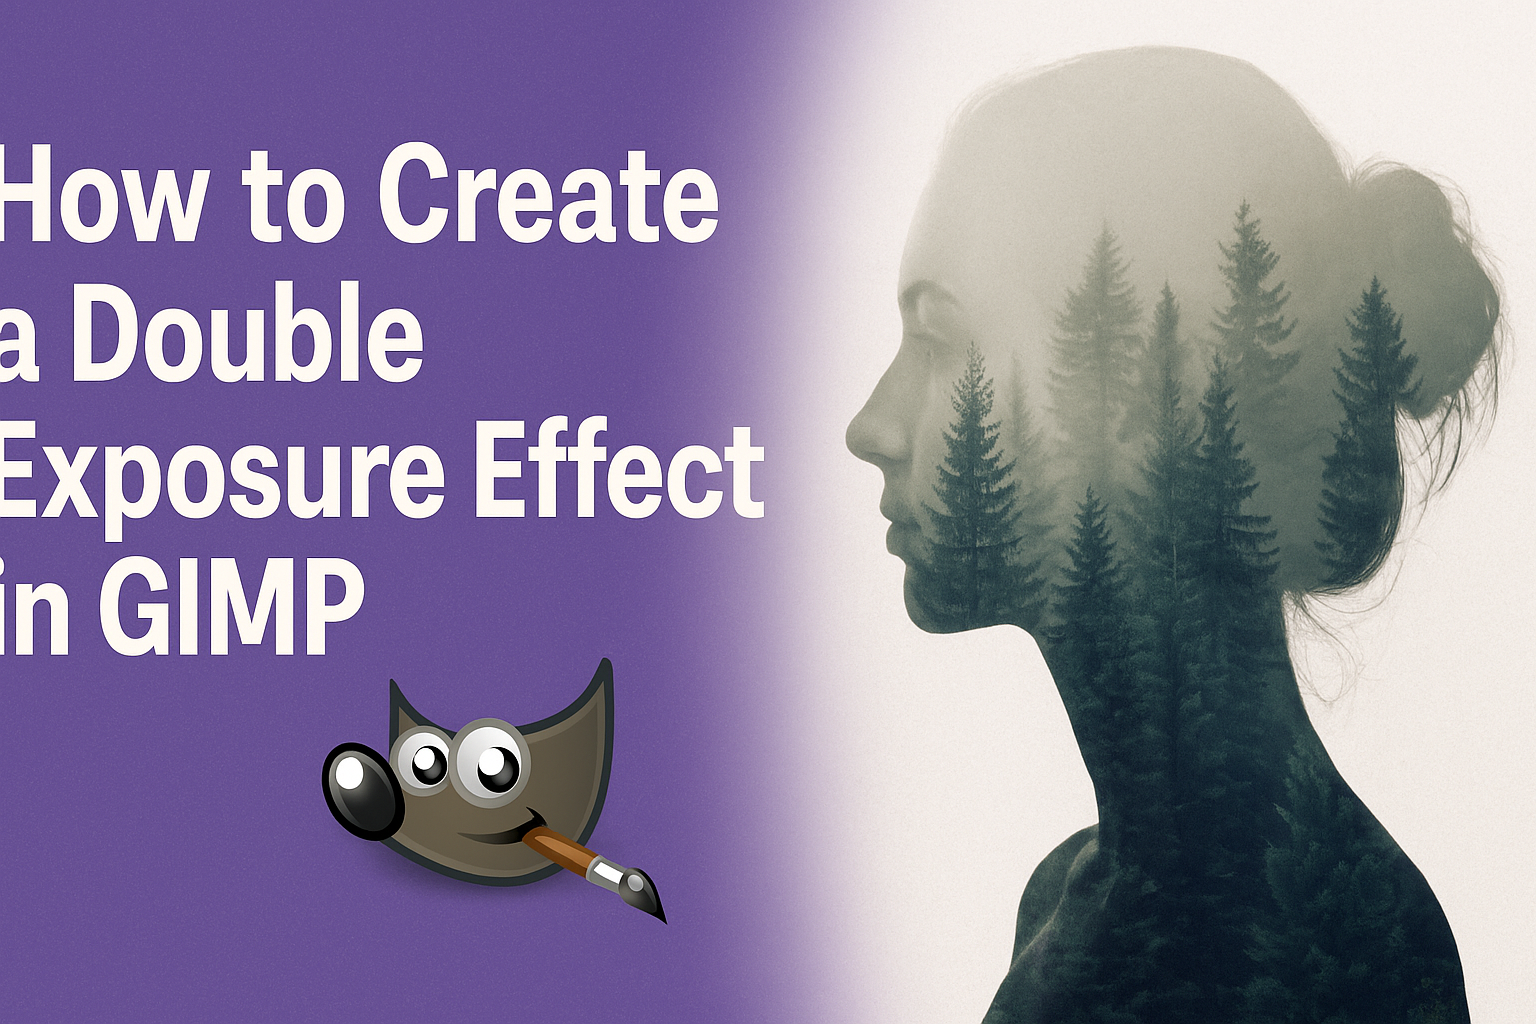
Double exposure involves overlaying two pictures onto a single frame. The technique creates an artistic image that seems to blend elements from both photos into one. This effect can be achieved in-camera or through editing software like GIMP. When executed digitally, tools such as layer masks and blend modes are often used. Each image contributes its own mood and detail, which can result in various visual styles, such as dreamlike scenes or abstract compositions. Double exposure is great for creative projects where storytelling and imagination are key.
History and Usage of Double Exposure
The history of double exposure dates back to the early days of film photography. Photographers used this method to manually expose the same film piece twice, capturing different scenes in each exposure. This technique was popular in creating ghostly or mystical effects.
Today, digital enhancements have allowed photographers various ways to use this approach, both for artistic and commercial purposes. Many use it in advertising, album art, and creative portraits. Its ability to bring about emotion and creativity makes it a favored choice in digital arts. For more about its application, check out double exposure photography techniques.
Getting Started with GIMP
Getting started with GIMP involves understanding its interface, setting up the workspace, and using essential tools for creating a double exposure effect. This guide provides insights into these key areas to help users make the most of GIMP for their photo editing needs.
Overview of GIMP’s Interface
GIMP’s interface can appear complex at first, but it is organized into sections. The main work area is the canvas, where users perform edits. On the left, the toolbox offers access to a variety of tools for image manipulation.
Panels on the right display layers, allowing users to manage different parts of an image. Menus provide quick access to features like filters and color adjustments, simplifying the editing process.
Familiarity with the interface lets users work efficiently. Adjustments like customizing toolbars can streamline workflows, saving time when editing images.
Setting Up Your Workspace
Configuring the workspace in GIMP can boost productivity. Users might start by arranging panels to fit their specific needs. This can involve dragging panels to different areas of the screen or even closing unused ones.
Another useful feature is saving custom workspace layouts. This ensures the setup is available for future editing sessions. It also allows quick switching between different tasks, which is helpful when working on varied projects.
Adjusting editing preferences, such as enabling autosave, can also be beneficial. These small tweaks allow users to focus more on creativity and less on managing settings.
Essential Tools for Double Exposure
Creating a double exposure effect in GIMP requires using specific tools. Layer masks are key, allowing users to blend images seamlessly. They give control over which parts of two images are visible.
Users will often rely on the opacity slider to adjust transparency levels between layers. This technique is vital in achieving the desired blend.
The brush tool is important for refining the effect. It can be used to softly erase or reveal parts of a layer mask, contributing to a more natural-looking exposure.
Preparing Your Images
Creating a double exposure effect in GIMP begins with choosing the right images. These images can be portraits and landscapes that work well together. Next, adjust the sizes and resolution for both images to ensure they blend seamlessly in the final composition.
Choosing the Right Images
The success of a double exposure effect often depends on the images chosen. A popular combination is using a portrait and a landscape photograph. The portrait should have a high contrast with a clean background. This makes the blending process easier and more effective.
When selecting a landscape, look for images with interesting textures or patterns, like forests or cityscapes. These details will fill in the silhouette of the portrait. It’s helpful to visualize how the two images will complement each other and what story or mood they can create together. With carefully chosen images, the final effect will be more striking and artistic.
Adjusting Image Sizes and Resolution
Once the images are chosen, adjusting the size and resolution becomes essential. Both images should share a similar resolution to prevent any loss of detail when combined. Use GIMP to resize the images if necessary, ensuring they have high quality without pixelation.
Align the images to make sure the important parts, like the subject’s face in the portrait, are positioned correctly. This alignment helps in creating a harmonious blend. Consider using tools like guides or rulers in GIMP for precision. Checking and adjusting these elements ensures the final double exposure effect looks polished and professional.
Creating the Base Layer
Creating a double exposure effect in GIMP starts with preparing your base layer. This involves opening your primary image and understanding how to effectively use layer masks for seamless blending. Each step is essential for achieving a polished result.
Opening the Primary Image
To begin, open GIMP and load the primary image. This image serves as the foundation for the double exposure effect. Images with clear, distinct subjects work best, like portraits or objects with defined edges.
Navigate to File > Open to locate your image. Ensure your image is of high resolution to prevent pixelation during editing. Once opened, familiarize yourself with the GIMP interface, focusing on the Layers panel. This panel will be crucial as you work on combining images for the double exposure effect.
Layer Mask Basics
Layer masks are key to creating smooth transitions between images. In GIMP, layer masks help blend the primary image with the secondary one. Begin by right-clicking the primary image layer in the Layers panel and selecting Add Layer Mask.
Choose the White (full opacity) option, allowing you to control visibility. By painting on the mask with black, you can hide parts of the layer, while using white reveals them. Experiment with brushes to achieve the desired effect, and adjust Opacity for more subtle blends. Mastering layer masks empowers you to create striking visual combinations in your double exposure projects.
Blending Images Together
Blending images in GIMP is about skillfully using features like blend modes, opacity adjustments, and masking. These tools help create a smooth transition between images and make the final composition more cohesive.
Using Blend Modes
Blend modes in GIMP allow two images to interact in exciting ways. They change how the colors of the top image mix with the bottom one. For example, the “Multiply” mode makes things darker and can add depth. The “Screen” mode does the opposite, brightening the image.
There are many blend modes to experiment with. Each mode has a unique effect. Trying different ones can lead to creative results. When selecting a blend mode, consider your intended outcome. Knowing which effect you want helps guide your choices.
Adjusting Opacity for Effect
Adjusting opacity helps fine-tune how two images combine. The opacity slider in GIMP controls how see-through the top image is. A lower opacity makes it more transparent. This can be helpful to subtly mix images together. By adjusting opacity, one can create gentle transitions.
Finding the right balance is key. Too much opacity may overshadow details, while too little may lose impact. Experimentation is crucial here, too. Tweaking this setting can transform the mood of the final image and highlight important elements.
Masking Techniques for Seamless Blends
Masks are essential for blending images smoothly. They allow for precise control over what parts of an image are visible. In GIMP, adding a mask to a layer lets you paint with black to hide or white to reveal areas. This is helpful for removing harsh edges between images.
A soft brush creates soft edges, enhancing the natural feel. By varying the brush size and hardness, one can achieve different effects. Using masks effectively requires practice. They empower users to make detailed edits and produce seamless compositions.
Refining the Double Exposure
Refining a double exposure in GIMP involves careful adjustments to layers, applying adjustment layers for color and brightness, and enhancing certain parts with brushes. This step is crucial to ensure that the images blend seamlessly and achieve the desired visual effect.
Fine-Tuning Layers
Adjusting the layers is a key step in refining your double exposure effect. By altering the opacity levels, users can control how much of each image shows through. This helps in creating a balanced look where neither image is too dominant. Offset adjustments help align the layers, ensuring that the composition looks natural. Organizing layers in the layer panel makes it easier to identify and modify specific elements of the composition. Using layer masks can also help blend the images more smoothly by hiding or revealing parts of each image without permanently altering them.
Adding Adjustment Layers
Adjustment layers are useful for modifying the color, contrast, and brightness of the images without changing the original layers. By using features like curves or levels, users can enrich the color depth and make adjustments that improve image harmony. This process can make the combined images more cohesive, giving the final image a professional touch. Color balance adjustment layers help in correcting any unwanted color tints, ensuring that both images appear as one unified artwork. These layers give users flexibility, allowing them to experiment with different settings.
Enhancing Details with Brushes
Using brushes in GIMP adds detail and texture to the double exposure effect. Users can apply soft brushes to fade edges or create a more blended transition between images. This helps achieve a smooth integration of elements. Highlighting certain areas with contrasting brush strokes can draw attention to key parts of the image, enhancing its visual impact. Brushes can also add artistic touches, like texture or patterns, to further enrich the image’s appearance. Changing brush opacity and size allows for varied effects, making it easier to apply nuanced enhancements.
Creative Variations
GIMP offers a lot of room for creativity when working with double exposure effects. By experimenting with color, textures, and unique techniques, artists can create varied and artistic images.
Introducing Color Effects
Adding color effects can transform a double exposure image dramatically. One method is to apply gradient maps that bring in colors matching the theme of the image. For instance, applying a warm gradient can evoke a sunset mood, while cool blues can suggest calm or mystery. Blend modes like Multiply or Screen also offer diverse visual styles by changing how colors from different layers mix.
Changing the color balance of the image can affect how it appears when combined with another. This can be useful for creating contrasting or harmonious looks. These tweaks help make the final image truly captivating.
Incorporating Textures
Textures add depth and interest to double exposure images. Using textures like grain, scratches, or fabric can create a vintage or tactile effect. The texture can either be a separate layer or applied as a layer mask. Using opacity adjustments, artists can blend textures seamlessly.
Different textures produce different moods. A cracked wall texture might convey a sense of decay, while a smooth, soft texture might feel more serene. Using the Clone Tool or Heal Tool in GIMP can refine how textures appear, ensuring they enhance rather than overpower the image. Layering subtle textures can add complexity without distractions.
Experimental Techniques
Trying out experimental techniques can lead to unexpected and exciting results. One approach is using layer masks to selectively combine parts of images. This can help in creating a more intricate composition by highlighting or hiding specific areas.
Artists might also experiment with the warp or transform tools to further manipulate shapes and forms within the image. Another fun technique is playing with the displacement maps to distort parts of the image, giving it a surreal look. By trying out various tools and effects, each double exposure project can become a unique piece of art, encouraging exploration and creativity in photo editing.
Final Touches
Completing a double exposure effect requires attention to detail. Adjusting the composition and saving the finished piece correctly ensures the final image looks professional and polished.
Cropping and Resizing Final Image
To enhance the final look, cropping is essential. This step frames the image better and removes any unnecessary parts. In GIMP, select the Crop Tool from the toolbox. Drag the edges to define the new borders. Maintain the focus on important elements to achieve balance in the composition.
Resizing the image can also be crucial, especially for posting online. Use Image > Scale Image to adjust dimensions. It’s important to maintain the aspect ratio to avoid distortion. After adjusting, check the image for clarity and detail.
Exporting Your Work
Once satisfied with the appearance, exporting ensures it’s saved in the right format. For online sharing, JPEG or PNG formats work best. In GIMP, go to File > Export As to choose your preferred format.
Naming the file properly helps in organizing. Try to use descriptive names like “Double_Exposure_Final”. Before exporting, verify compression settings, especially for JPEGs. Lower compression preserves quality but increases file size. PNGs offer lossless quality, ideal for high-detail images.