In the world of graphic design, small details can make a big difference. When working in Canva, adjusting the start and end of a line can enhance any design.
To customize line ends and starts, simply select your line and choose options from the top toolbar.
Many users find that the default line settings don’t always fit their vision. By exploring different line styles, such as arrows or dots, they can create designs that are truly unique.
This guide will help anyone looking to elevate their Canva projects with these simple adjustments.
With just a few clicks, designers can transform their lines to match their overall style. This process not only adds flair but also brings clarity to their creations.
Readers will discover how easy it is to personalize their designs with straightforward steps.
Getting Started with Canva
Canva is an easy-to-use design tool that helps users create various visuals. Learning how to set up a new design and navigate the interface is essential for an effective start.
Creating a New Design
To begin with Canva, users should first create a new design. They can do this by logging into their Canva account.
Once logged in, they will see an option to start a design on the dashboard. Users can choose from various templates, like social media posts, presentations, or custom dimensions.
After selecting a template, the design workspace will open. It will feature a blank canvas and several tools on the left side.
Users can add elements like text, images, and more right from this area.
Understanding the Canva Interface
Navigating the Canva interface is straightforward. The main dashboard displays available design types, recent projects, and a search bar for templates.
On the left side, users will find a toolbar with options for Elements, Text, Photos, and more.
At the top, the editing tools allow for text adjustments, color changes, and alignment options. The design can be saved by clicking the “Save” button on the right.
Lastly, users can easily share their designs through a link or by downloading them. This combination of features makes it simple to create expressive and professional visuals.
Adjusting Lines in Canva
Adjusting lines in Canva is a simple process that allows users to enhance their designs. This involves selecting the right elements and customizing line start and end points for a polished look.
Selecting the Line Element
To begin, she should open her design in Canva and select the “Elements” tab located on the left side. Here, she can find a variety of lines and shapes.
By clicking on “Lines,” she can choose a line type that best fits her design’s theme.
After choosing a line, clicking on it brings up options for adjusting the size and position. Users can click and drag to place the line where they want it.
Resizing can easily be done by dragging the endpoints of the line. This allows for creative flexibility, as she can create lines of different lengths to fit her layout perfectly.
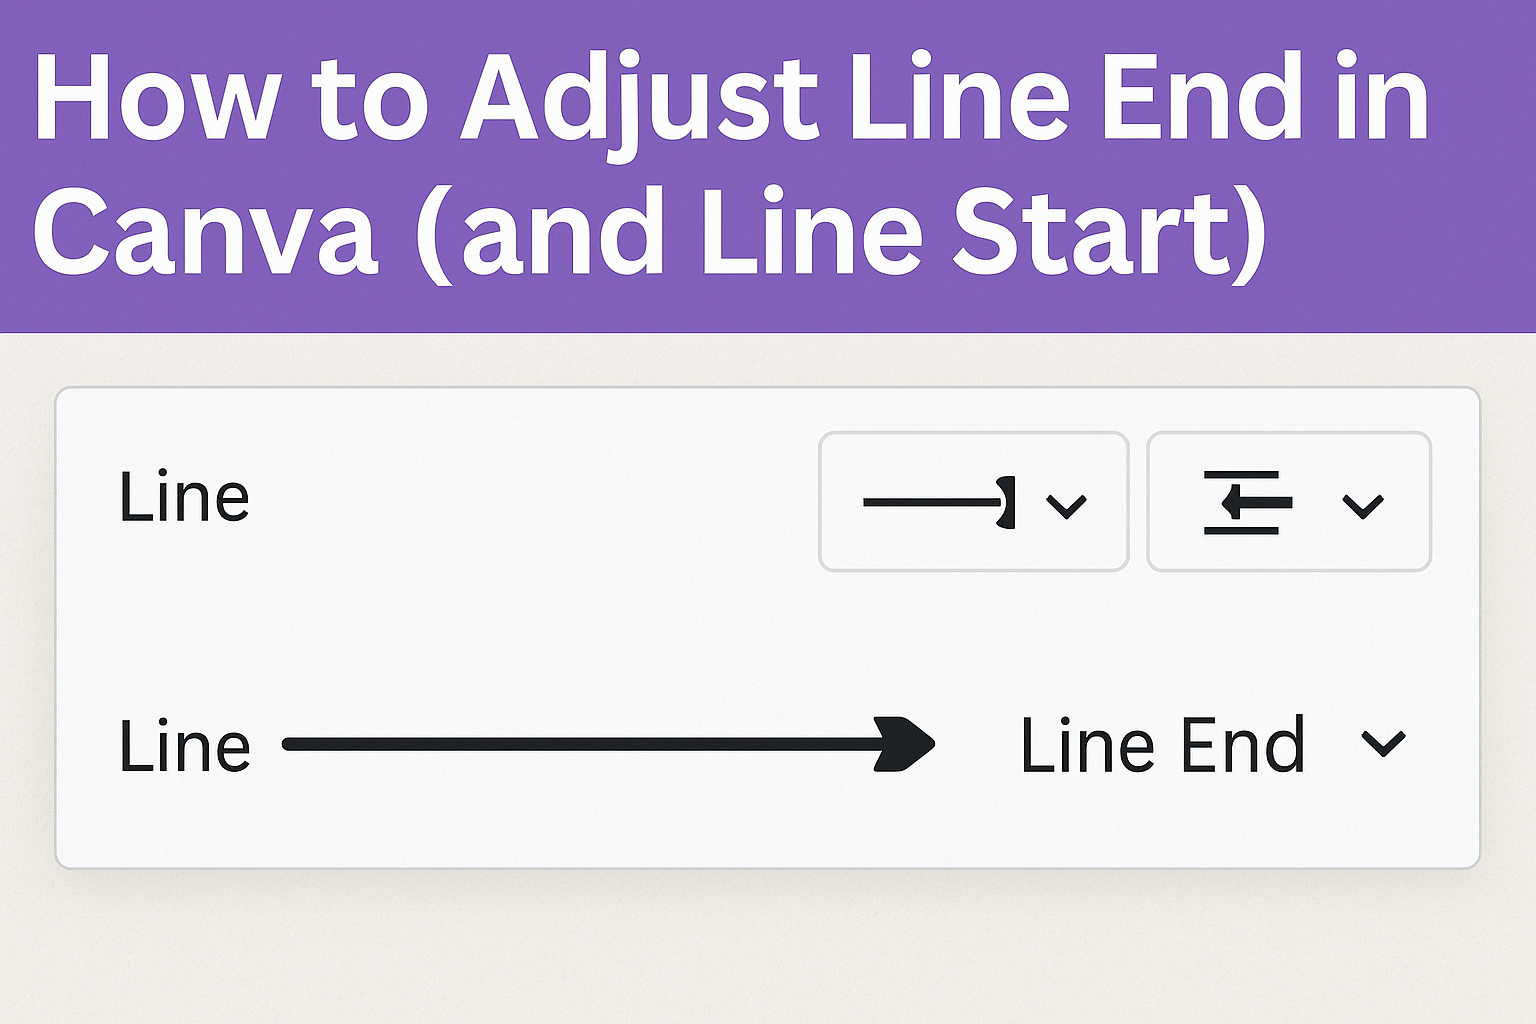
Customizing Line Start and End Points
Once the line is selected, customizing its start and end points is straightforward. She can find this option in the top toolbar.
By clicking on “Line start” or “Line end,” a variety of shapes appear, such as arrows, dots, or squares.
Selecting a specific style changes the look of the line instantly. It allows for a more personalized design that matches her project’s aesthetic.
For instance, using an arrow on one end of a line can show direction or flow. Similarly, adding dots could give a softer, more playful touch. This level of detail can significantly impact the final design.
Enhancing Your Design
To create a visually appealing design in Canva, users can enhance their work by adding visual effects and incorporating text and images effectively. These elements can make a design stand out and communicate ideas more clearly.
Adding Visual Effects
Visual effects can elevate any design by adding depth and interest. Canva offers various options, including shadows, highlights, and transparency adjustments.
-
Shadows: Adding a subtle shadow can create a 3D effect. Users can select a line or shape and adjust the shadow settings in the toolbar.
-
Gradients: Utilizing gradients allows for smooth color transitions. This can be done by selecting a background or shape and choosing the gradient tool.
-
Transparency: This feature helps layers blend seamlessly. Adjusting the transparency of a line or image adds a layer of sophistication to the design.
Each effect contributes to a better understanding of the content while keeping the design engaging.
Incorporating Text and Images
Text and images play a key role in communicating a message. When used correctly, they will enhance the overall design.
-
Choosing Fonts: The right font sets the tone. Canva has a variety of font styles. It’s best to stick to two or three complementary fonts for consistency.
-
Aligning Text: Proper alignment helps guide the viewer’s eye. Users should center or left-align text for better readability and balance.
-
Adding Images: Incorporating relevant images can enhance the design. Users can upload personal images or choose from Canva’s library.
Combining text and images smartly makes the design clearer and more professional.
Tips and Tricks
There are several helpful strategies to enhance line adjustments in Canva. These tips focus on using shortcuts for efficiency and aligning objects for a cleaner design.
Using Shortcuts for Efficiency
Shortcuts can save time and improve workflow in Canva.
For adjusting lines, holding the Shift key helps keep lines perfectly straight while dragging. This is useful when precise angles are needed.
For adjusting the start and end of lines, users can click and drag directly on the line’s endpoints. Pressing Command (or Control) while moving, allows for finer adjustments without snapping to other elements.
To switch between line styles quickly, selecting a line and pressing Option + 1, 2, or 3 changes line styles to different preset options. Familiarizing oneself with these shortcuts leads to faster designs and less hassle.
Aligning Objects Precisely
Aligning lines and objects is key for a polished look. Canva has alignment tools that make this easy.
Users can access these tools from the top toolbar. It provides options to center vertically and horizontally.
For even more precision, holding down the Alt (or Option) key while dragging an object helps to duplicate it instantly. This is perfect for creating symmetrical designs.
Using the grid and ruler features in Canva allows for more accuracy.
Users can turn on the grid from the view menu to snap lines and shapes into place effortlessly.
Combining these features and techniques can greatly enhance the overall presentation of designs.