In the fast-paced world of digital design, organizing your work efficiently is crucial. InDesign’s Layers Panel offers a powerful way to keep your designs neat and accessible. By mastering layers, designers can streamline their workflow, speeding up the creation of complex documents.
Layers in InDesign allow users to manage different elements separately, making it easier to make changes without affecting the entire project. This feature is especially helpful for those handling large projects or working in teams. Imagine being able to lock, hide, or rearrange components quickly—saving time and reducing mistakes.
For anyone looking to improve their design skills, learning to navigate the Layers Panel is essential. This tool not only boosts productivity but also enhances creativity by offering more control over each aspect of the design. Understanding this skill opens up new possibilities in the world of document design and management.
Getting Started with InDesign’s Layers Panel
To kick off your learning about InDesign’s Layers Panel, it’s important to first know how to access it and understand its layout. This helps in organizing complex designs more effectively by managing various design elements separately.
Accessing the Layers Panel
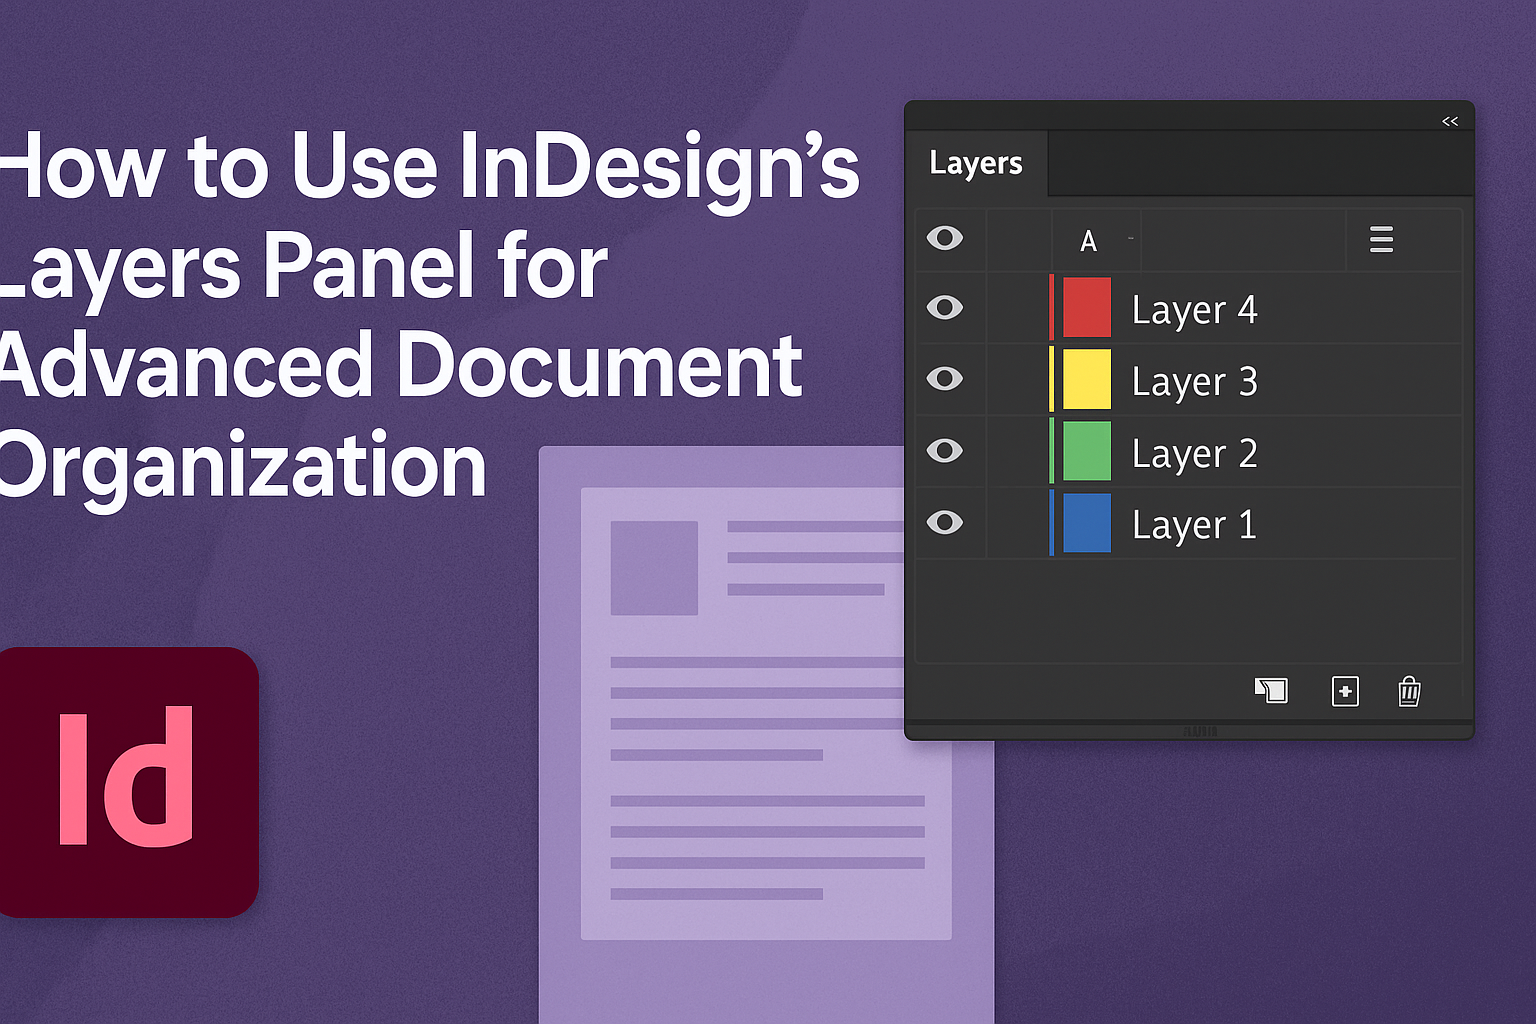
To open the Layers Panel, users need to navigate to the Window menu in Adobe InDesign. From there, select Layers. This action reveals the Layers Panel, which is crucial for document organization. Each new InDesign document starts with a single layer named “Layer 1.” Adding more layers allows users to separate different elements like text, images, and graphics.
Creating a new layer is simple. Just click the New Layer button at the bottom of the panel. For placing a layer below an existing one, hold down Ctrl on Windows or Command on a Mac while clicking the button. By doing so, users can better arrange and manage content, which is especially useful in complex documents.
Understanding the Layout
The Layers Panel in InDesign is designed to offer a clear view of all the elements in a document. The panel shows each layer in the stack, allowing users to select, hide, or lock layers. This visual layout is helpful when working with intricate designs.
Layers can be renamed to keep everything organized. Simply double-click the layer name and enter a new one. This feature is especially helpful when working with multiple layers, as it keeps everything clear and accessible. Managing layers through visibility and locking options allows for precise control over each element in the design.
Creating and Managing Layers
Layers play a crucial role in organizing elements in Adobe InDesign. By learning how to add, rename, remove, and control layers, users can achieve a more efficient workflow and maintain a clear structure in their projects. These skills help keep design elements neatly organized and easily accessible.
Adding New Layers
To create a new layer in InDesign, users can open the Layers panel by selecting Window > Layers. Then, click the New Layer button at the bottom of the panel. This adds a new layer above the one currently selected. For those using Adobe InDesign, proper layer management ensures that design elements are easy to locate and edit.
Adding layers can help separate text, images, and other design elements, reducing the chance of accidentally moving or editing the wrong item. For example, keep all text on one layer and images on another. This improves the editing process, as each type of content is isolated. The use of separate layers can make complex documents more manageable as each element can be individually controlled without interfering with others.
Renaming Layers
Renaming layers is a straightforward but essential task to keep projects organized. InDesign users can double-click the layer’s name in the Layers panel to rename it. Clear and descriptive names make it easier to find specific layers when needed. For instance, using names like “Header Text” or “Background Image” helps in quickly identifying their purpose.
Layer names can reflect the content they hold or the part of the design they serve. This descriptive naming is especially helpful in distinguishing between similar layers. If a project has multiple layers with similar content, assigning detailed names helps avoid confusion and speeds up the design process. Every layer can be easily tracked and managed through appropriate naming conventions, which is crucial in complex projects.
Deleting and Duplicating Layers
Deleting a layer can be done by selecting the layer in the Layers panel and clicking the Delete Layer button. It’s useful for removing unnecessary content and decluttering the document. Before deleting, ensure that all elements in that layer are either obsolete or moved to another layer. This prevents accidental data loss.
Duplicating layers can be done by right-clicking the desired layer and choosing Duplicate Layer. This is especially handy when similar layouts are needed throughout the document. Duplicating layers can save time and ensure consistency across pages. It allows for quick alterations and adjustments without affecting the original layer.
Layer Options for Better Organization
InDesign provides several options to improve layer organization and visibility. Users can lock layers to prevent accidental changes by clicking the lock icon next to the layer name in the Layers panel. Locking is vital when working on multiple design aspects simultaneously, ensuring that critical layers remain unaffected.
Users can also adjust the visibility of layers by clicking the eye icon to hide or show them. This is helpful when focusing on specific parts of a project. Additionally, changing the layer color, which indicates selected objects, can visually separate different elements within a document. By mastering these options, users can maintain a neat and well-organized workspace.
Working with Objects and Layers
InDesign’s Layers panel is a powerful tool for managing complex documents. Users can efficiently select and move objects, control layer visibility, and group items for better organization.
Selecting and Moving Objects Between Layers
Selecting objects in InDesign is simple with the Layers panel. To begin, open the Layers panel and identify the object by the colored square next to it.
To move an object to another layer, drag the square to the desired layer. This technique allows for precise control over object placement. This method helps in keeping similar items together, which makes editing faster and more efficient. For more details, check out tips on selecting objects using the Layers panel.
Locking and Hiding Layers
Managing visibility and preventing accidental edits is key to working with layers. Users can lock layers to protect objects from changes. To lock a layer, click the small lock icon next to the layer name.
Hiding layers is equally simple. Just click the eye icon, and the entire layer becomes invisible. This feature is handy when you need to focus on certain parts of your project without distraction. For a practical guide, see how to work with layers.
Grouping Objects Within Layers
Grouping objects is a great way to manage multiple items within a single layer. To group items, select the objects on your page you want to keep together. Then, right-click and choose Group from the menu.
This organizes objects so you can move or modify them as a unit. Grouping maintains the relationship between items, saving time during edits and adjustments. For a more detailed explanation, explore basic layer management techniques.
Advanced Layer Functionality
InDesign’s Layers Panel offers a wide range of functionalities beyond basic organization. It’s designed to enhance productivity and allow for creative possibilities in document design. These advanced features help users manage complex projects efficiently by streamlining workflows and expanding creative options.
Color Coding for Clarity
Using color-coding in the Layers Panel helps quickly identify different types of content. Assigning colors to layers like text, images, and graphics can make identifying and switching between them a breeze. This technique makes it visually appealing and easier to manage complex documents with many layers involved.
To apply a color code, go to the Layers Panel, select a layer, and choose a color from the options. This small but powerful tool can greatly reduce errors and save time when editing.
Isolating Layers for Focused Editing
Isolating layers allows for focused editing without distractions from other elements. This function is particularly helpful when one needs to concentrate on one aspect of a multi-layer document. By isolating a layer, all others are hidden temporarily, enabling a detailed view of the work in progress.
To isolate a layer, simply click on its eye icon while holding Alt (Windows) or Option (Mac). It provides an environment where designers can tweak or refine elements without interference from adjacent layers.
Applying Effects to Layered Content
Applying effects to layers can bring a document to life. Effects like drop shadows, glows, and bevels offer depth and dimension to designs. These effects can be accessed through the Effects Panel, where they can be fine-tuned to achieve the desired appearance.
Combining various effects on different layers can result in unique visual outcomes. It’s crucial to experiment with these settings, as they offer a valuable opportunity for creativity and highlight essential elements of the design.
Blending Modes and Layer Transparency
Blending modes and layer transparency create varying visual effects by combining layers in different ways. Different blending modes can alter the way colors interact, producing unique results. Meanwhile, adjusting transparency can help layers fade into one another or the background.
To access blending modes, click on the drop-down menu at the top of the Layers Panel. Options like Multiply, Screen, and Overlay present varied ways to achieve interesting looks. By altering transparency and blending, designers can create depth and focus within the visual hierarchy of their work.
Efficiency Tips for Layer Usage
Using layers effectively in InDesign can greatly enhance workflow efficiency. By utilizing versioning, shortcuts, and templates, designers can organize their projects more efficiently and maintain consistency in their documents.
Using Layers for Versioning Document Changes
Layers can help manage different versions of a document. By creating a new layer for each version, designers can easily track changes. This approach allows them to compare various edits without altering the original layout.
Each layer can hold distinct elements of a version. For example, one might contain draft text, while another includes the final copy. This separation simplifies reverting to previous versions when needed. An organized layer panel keeps varying versions clear and accessible.
This method is particularly helpful for collaborative projects, enabling team members to understand revisions without confusion.
Streamlining Work with Layer Shortcuts
InDesign offers shortcuts for faster layer management. Learning these can save significant time. For instance, quickly locking or unlocking layers can prevent accidental edits. Designers can also hide or reveal layers instantly to focus on specific parts of the project.
Using shortcuts streamlines repetitive actions in complex documents. Assigning specific keys to frequently used layers speeds up the editing process. This efficiency is especially beneficial in projects with multiple components or tight deadlines.
Customizing shortcuts to suit personal workflow preferences can further enhance productivity. By integrating these shortcuts, managing layers becomes seamless and efficient.
Template Layers for Consistent Design Elements
Creating template layers ensures design consistency across documents. Designers can set up layers with repetitive elements like headers, footers, or logos. These design elements remain uniform, saving time on redesigning from scratch.
By using template layers, changes to design elements are straightforward and apply uniformly across all instances. This technique is invaluable for maintaining brand consistency, especially in large campaigns or publications with multiple pages.
Template layers also allow for easy updates. When changes are made on the template layer, they automatically reflect in all documents using that template. This approach solidifies cohesive design language throughout projects.
Collaborating with Layers
When working in Adobe InDesign, collaboration can get challenging, especially with complex documents. Using layers effectively can make teamwork much more seamless. Layers help users manage changes and maintain organization across shared projects.
Sharing Layers Between InDesign Files
Sharing layers between different InDesign files can boost team productivity. By copying elements from one document and placing them into a new one while retaining layer structure, teams ensure consistency.
To transfer layers, users can select the layers they want, copy the elements, and then paste them into the target document while holding the same layer structure. This method prevents inconsistencies and makes shared projects easier to update and understand. Keeping a consistent layer setup is vital for maintaining uniformity across multiple documents.
Layer Navigation in Document Collaboration
Navigating layers efficiently is key during document collaboration. Each collaborator should know how to access specific layers quickly to avoid workflow interruptions. They can utilize the layer visibility toggles to focus on specific content during different stages of editing.
Locking and unlocking layers ensures that no accidental changes are made to critical elements. It is also helpful to use layer color coding, as it allows collaborators to identify and manage specific parts of the document easily. Users should also employ layer naming conventions to improve clarity when multiple people work on the same file. This organized approach allows for smoother teamwork and project management.
Troubleshooting Common Layer Issues
Sometimes, working with layers in Adobe InDesign can be a bit tricky. Here are a few common issues and how to solve them.
Issue: Missing Objects
If objects seem to disappear, check if they are on a hidden layer. Use the Layers panel to unhide layers by clicking the eye icon on the left.
Issue: Objects not displaying correctly
This could be due to incorrect layer order. To fix this, drag the layer containing the object above the layer that’s obscuring it. Learn more about moving objects between layers at moving objects between layers.
Issue: Unable to edit objects
If editing an object isn’t possible, the layer might be locked. In the Layers panel, ensure the layer is unlocked by clicking the lock icon. Otherwise, use the option to unlock other layers if only a specific one should stay locked, as explained in create and use layers.
Tip: Properly Name Your Layers
Naming layers helps in quickly identifying and managing them. Double-click the layer name to rename it, helping to avoid confusion later on. More tips on organizing layers can be found at Adobe Support Community.