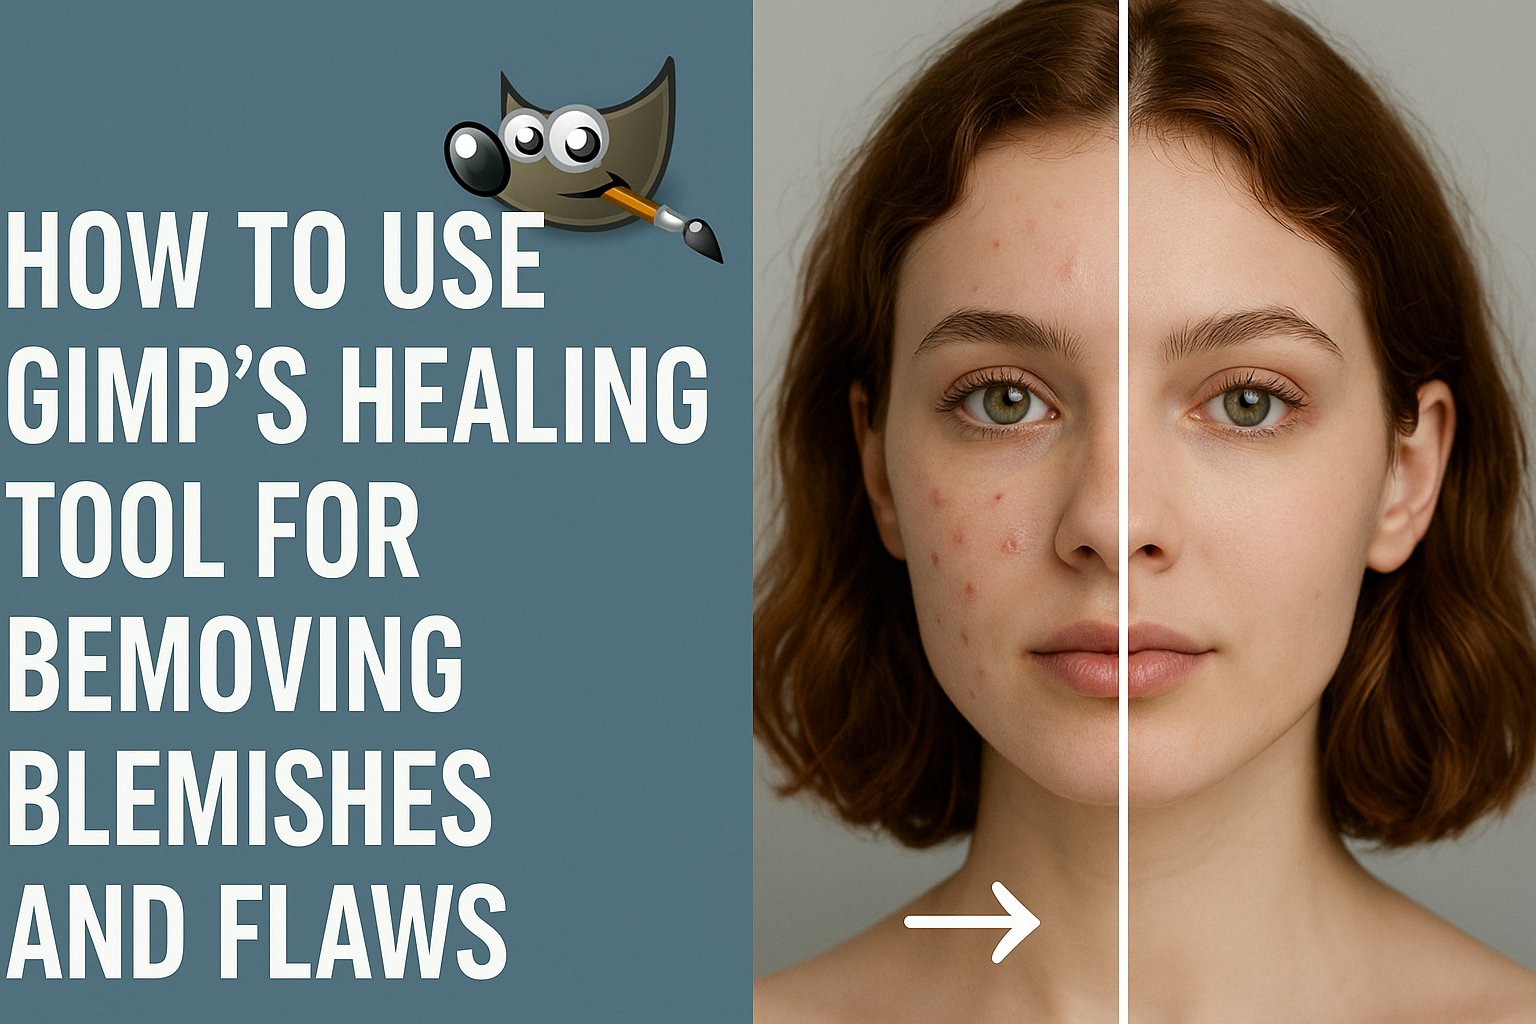
Editing photos can be a fun and creative process, but removing blemishes and imperfections requires the right tools. GIMP, a popular free photo editing software, offers a powerful feature known as the Healing Tool. This tool allows users to effortlessly remove blemishes, giving images a professional and polished look.
For those new to GIMP, mastering the Healing Tool might seem daunting. However, with a little guidance, anyone can use it to enhance their photos.
The Healing Tool works like a smart clone feature, letting users seamlessly blend away imperfections. Exploring how to activate this tool and use its features will surely make photo editing a more satisfying experience.
Understanding the Healing Tool
The Healing Tool in GIMP is essential for correcting blemishes and minor flaws in images. It offers a way to blend unwanted spots with their surroundings, providing a natural look. This section will explain the tool, how it functions, and its differences from the Clone Tool.
What Is the Healing Tool?
The Healing Tool in GIMP is used to smooth out imperfections in images, such as blemishes, wrinkles, or dust spots. It works by using texture and color from a selected source point and blending them into the area needing correction. Unlike other tools, the Healing Tool focuses on creating adjustments that look natural to the human eye.
Using this tool, users can easily improve their images without leaving noticeable traces of editing. It is particularly helpful for portrait photography or any image needing small touch-ups. By allowing minute adjustments, it produces a polished and refined image without over-editing.
How the Healing Tool Works
The Healing Tool operates by sampling the texture from a source area and applying it to the target area. Users activate it by pressing the ‘H’ key or selecting it from the toolbox. When using the tool, you first select the source point by holding the ‘Ctrl’ key and clicking on the image. Then, you can paint over the area with flaws.
What sets the Healing Tool apart is how it not only copies texture but also blends it with the color of the surrounding pixels. This blending process is crucial for seamless image correction. It’s effective at covering up spots without making them look edited, resulting in a professional-quality finish.
Healing Tool vs. Clone Tool
Though the Healing Tool and Clone Tool might seem similar, they serve distinct purposes. The Healing Tool focuses on integrating the source texture into the target area, making the transition smooth. This involves both texture blending and color adjustment for a realistic result.
In contrast, the Clone Tool replicates exact pixels from the source point without blending or adjusting. It works well for duplicating parts of an image but can look unpolished if used for blemish removal. For subtle corrections, the Healing Tool offers a more refined solution than the Clone Tool because of its ability to blend colors naturally.
Preparing Your Image for Editing
Before making edits in GIMP, it’s important to set up your image correctly. This involves two main steps: opening the image in GIMP and creating a duplicate layer for safe editing.
Opening Your Image in GIMP
To begin editing, first open the GIMP software. Then, load your image by clicking on File in the top menu and selecting Open. Choose the image you want to edit from your computer. This step is crucial as it allows you to start working on the correct image file. If your image isn’t in the right format, you may need to convert it to a compatible type like JPEG or PNG.
GIMP supports various file formats, so this is usually straightforward. It’s a good idea to check the image resolution and make sure it’s high enough for your editing needs.
Creating a Duplicate Layer
Once your image is open, creating a duplicate layer is a smart move. This process protects your original image from accidental changes. To make a duplicate layer, locate the Layers panel on the right side of the screen. Right-click on your image layer and select Duplicate Layer. You will see a new layer appear above the original one.
This new layer will allow you to make edits without affecting the original file. Edits made on the duplicate layer can be undone easily. Thus, it’s helpful for experimenting with different techniques and maintaining control over your changes.
Accessing the Healing Tool
To start using GIMP’s Healing Tool, it’s important to know where to find it and how to adjust its settings. These steps allow for a smoother editing process and better results when removing blemishes or flaws.
Locating the Tool in the Toolbox
The Healing Tool is found in the toolbox, a collection of essential tools within GIMP. Users can spot it by looking for an icon that resembles a bandage. Clicking on it will activate the tool. Alternatively, pressing the ‘H’ key on the keyboard is a quick way to select this tool, making it convenient for those familiar with keyboard shortcuts.
For those who prefer using menu navigation, the tool can also be accessed through the image-menu by selecting Tools → Paint Tools → Heal. This method is intuitive for users who are newer to the software. By following these steps, users can easily locate and activate the Healing Tool.
Configuring Tool Options
After activating the Healing Tool, configuring its options is crucial for effective image editing. Users should start by setting the correct brush size to match the area they intend to edit. A larger brush may work better for extensive areas, while a smaller brush is ideal for precise touch-ups.
In addition to brush size, the opacity setting determines how intense the healing effect will be. Lower opacity makes changes more subtle, which can be useful when blending touched-up areas with the surrounding image.
The source point plays a key role as well. By holding down the Ctrl key and clicking on a specific part of the image, users define where the Healing Tool pulls its texture from. Proper setup of these tool options ensures that the Healing Tool fixes imperfections seamlessly.
Using the Healing Tool
The healing tool in GIMP is perfect for fixing imperfections like blemishes and wrinkles. This tool smoothly blends these areas with the surrounding pixels, creating a natural look. Key steps include selecting a source area, applying the healing brush, and adjusting brush settings for best results.
Selecting the Source Area
Before using the healing tool, it’s essential to choose the right source area. This area should closely match the texture and color of the area being corrected. To do this, users need to press and hold the Ctrl key while clicking on the desired spot. A well-chosen source makes a significant difference, ensuring that the correction appears seamless.
This process allows the brush to use pixels from the source area to replace blemishes. It’s important to pick a source nearby, so the blending is smooth. Images that have a consistent tone or texture around blemishes will make this easier.
Applying the Healing Brush
After setting the source area, it’s time to apply the healing brush. Gently drag the brush over the unwanted spot on the photo. It’s best to work in small areas and use gentle strokes to ensure a natural blend.
Users often find that short, steady strokes yield the best results. A careful approach helps avoid noticeable patterns or textures that may not match with the rest of the image.
The key is to maintain consistency in strokes, as this helps replicate the area correctly. Overlapping strokes are usually necessary for larger blemishes, creating a more unified look.
Adjusting Brush Size and Hardness
Adjusting the brush size and hardness is crucial for precise editing. A smaller brush provides more control over details, while a larger brush covers bigger areas efficiently. Brush hardness affects the transition between edited and unedited areas.
A softer brush edge is ideal for blending, as it creates a smooth transition. On the other hand, a harder edge might be better for well-defined spots. Adjusting brush size and hardness can be done in the tool options or by using shortcuts.
Experimenting with these settings can greatly enhance the effectiveness of the healing tool, tailoring it to the photo’s needs.
Enhancing Your Healing Techniques
Improving your skills with GIMP’s Healing Tool involves understanding how to adapt your approach based on texture and blemish complexity. This helps you achieve more natural and realistic results in your images.
Working with Different Textures
When working with the Healing Tool, it’s important to consider the different textures in your images. Skin, fabric, or natural backgrounds each require a unique approach. For skin, select an area near the blemish with a similar tone to ensure even blending.
In more textured areas, such as fabrics or landscapes, adjusting the brush size can help maintain the texture’s detail. Smaller brushes work well for fine textures, while larger ones are suitable for smoother areas. A subtle approach helps prevent the edited section from standing out.
Use a soft-edged brush to gently blend the healed area with its surroundings. Adjusting the opacity can also create more natural transitions, especially when dealing with textures that have subtle gradients.
Addressing Complex Blemishes
Complex blemishes, like wrinkles or shadows, often require multiple steps to handle effectively. Start by breaking down the blemish into smaller, manageable parts. Use the Healing Tool with care to avoid losing important details around the area.
Consider using layer masks to deal with multi-layered blemishes. This technique allows for correcting irregularities without altering the entire image. For areas that need extra care, blend the edges of the healed portion with a lower opacity.
If the blemish involves different colors or lighting conditions, experiment with using sample sources from areas with similar lighting to achieve a consistent finish. This method ensures the corrected area doesn’t appear out of place.
Refining Your Edits
To improve edits made with GIMP’s Healing Tool, focus on accurate detailing. Achieve the best results by zooming in for precision, using layers for protection, and merging these layers for a smooth final output.
Zooming In for Precision
Getting close to the image helps in making precise adjustments. When working on small details or flaws, zoom into the area. This level of detail helps use the Healing Tool more accurately. GIMP has easy zoom controls that enable users to hone in on specific sections of their images.
By zooming in, users can closely monitor the impact of their edits. This prevents over-editing and ensures the changes blend naturally with the rest of the image, providing a seamless finish.
Using Layers to Protect Your Work
Layers are a vital feature in GIMP that can safeguard edits. When editing with the Healing Tool, create a new layer. This step protects the original image and allows modifications to be made non-destructively. If any mistakes happen, they can easily be corrected without affecting the main image.
To make a new layer, navigate to the layers panel and select “New Layer.” Ensure this layer is active while using the Healing Tool. It allows for more flexibility, enabling the user to experiment without permanent consequences.
Merging Layers for the Final Output
Once satisfied with the edits, merge the layers for a cohesive image. This step is essential for reducing file size and preparing the image for export or further use. GIMP allows users to merge layers simply by right-clicking the layer and choosing “Merge Down.”
Combining layers finalizes all the changes made while safeguarding the original image during the editing process. This ensures the edited image is smooth, unified, and ready for any additional adjustments or sharing.