Creating a professional event checklist graphic can make planning much easier and more organized. Using PicMonkey, anyone can design a checklist that is both functional and visually appealing. This graphic not only helps streamline tasks but also adds a polished touch to the planning process.
With its variety of templates and customization options, PicMonkey is the perfect tool for anyone looking to create unique checklists.
Whether for a corporate event or a personal gathering, a well-designed checklist can ensure nothing is overlooked.
By following some simple steps, this blog post will guide readers on making a standout event checklist graphic. Ready to elevate event planning?
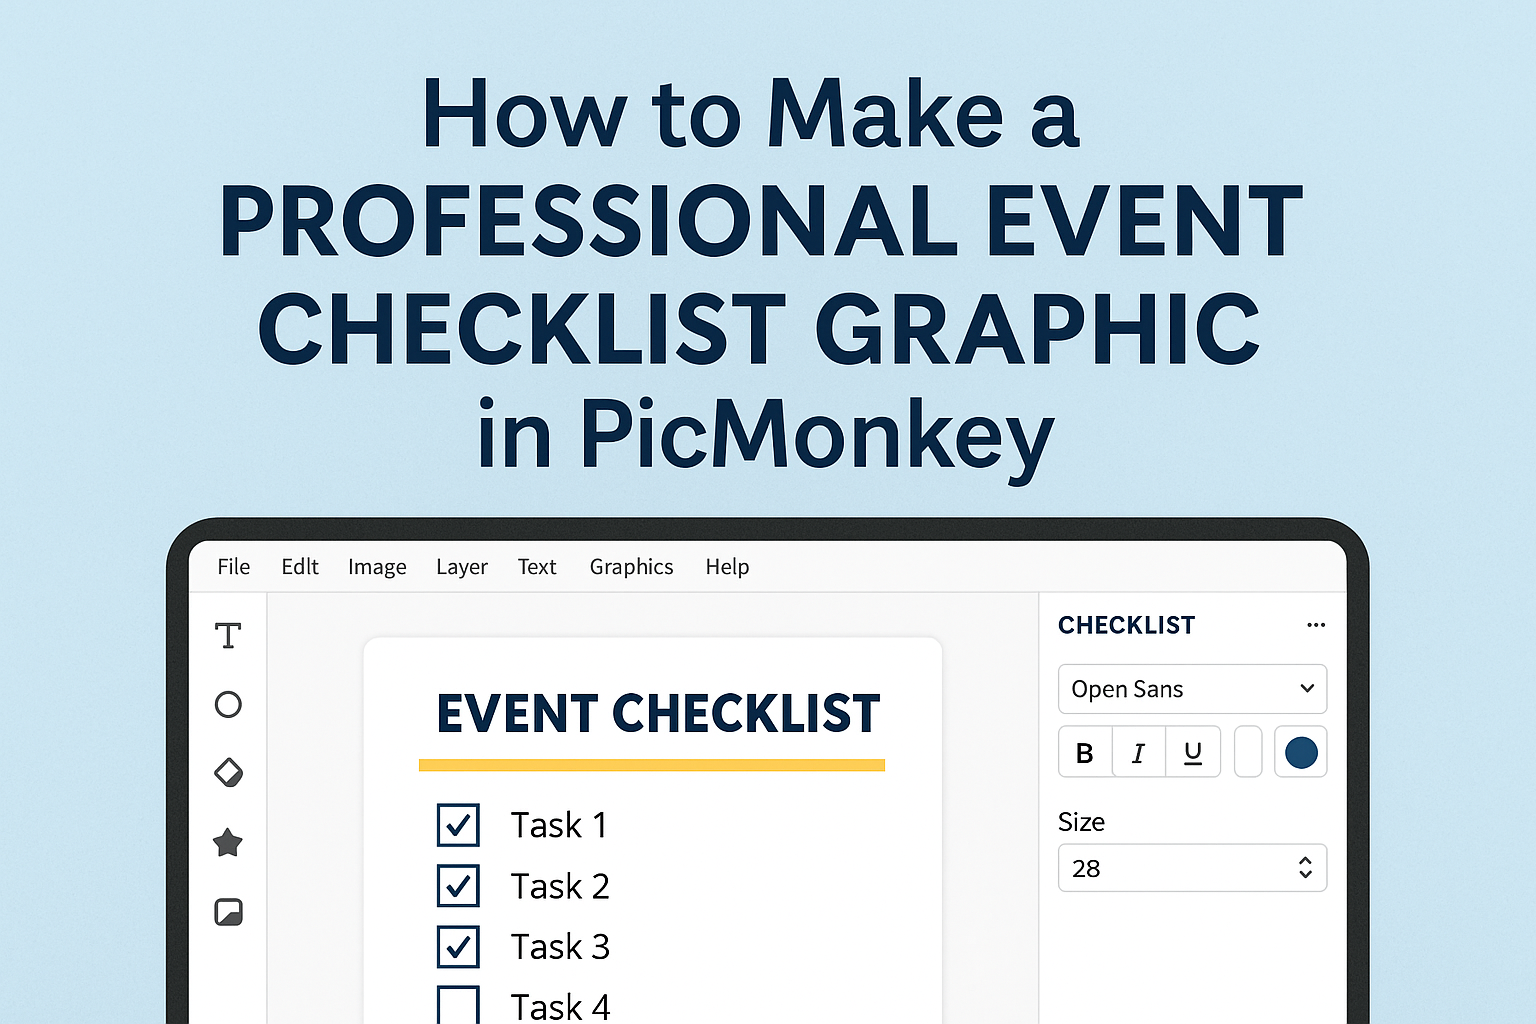
Getting Started with PicMonkey
To begin creating a professional event checklist graphic in PicMonkey, users first need to set up an account and familiarize themselves with the platform.
This section outlines essential steps to help users navigate PicMonkey efficiently.
Creating an Account
Setting up an account on PicMonkey is quick and simple. Users can visit the PicMonkey website and click on the “Sign Up” button.
They’ll have the option to register using an email address or through social media accounts like Facebook or Google.
After providing the required information, users may receive a confirmation email. Following this, they can activate their account and log in. PicMonkey offers a free trial, allowing users to explore features before committing to a subscription.
Once the account is created, it’s time to dive into the platform and explore all the available tools.
Navigating the Interface
Once logged in, users will encounter the PicMonkey dashboard. Here, they can access various design tools and options easily.
The main navigation bar at the top includes key features such as Create New, My Projects, and Templates.
On the left side, there are panels for Background, Graphics, Text, and more. Each panel provides a range of options for customization.
For beginners, it’s helpful to hover over the icons to reveal tooltips that explain each feature.
Users can easily switch between panels to find the right tools. This helps streamline the design process, making it easy to create eye-catching graphics for event checklists.
Selecting the Right Template
Choosing the right template is a critical step in creating an event checklist. PicMonkey offers a variety of templates that cater to different themes and styles.
Users can browse the templates by clicking on the “Templates” tab.
To find a suitable checklist design, users can use keywords related to their event when searching. Whether it’s a wedding, conference, or birthday party, there’s likely a template that fits the occasion.
Once a template is chosen, it can be easily customized. Users can change colors, add graphics, and insert text to make the checklist their own. This flexibility ensures that each checklist can reflect the user’s unique style and needs.
Designing Your Event Checklist
Creating a visually appealing event checklist enhances organization and clarity. Key aspects to consider include adding text and typography, utilizing design elements, and incorporating branding to make the checklist effective and engaging.
Adding Text and Typography
Text is the backbone of any checklist. It needs to be clear and easy to read.
Choose fonts that match the tone of the event; a sleek font suits corporate events while a playful font works for casual gatherings.
Using bold text for headings can help items stand out. Consider varying font sizes to create a hierarchy. For example, major sections can use larger text, while details use a smaller size.
Maintain ample spacing between lines and around text areas. This practice minimizes clutter and helps the reader quickly find necessary information. Avoid overly decorative fonts that may reduce readability.
Utilizing Design Elements
Design elements can bring a checklist to life. Color plays a crucial role in creating interest.
Use a consistent color palette that aligns with the event’s theme. For example, bright colors can energize a fun event, while muted tones suit a formal occasion.
Shapes and icons also enhance understanding. Using checkboxes or bullet points allows easier tracking of tasks. Visual elements like arrows can guide the reader’s eye through the list smoothly.
Additionally, consider using dividers or backgrounds to separate sections. This spacing helps prevent overcrowding and allows for quick navigation through the checklist.
Incorporating Branding
Branding is essential for a professional look. Including a logo at the top of the checklist reinforces brand identity. It also sets the tone for the event.
Colors from the brand should be reflected throughout the checklist. This consistency creates a cohesive feel. Use the brand’s fonts, if available, to further enhance this aspect.
Finally, ensure that all items in the checklist reflect the brand’s voice and values. This consistency not only builds recognition but also fosters trust with participants.
Finalizing and Exporting
This section covers crucial steps to ensure that your checklist graphic looks its best before sharing it. Careful review and the right export settings help maintain quality and functionality.
Reviewing Your Design
Before exporting, it is essential to review the design thoroughly.
He should check for any spelling errors, ensure that all elements are aligned, and confirm that the colors look vibrant.
Using the zoom feature helps spot smaller details that may need adjustment. Consider asking a friend or colleague for feedback; a fresh set of eyes can often catch issues that might have been overlooked.
It’s also wise to ensure that the checklist format is user-friendly. All items should be easy to read and visually distinct. This step can enhance the overall effectiveness of the graphic.
Exporting the Checklist Graphic
Once the design is polished, it is time to export the graphic.
He should select the appropriate file format based on need. For digital use, PNG or JPEG formats are suitable. They provide good quality while keeping file sizes manageable.
If the checklist will be printed, exporting as a PDF ensures that it retains high resolution.
He can access the export options in PicMonkey by clicking on “Download” in the top right corner.
Before finalizing the export, double-check the dimensions.
The size should match the intended use, whether for social media or a physical handout.