Creating custom patterns in Procreate becomes a breeze when you use the Drawing Guide feature. The Drawing Guide offers various tools and settings that help perfectly align and repeat elements, making it ideal for pattern creation.
Whether you’re a seasoned digital artist or just starting, the possibilities are endless with Procreate’s features. From aligning motifs to ensuring seamless repeats, this tool allows users to refine their designs effortlessly. This guide will cover all the basics, ensuring every reader feels confident enough to dive in.
In this article, artists will discover tips and tricks to make the most of Procreate’s features. They’ll learn how to use symmetry, grids, and assisted drawing functions. By understanding these tools, anyone can create patterns that stand out and showcase their unique style.
Getting Started with Procreate
Starting with Procreate is an exciting journey for digital artists. They’ll explore its intuitive interface, organize their artwork, and learn how to begin a project with ease.
Understanding Procreate’s Interface
The interface of Procreate is designed for simplicity and efficiency. At the top, users can find tools like the brush library, color picker, and layer options. These are essential for creating and editing artwork.
On the left, the sliders control brush size and opacity, allowing quick adjustments while working. The bottom section holds the time-lapse feature and other settings, which are useful for reviewing or sharing work. Getting familiar with these locations helps artists navigate Procreate with confidence and speed.
Navigating the Gallery
The Gallery in Procreate is where all artworks live. Users can view and organize their projects here. By tapping the “+” icon, they can create a new canvas or import images.
Organizing projects is simple with the ability to make stacks. Artists can group related projects together for easy access. Additionally, artworks can be shared or duplicated directly from the Gallery, which streamlines workflow and backup processes.
Setting Up a New Canvas
Setting up a new canvas is the first step to bringing ideas to life. Procreate offers several templates, or users can create a custom size. The dimensions, DPI, and color profile can be adjusted to suit different needs.
To start, tap the “+” button in the Gallery. Users can then select a canvas size or enter custom values. Higher DPI is recommended for projects that require high resolution, like printing large art pieces. This customization ensures each artwork is created under the best conditions for its intended purpose.
Exploring the Drawing Guide
The Drawing Guide in Procreate offers tools like grids, symmetry, and perspective that make artwork creation smoother. Knowing how to access these tools and understanding their features can help artists enhance their designs.
Accessing the Drawing Guide
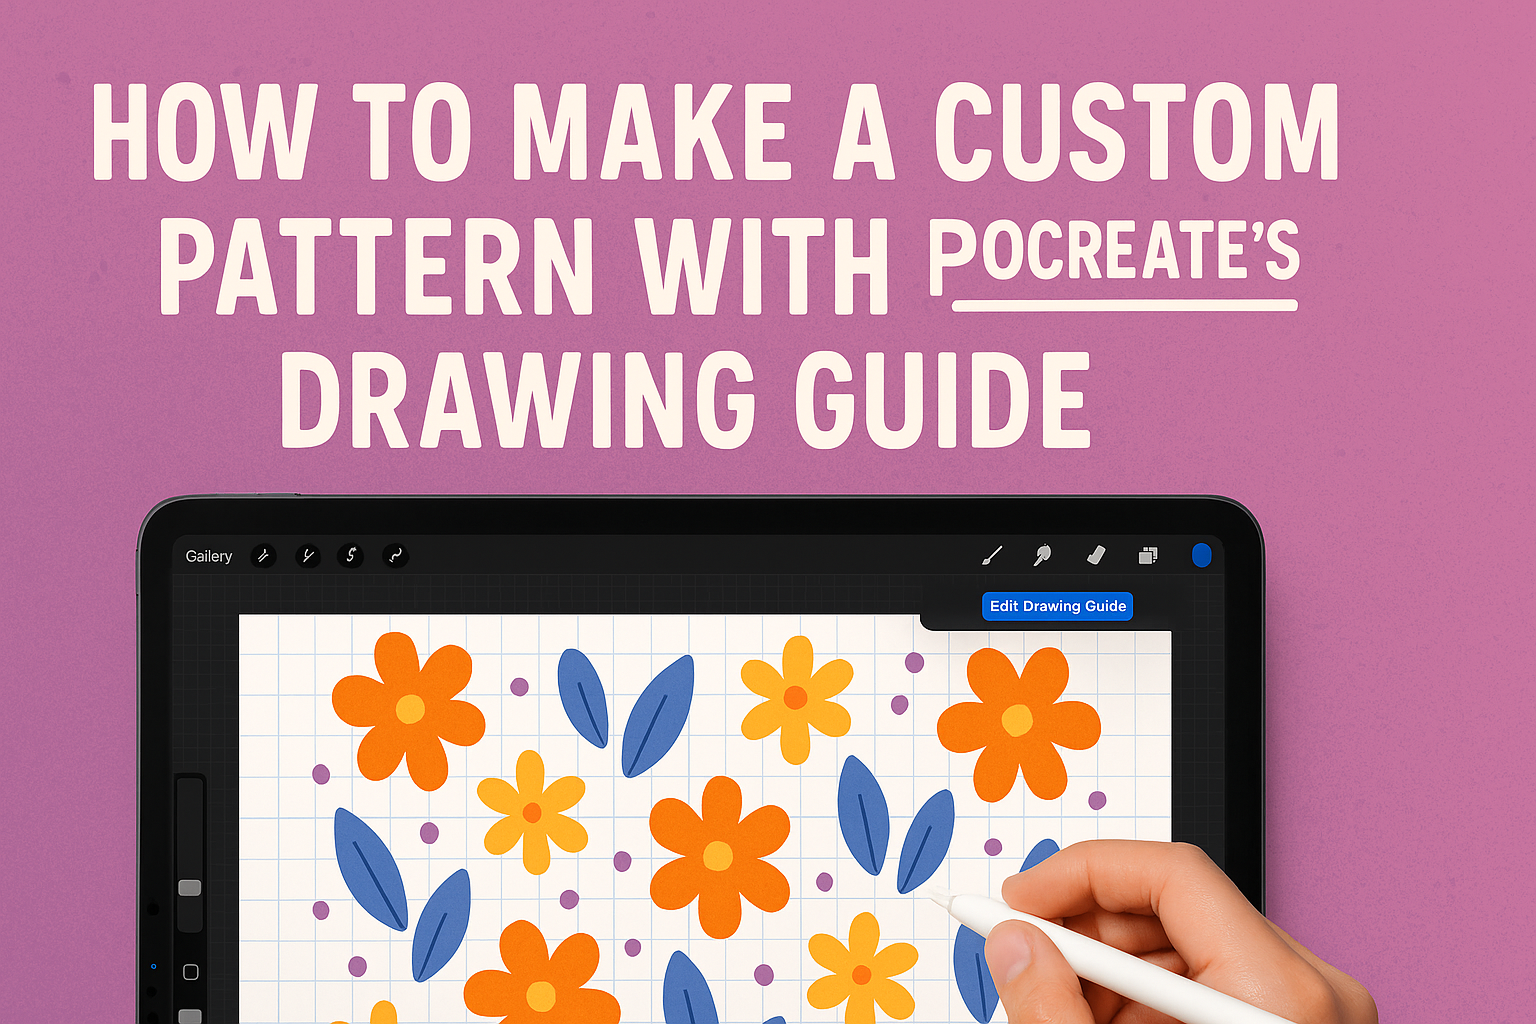
To use the Drawing Guide in Procreate, you first need to open the Actions Menu by tapping on the wrench icon. Once there, go to the Canvas tab. Here, you’ll find the option to toggle on the Drawing Guide.
After enabling it, tap on Edit Drawing Guide to choose from different grid options like 2D, isometric, and perspective. Each option offers unique benefits, allowing artists to craft pieces with precision.
Assisted Drawing can be turned on from the same menu, helping with tasks like perfecting symmetry or keeping lines straight. This tool is especially handy for those who want to maintain consistent designs.
Overview of Drawing Guide Features
Procreate’s Drawing Guide is packed with choices. The 2D Grid gives a simple square pattern, perfect for basic alignment. The Isometric Grid offers a three-dimensional feel, ideal for designers working with more geometric shapes.
The Perspective Guide lets users set up to three vanishing points, which is crucial for drawing with depth. Meanwhile, the Symmetry Guide provides options for drawing mirrored designs effortlessly, which is great for creating balanced artwork.
Artists can practice different styles using these guides. Adjusting settings to fit individual project needs enhances creativity and accuracy in artwork. The versatility in these guides empowers artists to explore more complex techniques with ease.
Creating Basic Shapes
Making basic shapes in Procreate requires some simple techniques that make designing easier and more precise. This part covers the use of QuickShape for creating perfect geometric forms along with assisted drawing tools for enhanced control.
Using QuickShape for Precision
Procreate’s QuickShape tool is perfect for drawing precise shapes. When drawing a line or shape, holding down the stylus will automatically create a perfect line or shape. This is great for making circles, squares, and other basic shapes with ease.
To use QuickShape, start by drawing a rough shape. Without lifting the stylus, hold it still at the end of the stroke. Procreate will automatically snap the shape to a perfect version of itself. You can edit the shape further by tapping “Edit Shape” at the top of the screen.
This tool helps in making sure your shapes are symmetrical and well-formed. It saves time and reduces the hassle of getting lines just right.
Employing Assisted Drawing
Assisted drawing in Procreate lets artists create shapes with more support using tool features like symmetry and guides. To use assisted drawing, go to the spanner icon and turn on the Drawing Guide.
Once the guide is on, tap “Edit Drawing Guide” to choose options like symmetry or grids. For basic shapes, symmetry aids in creating uniform and mirrored images easily.
Employing assisted drawing ensures better alignment and proportions. It’s useful in keeping design elements consistent across the canvas. By setting up grids and lines, you can create the shapes you need without worrying about uneven edges or slants.
Custom Pattern Design
Creating a custom pattern in Procreate involves imagining your design and laying down a strong base. These steps ensure that the final pattern is both unique and visually appealing.
Conceptualizing Your Pattern
When coming up with a new pattern, it’s important to start with a clear idea. Think about the theme or emotion you want to capture. Is it a floral design or something abstract?
Gather inspiration from your surroundings or materials like books and online galleries. Creating a mood board can help you organize your ideas visually. This can include colors, textures, or similar patterns that inspire you.
Don’t rush this step. Spend time noting all the elements you want in your pattern. A strong concept will guide you throughout the design process, making each decision easier.
Sketching the Pattern Base
Once you have a strong concept, move on to sketching. Start with a simple base in the center of your canvas. This helps in maintaining balance. Use Procreate’s layers to help organize elements.
When beginning your sketch, consider using Procreate’s drawing aids like grids or the symmetry tool. These can make repetitive designs easier to execute.
Adjust the transparency to layer guides, giving you a clear overview of what works and what doesn’t. Experiment with shapes and lines. The goal is to create a base ready for colors and more intricate details.
By refining sketches with layers and tools, you set up a solid foundation for a standout custom pattern.
Adjusting the Drawing Grid
To make the most of Procreate’s drawing features, it’s essential to know how to adjust the grid. This involves altering grid size and spacing as well as modifying its opacity and color.
Changing Grid Size and Spacing
To adjust the grid size and spacing, users start by accessing the Drawing Guide through the Actions menu. Once there, they can select “Edit Drawing Guide” to display several options.
Sliders at the bottom of the screen will let them change the grid size. This can help when creating patterns that need precise alignment.
Adjusting the spacing involves moving these sliders to determine how far apart lines appear on the canvas. Experimenting with these settings can ensure elements are perfectly aligned, crucial for pattern making.
Modifying Grid Opacity and Color
Modifying the grid’s opacity and color involves a few simple steps. Once the Drawing Guide is active, users can return to “Edit Drawing Guide” to explore these options.
Opacity is controlled using another slider. Adjusting this helps the grid blend with the artwork or stand out more visibly. This can be vital when working with varied background colors.
For the grid color, Procreate offers a palette to choose from. Selecting different colors can improve visibility against the canvas, depending on the shades in the artwork. By customizing these aspects, users can enhance their creative process with clearer visual guidance.
Utilizing Layers for Patterns
Using layers effectively in Procreate can enhance the creation of custom patterns. Layers allow for flexibility in designing complex patterns, enabling artists to adjust elements without altering other parts.
Working with Multiple Layers
Layers in Procreate help organize different pattern components. Each layer can hold individual elements, such as shapes, lines, or textures. By keeping elements on separate layers, artists can easily modify parts without disturbing the entire design.
When creating a pattern, start by analyzing which elements should be isolated. For instance, background, main design, and detailing can each have their own layer. This separation enables quick changes, like adjusting colors or opacity without affecting other sections. Utilizing the Pattern Maker Canvas and Brushset simplifies this process.
Grouping layers is another useful feature. By selecting multiple layers and grouping them, one can apply transformations to all elements within the group simultaneously. This helps in maintaining alignment and consistency when scaling or rotating patterns. Artists can also duplicate groups to experiment with variations while keeping an original backup for reference.
Merging and Adjusting Layers
To streamline a pattern design, merging layers can be helpful. Merging combines selected layers into one, making it easier to manage complex designs after careful adjustment. This step is ideal when certain elements are finalized and no longer need individual tweaks.
When merging, ensure that layer contents are aligned properly to avoid any misplacements. Artists can merge layers by pinching them together in the layers menu. Sometimes, blending modes are used to create unique effects; however, merging might alter these effects, so it’s wise to duplicate layers first.
Adjusting layers is straightforward in Procreate. By selecting a layer, one can transform its placement, size, or rotation using the Freeform or Uniform options. This flexibility ensures that each pattern component can be arranged precisely where needed. Regular adjustments during the design process help in fine-tuning the overall appearance, ensuring the pattern looks cohesive and visually appealing.
Refining Your Pattern
Creating a custom pattern in Procreate is exciting, but refining it is key for polished results. This involves precise editing, clever erasing, and the use of color and texture to enhance the design.
Erasing and Editing Techniques
Refining a pattern starts with careful erasing and editing. Artists should use Procreate’s eraser tool with adjustable brush sizes for precision. This allows them to remove unwanted parts of the design without affecting other areas.
Using layers is crucial for non-destructive editing. By keeping different elements on separate layers, changes can be made easily without risking the whole design. Transform tools like scale and rotate help adjust motifs interactively, providing flexibility in refining the overall pattern structure.
Adding Color and Texture
Color and texture bring a pattern to life. By experimenting with the color wheel, users can find the right hues to make their pattern pop. Procreate offers a variety of brushes that add texture, giving depth and interest to the design.
Layering colors and textures intelligently adds sophistication. For example, using a soft brush to apply shadow can create a three-dimensional effect. Utilizing blending modes can further enhance these effects, letting colors interact in creative ways.
For unique textures, the Procreate Guide suggests using built-in textures or importing custom ones.
Transforming and Distorting Patterns
Procreate offers several tools that make adjusting patterns a breeze. These features help artists move and reshape patterns to fit their creative vision. Whether using the Transform tool or applying warp and distort effects, artists can customize their designs with ease.
Using the Transform Tool
The Transform tool in Procreate allows artists to move, scale, and rotate their patterns. It helps adjust the pattern’s size without losing its quality. By tapping on the arrow icon, users can access the Transform options. These include Freeform, Uniform, Distort, and Warp.
When using the Freeform option, patterns can stretch freely in any direction. This is useful for changing the shape without maintaining proportions. The Uniform option keeps the original aspect ratio, making it easy to scale up or down without distortion.
Artists can manipulate the pattern by dragging the blue border corners. They can rotate the design by holding two fingers on the screen and twisting. This tool provides flexibility, making it simple to place patterns exactly where they want.
Applying Warp and Distort
Warp and distort effects truly enhance creativity in Procreate. These features let users bend and twist patterns in unique ways. The Warp feature divides the pattern into a grid, offering precise control over transformation. Each grid point can be dragged to create smoother or more curved lines.
The Distort option, on the other hand, alters the perspective of the pattern. It skews the design diagonally, adding depth or a unique angle. By accessing these from the Transform menu, users can tap into another layer of personalization.
Using these effects helps breathe life and dimension into a pattern. Patterns can wrap around objects or appear in motion, providing a dynamic touch to any artwork.
Finalizing the Pattern
Finalizing a pattern in Procreate requires careful attention to details. Checking for repeats ensures that the pattern flows seamlessly, while exporting it correctly makes it easy to use in various projects.
Checking for Repeats and Flaws
Once the pattern is complete, it’s important to ensure it repeats seamlessly. They should zoom in and out to see how elements align. This step is crucial to avoid any disruption in the pattern flow.
Using grids or drawing guides in Procreate can help spot misalignments. Turn on the drawing guide by accessing Canvas settings. Adjusting the grid size may help see smaller flaws.
Rotating the canvas and checking in layers can reveal any hidden issues. If any flaws are found, they might need to adjust their elements slightly. Sometimes, duplicating layers or using the liquify tool can assist in fixing minor errors.
Exporting Your Custom Pattern
Once you are satisfied with the pattern, the next step is exporting it. First, ensure all layers are grouped correctly. By selecting all relevant layers and grouping them, any unwanted changes during export can be minimized.
To export the pattern, go to the Actions menu, tap Share, and choose a format like PNG or JPEG. These formats retain quality and transparency. It’s essential to check resolution settings, as high resolutions are ideal for printing.
For digital use, lower resolutions can work well. Naming the file clearly can help in organizing and retrieving it later. If shared online or in portfolios, maintaining a professional naming convention is advisable, enhancing the pattern’s appeal.