Blurring the edges of a photo can add a touch of creativity and focus to your images. This simple effect can make your subject stand out or add a dreamy feel to your creation.
In Canva, blurring the edges can be done easily with just a few clicks, making your photos look professional and polished without much effort.
Many people want to blur photo edges for social media, presentations, or personal projects. Canva offers tools that let anyone achieve this effect quickly.
By selecting the photo border and using the “Effects” button, you can apply the blur effect that enhances your images.
Whether you’re a beginner or more experienced, using Canva to blur photo edges can bring your designs to life. If you’re aiming to make your images pop, take advantage of the user-friendly options provided by Canva’s design platform.
Understanding Canva’s Blur Tool
Canva’s blur tool is a simple yet effective feature for enhancing photos by softening the edges. This tool allows users to add an artistic touch to their images while seamlessly blending the photo with its background.
Essentials of Photo Editing in Canva
Photo editing in Canva is designed to be intuitive and user-friendly. Users can access various editing tools directly from the main interface.
These include options for cropping, adjusting brightness, and applying filters. The simplicity of these tools means even beginners can make their photos look professional with little effort.
For those looking to add highlights or focus to specific areas of their images, Canva offers a range of features.
Users can experiment with different techniques without worrying about making irreversible changes. The platform supports non-destructive editing, allowing users to experiment and refine their work.
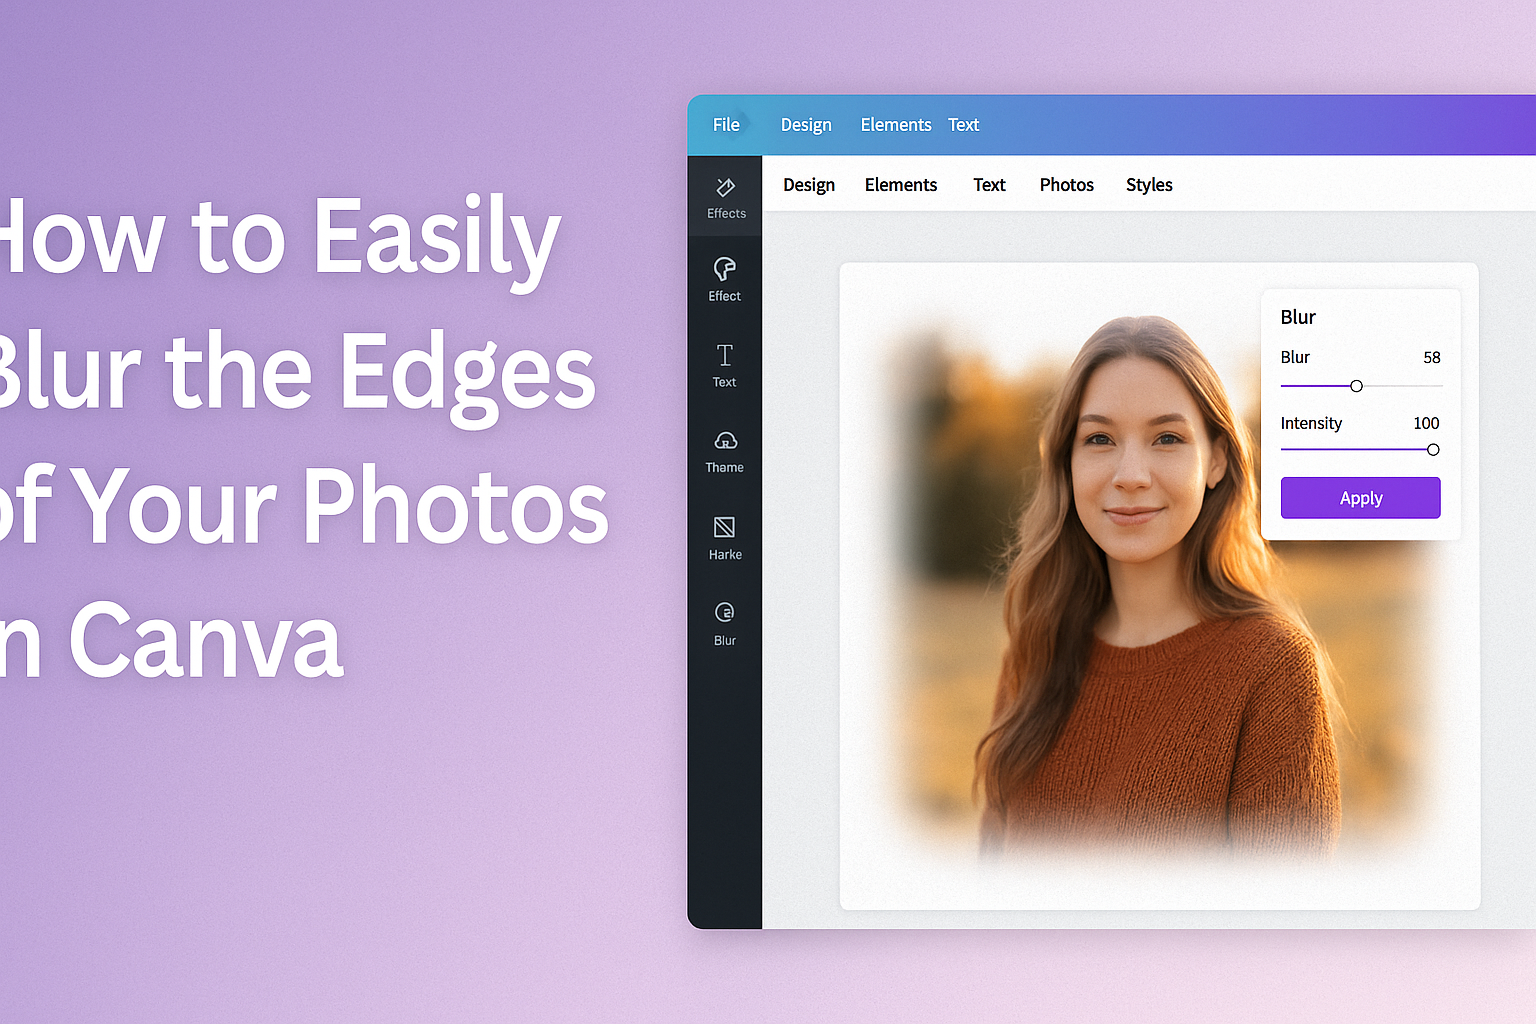
Blur Tool: Basics and Access
The Blur tool in Canva helps users create a smooth transition on the edges of their photos. To blur the edges, users need to select a photo and click on the “Edit Image” option. This opens up the editing suite where various adjustments can be made.
In the suite, users can find the “Blur App” to adjust settings like Intensity, Brush Size, and Spread for more control.
These adjustments allow for either subtle or more pronounced blur effects, catering to different creative needs. For a step-by-step guide, users can refer to How to Easily Blur the Edges of Your Photos in Canva.
Preparing Your Photo for Editing
Before diving into editing, it’s important to upload your image to Canva and choose a photo that will look great with blurred edges. These steps ensure a smooth editing experience and the best results.
Uploading Your Photo
To start editing, upload your photo to Canva. First, log into your Canva account. If you don’t have one, signing up is easy and free.
Once logged in, go to the Uploads section on the left sidebar.
Click the Upload button to select a photo from your device. You can also drag and drop your file directly into the uploads pane. Canva supports popular formats like JPEG, PNG, and GIF.
After uploading, your image appears in the uploads section, ready for use. You can manage your uploads efficiently by grouping similar photos or deleting unwanted files.
Keeping your uploads organized makes it easier to find what you need when editing multiple projects later.
Selecting the Right Photo
Choosing the right photo is crucial for achieving a professional look. Consider using images with defined subjects and plain backgrounds since these highlight the blurred edges better.
A photo with too many details can distract from the main focus.
Look for images with strong color contrasts. This contrast can enhance the blurring effect, making the photo more visually appealing. Having a clear subject also helps the blurred edges create a dreamy look that draws attention.
Experiment with different images to see what works best. Not every photo suits this type of editing, so take your time to find the perfect one.
Remember, the right choice can make your design look polished and intentional.
Applying the Blur Effect
Applying the blur effect to photo edges in Canva is a simple process that can enhance your images beautifully. This involves adjusting the blur’s intensity, customizing the edge blur, and previewing the effect to get just the right look.
Adjusting Blur Intensity
To control how blurred the edges of an image appear, users can change the intensity. This feature allows them to apply anything from a soft focus to a heavier blur.
In Canva, adjust the blur by selecting your image and using the Blur app tool. Users can find blur options under the Effects menu.
Moving the slider one way increases the blur, while the other direction decreases it. Experimenting here helps find the exact level needed to match the design’s style.
Customizing the Edge Blur
When customizing edge blur, Canva offers options for precise control. Users can target only the outer edges of the image by selecting the specific area.
This method keeps the important parts of the picture clear while softening the surroundings.
To customize, first, select your photo. Then, navigate to the Elements Tab and search for the blur tool. Once you have the tool active, adjust the targeting area to suit your design.
This customization ensures that the blur effect aligns with the creative vision.
Previewing the Effect
Before finalizing, previewing the blur effect ensures everything looks perfect. Canva allows users to see changes in real-time, making adjustments easier.
They can toggle between the original image and the edited version, comparing the effects.
By selecting the Preview option, users can view the complete design before downloading or sharing it.
This is a chance to refine the blur effect by going back and tweaking the intensity or edge customization. Seeing the full picture enables users to achieve the desired aesthetic without any surprises.
Advanced Blurring Techniques
Creating blurred edges in Canva can enhance the artistic look of photos. Techniques like layering and using gradients add depth and visual interest, taking photo editing to the next level.
Layering and Depth
Using layers is a powerful way to add depth to photos. Canva allows users to overlay multiple elements, creating a multi-layered effect.
Start by duplicating the image you want to edit. Place the copied layer on top of the original.
Next, adjust the opacity of the top layer to make it semi-transparent. Use the blur tool to soften the edges, creating a seamless blend between the layers.
This technique draws attention to the focal point of the photo while creating a sense of depth and dimension.
Experiment with different elements like shapes or text layers. By carefully choosing which parts to blur, the final image can gain a professional look.
Play with colors to find the best combinations that suit the theme or mood of the photo.
Gradient Blur
A gradient blur offers a smooth transition from sharp to blurred areas.
Start by selecting the photo and opening the blur tool. Instead of blurring the entire edge uniformly, use the gradient tool to apply a variable blur effect.
To create a gradient blur, adjust the blur intensity from high to low across a selected area.
This technique is useful for photos where one part is meant to stand out more clearly while the background subtly fades.
Applying a gradient blur can be useful for focusing on a particular subject. It helps guide the viewer’s eye and adds an artistic flair.
Experimenting with different gradients and intensities will help achieve the desired result, giving each image a unique look while maintaining clarity on key elements.
Creative Uses of Edge Blur
Blurring the edges of your photos in Canva can add an artistic touch. It can bring attention to the main subject and create a pleasing visual effect. Here are some creative ways to use edge blur effectively.
Focus on Subjects
Edge blur can be a great way to make your main subject stand out. By softly blurring the edges, the focus naturally shifts to what matters most in the image.
This technique helps guide the viewer’s eyes directly to the subject.
Photographers often use this method to highlight people or objects. For example, in a portrait, blurring the edges can make the person’s face appear sharper and more prominent.
This approach is useful in any photo where you want an element to be the clear focal point.
Creating a Vignette Effect
The vignette effect is a classic way to give photos a dreamy feel. Softly blurring the edges can help mimic this effect, providing a gentle fade around the corners of the image.
This effect can create a sense of depth and draw the viewer in.
In Canva, you can apply this by using the blur tool to gradually soften the edges. This works well for landscape photos or any image where you want to add a touch of nostalgia or drama.
The result is subtle yet powerful, adding to the image’s story.
Background Blurring for Text Readability
When placing text over a photo, clarity is key. Blurring the background edges can make text easier to read by reducing visual noise.
This technique is especially useful in posters or social media graphics where words need to stand out.
To achieve this in Canva, slightly blur the areas surrounding the text. This ensures the text remains the primary focus without distractions from the background.
It’s a simple trick that can enhance the overall design, making sure your message is delivered clearly and effectively.
Final Touches and Exporting
Once the edges of a photo are blurred in Canva, the next steps are making overall adjustments to enhance the image and then saving and downloading the final product. These steps ensure the photo looks its best before sharing or printing.
Applying Overall Adjustments
Before exporting, users may want to fine-tune their photos. Canva offers tools for adjusting brightness, contrast, and saturation.
Editing these settings can highlight important features of the image. A little brightness can make the photo appear more vibrant, while a slight contrast boost can help details stand out.
Users can experiment with saturation to enhance or mute colors according to their preference.
Additionally, Canva provides filters that can add style to photos. For images that need a cohesive look, trying various filters is key.
Each filter can change the mood or tone, so choosing one that fits the photo’s theme is important.
Saving and Downloading Your Edited Photo
After adjustments, exporting the photo is the final step. Canva makes this process simple.
Begin by clicking the “Share” button at the top. From there, choose “Download” to access format options like PNG or JPEG.
For most users, PNG is ideal due to its high-quality output. Users can select the image size and quality.
For web use, a smaller size might be sufficient, but for printing, a higher resolution is advisable. Once settings are finalized, clicking “Download” saves the photo to the device, ready for any use.