Master page templates in Adobe InDesign can make design work fast and easy. They serve as the backbone for document design, allowing users to add consistent elements like headers, footers, and page numbers across multiple pages. To create and edit master page templates, users simply double-click the desired master icon in the Pages panel.
By using master pages, individuals can ensure that common design elements are aligned and consistent throughout the entire document. This saves time and enhances the professional look of the final product. Learning to edit a master page is a simple process and can significantly improve productivity.
Anyone working on multi-page documents such as magazines or brochures will find master pages a crucial tool. Users can start by adding various design elements to these templates and watch as InDesign updates all the relevant pages automatically. It’s a game changer for those looking to streamline their design process.
Understanding Master Pages in Adobe InDesign
Master pages are like templates in Adobe InDesign. They let users add consistent elements to multiple pages in a document. For example, if someone wants the same header, footer, or page number on each page, they can create these on a master page.
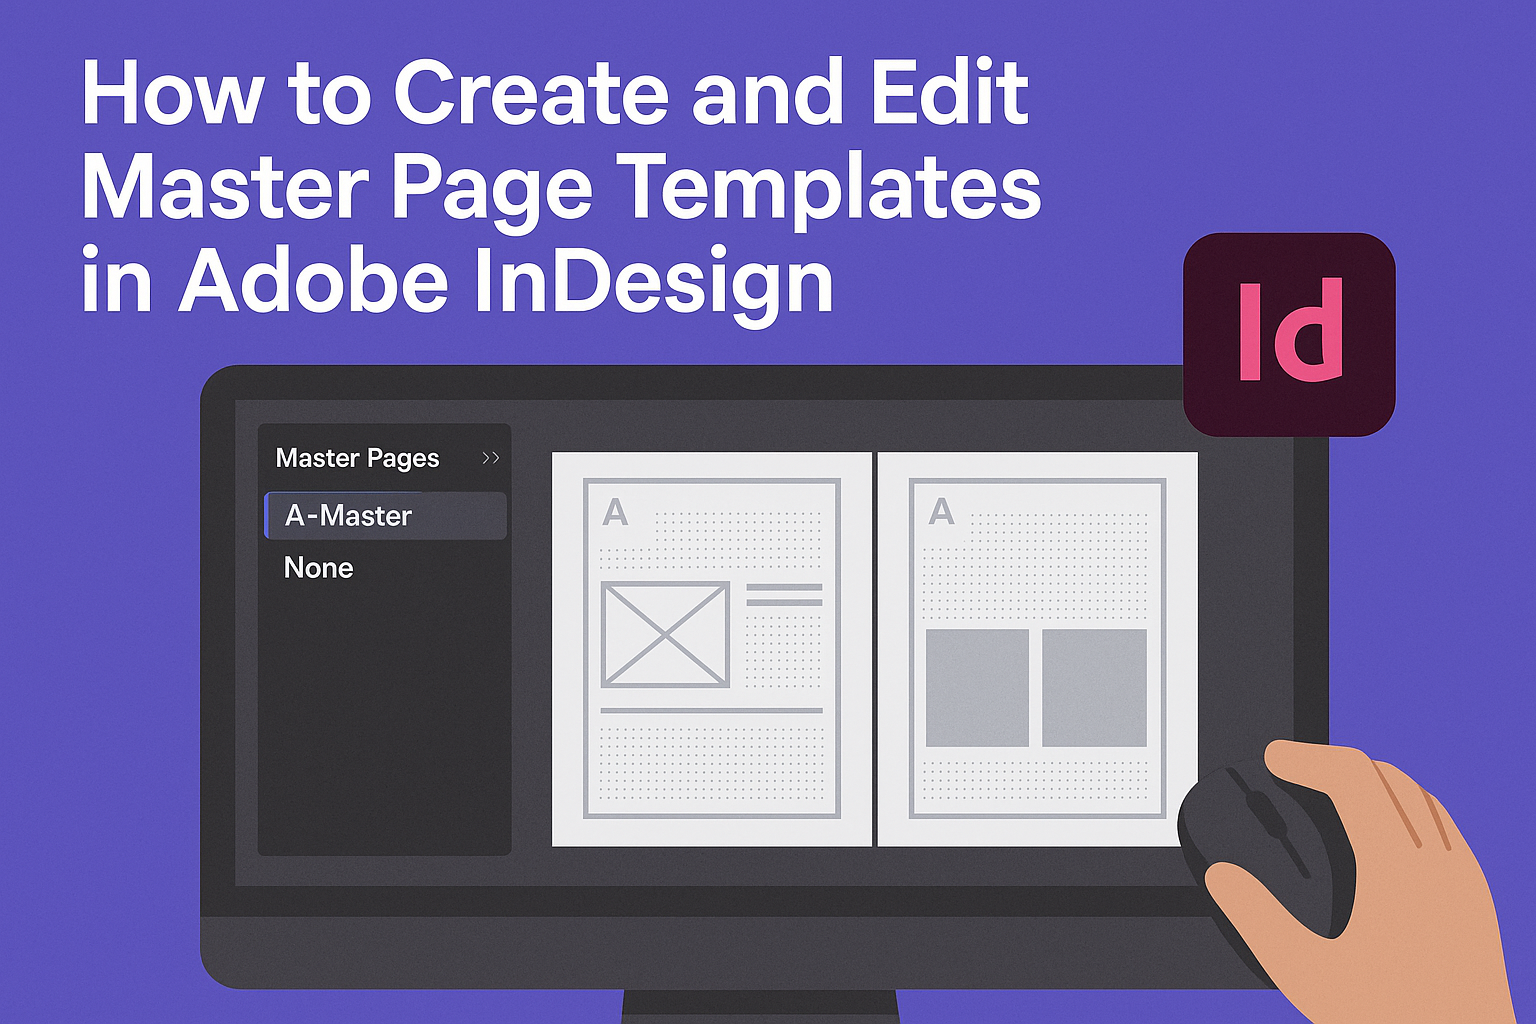
InDesign’s Pages panel is the place to find and work with master pages. To edit a master page, one can double-click on the desired master, often labeled with something like “A-Master.” Changes made here update all pages using that master.
Here’s a simple list of what users can do with master pages:
- Add elements like text or images
- Set up guides and grids for alignment
- Create a consistent layout across different pages
When someone is ready to apply a master page, they can simply drag it onto a page thumbnail in the Pages panel. This action applies the master’s layout to that specific page.
If modifications are needed later, updating the master page will automatically reflect on all associated pages. This makes it easy to manage large documents, saving time and maintaining consistency.
For more in-depth help, Adobe offers guides, such as their page on how to use parent pages in InDesign. Another useful guide is on creating and editing master pages, which explains how to set them up efficiently.
Setting Up Your Document
Getting started with Adobe InDesign requires setting up your document correctly. This includes selecting settings that match your project needs, organizing your layout with margins and columns, and using layers for easy management. These steps ensure a smoother design process and a more polished final product.
Choosing the Right Document Settings
When setting up a new document in Adobe InDesign, it’s essential to choose the proper settings from the start. These settings include the correct page size, orientation, and number of pages. If you’re designing for print, consider options like bleed and slug. Bleed allows images or background colors to extend beyond the edge of the page, preventing white edges after trimming.
In the New Document window, set your desired units of measurement. Consider the purpose of your document. For example, a brochure might demand a landscape orientation and a wider page format. Understanding the project’s end-use will guide these choices. Also, set the number of columns and margins for initial guidance, which can be adjusted later.
Working with Margins and Columns
Margins and columns help organize content on the page, making your design cleaner and more readable. Begin by setting the margins to define the printable area and leave space between text and the page edge. InDesign allows the flexibility to set uniform margins or different sizes for each side.
Next, determine the number of columns you need for your layout. Columns help align text and images consistently across pages. For a standard newsletter, two or three columns are common. However, a catalog might need more to fit detailed descriptions and images. Columns also create a structure for placing text frames and objects neatly.
Creating Layers for Better Organization
Using layers in InDesign helps manage complex documents with multiple elements. Layers allow you to separate content types, such as text, images, and guides. This separation keeps the workspace uncluttered and makes editing easier. You can lock layers or hide them temporarily to focus on specific elements without distraction.
To create layers, open the Layers panel and click the “New Layer” button. Give each layer a descriptive name, indicating its content, like “background,” “text,” or “images.” By organizing elements into layers, designers can work more efficiently. This approach enhances productivity, especially in projects requiring frequent updates or changes.
Creating Your First Master Page
Creating a master page in Adobe InDesign allows users to establish a consistent design throughout a document. This process includes accessing the master pages panel, adding key elements, and utilizing placeholders for text and images.
Accessing the Master Pages Panel
To get started, users need to open the Pages panel. This panel can be accessed by navigating to Window > Pages in the top menu. In the Pages panel, master pages appear at the top section. Each document typically comes with a default A-Master. Double-clicking on the A-Master will open it in the main workspace.
Master pages serve as templates, enabling users to apply uniform elements across multiple pages. This approach saves time and ensures design consistency. Users can create new master pages or modify existing ones to fit the project’s needs.
Adding Basic Elements to the Master Page
Once the master page is open, it’s time to add consistent elements like headers, footers, and page numbers. These components help maintain a uniform look throughout the document. Text boxes and shapes can be added using the tools available in the toolbar.
For instance, creating a header might involve inserting a text box and typing the required text. Design elements such as lines and shapes can be added to enhance the layout. Adjusting the position and styling of these elements on the master page ensures they are correctly placed on all corresponding document pages.
Using Placeholder Text and Images
Using placeholders is an efficient way to set up areas for text and images on a master page. This way, users can customize specific content on individual pages while keeping the layout consistent. Placeholders can be added by inserting text frames and image frames where needed.
These frames act as temporary containers that can be overridden with actual content on individual pages. Using parent pages helps automate updates. Once text and images are added to placeholders, they can flow automatically, keeping the document cohesive and aligned with the design template.
Editing Master Page Templates
Master pages in Adobe InDesign allow users to make consistent changes across multiple pages efficiently. This section covers how to access, adjust, and customize master page templates to fit specific needs.
Navigating to the Master Page Spread
To edit a master page, users start by opening the Pages panel, which they can find under the Window menu. In the Pages panel, master pages are usually listed in a separate section labeled “Master Pages.” They typically have a prefix, such as “A-Master.”
By double-clicking on the desired master page name or icon, the master spread will open in the document window. This action allows users to view and edit the existing elements on the master page. Users can quickly move back to document pages by selecting them from the Pages panel.
Adjusting Layout and Design Elements
Once on the master page, users can begin modifying the layout and design elements. Common adjustments include changing margins, adding or deleting text frames, and inserting graphic elements. These changes will automatically apply to all pages that use that master template.
To keep design elements consistent, users might include headers, footers, or page numbers. Each element on a master page will reflect across every associated document page, making it easy to ensure uniformity in a project. Using InDesign’s master pages can streamline the design process by allowing for easy updates.
Overriding Master Items on Document Pages
Sometimes, it’s necessary to tweak specific pages without affecting the master layout. To do this, users have the option to override master items on particular document pages. They can achieve this by going to the document page, holding down the Shift + Ctrl (or Shift + Cmd on Mac), and clicking on the item they want to change.
This action will unlock the item from the master page, allowing for individual edits on that page only. This technique is helpful for making unique adjustments while maintaining an overall cohesive design. Applying these steps can enhance customization options while leveraging the benefits of master pages efficiently.
Advanced Master Page Techniques
InDesign’s master pages offer powerful tools for designers looking to enhance their workflow. Creating variations, linking master pages, and using automatic page numbering can significantly boost efficiency and consistency in any project.
Creating Multiple Master Pages for Variations
Designers often need different layouts for different sections of a publication. InDesign allows the creation of multiple master pages to meet these needs. By using the Pages panel, users can easily set up unique master pages for various designs, such as chapter openers or section dividers.
Consider using different elements like text frames, images, or color schemes to differentiate these master pages. Flexibility is key, as each master page can be tailored to fit specific requirements. This feature helps keep designs organized while allowing room for creativity.
A well-organized Pages panel will make managing multiple masters much easier. Users can quickly apply any of these master pages to document pages, streamlining the design process. Overall, setting up multiple master pages adds versatility to any InDesign project.
Linking Master Pages for Efficiency
Master pages can be linked to maintain consistency across related designs. This technique is useful when working on large projects with repeated elements. By creating a parent master page and linking child master pages, changes made on the parent reflect across the linked child pages, ensuring uniformity.
To do this, users simply drag elements from one master page to another in the Pages panel. This keeps linked elements synchronized. For example, if the footer style changes, updating it on the parent master will apply changes to all linked pages, saving time and effort.
This method simplifies management and provides consistency without manual updates. For those handling complex documents, linked master pages are a time-saver, maintaining a cohesive look throughout.
Applying Automatic Page Numbering
Including automatic page numbering in a layout is simple yet powerful. By using text frames in the A-Master or any other master page, users can insert a special character for page numbers through the Type menu. This feature saves time and minimizes errors when pages are added or removed.
With automatic numbering, every page that uses the master will display the correct number, updating automatically as layout changes. Customize the number styling to suit the design, ensuring the final product is both attractive and precise.
This tool is especially useful in long documents like books or magazines. The efficiency it brings makes maintaining large publications much more manageable.
Applying Master Pages to Document Pages
Applying master pages in Adobe InDesign helps maintain consistency across your document. This section covers how to assign these templates to specific spreads, use the ‘Apply Master to Pages’ dialog box, and manage any overrides needed.
Assigning Master Pages to Spreads
Assigning a master page to a spread ensures that elements like headers, footers, or page numbers appear consistently. To do this, users can open the Pages panel. Next, they should select the master page they want and drag it onto the document’s spread.
This method is quick and visual, making it easy to see what changes will be applied. If the document has facing pages, it’s crucial to ensure the master page fits the spread’s layout. Doing this ensures that each page looks coherent with the rest.
Using the ‘Apply Master to Pages’ Dialog Box
The ‘Apply Master to Pages’ dialog box provides an alternative method for applying master pages to specific document sections. To access it, users should right-click on the desired page or spread in the Pages panel and choose ‘Apply Master to Pages.’
In this dialog box, select the appropriate master from the list. Users can enter specific page numbers to apply masters precisely. This method is beneficial for large documents where only certain sections need uniform elements. It saves time compared to dragging and dropping individual masters onto each spread.
Managing Master Page Overrides
Sometimes, individual pages need slight alterations despite using a master page, known as overrides. To manage these, users can click on the page in question and edit the specific element. This process allows for unique page features while keeping most master elements intact.
It’s crucial to be mindful of what is overridden, as too many changes might disrupt the document’s overall uniformity. Users can always revert any overridden elements back to the master settings by using the ‘Remove Selected Local Overrides’ option. This helps in maintaining the initial layout intention while offering page-specific flexibility.
Best Practices for Master Page Design
Consistency is key when designing master pages in Adobe InDesign. By creating a uniform style, designers can ensure that all pages in a document have a cohesive look and feel.
Use guides and grids to keep text and images aligned. This helps maintain a clean and organized layout. Guides are especially useful for keeping margins and columns in check.
Consider setting up text styles for headings, subheadings, and body text on your master pages. This makes it easy to apply consistent typography across all pages. Changes to a style on the master page will automatically update in the document.
Incorporate repeating elements, such as logos and page numbers, on the master pages. This eliminates the need to manually add these elements to each page, saving time and reducing the risk of errors.
Make use of nested master pages if different sections of a document require slightly different layouts. This allows for flexibility while keeping the overall design consistent.
Remember to keep your design simple. Overloading your master pages with too many elements can make them cluttered and difficult to navigate.
Lastly, test the changes by applying your master pages to sample document pages. This helps ensure everything looks as expected before making final adjustments.
Troubleshooting Common Master Page Issues
When working with master pages in Adobe InDesign, users may encounter a variety of issues. Addressing problems with automatic numbering, overridden elements, and layout inconsistencies is crucial for a smooth design process. This guide provides practical solutions for each of these common issues.
Dealing with Automatic Numbering Problems
Automatic page numbering can sometimes be tricky. Users often find numbers missing or repeating incorrectly. To address this, it’s essential to ensure proper placement of the page number marker on the master page. Make sure it’s within a text frame and not on locked layers.
If numbering skips or duplicates, check that master pages are correctly applied to your document pages. Verify that sections are set up properly in the document panel. Selecting each section and ensuring that numbering starts in sequence can often fix these issues. Also, look for conflicting numbering styles between sections.
Formatting consistency is key. Make sure that the text frame containing the page number is formatted uniformly across the master pages, utilizing the right character and paragraph styles to avoid mismatches.
Resolving Overridden Elements Difficulties
Dealing with overridden elements involves eliminating unwanted changes. When master page items are unintentionally overridden, they can disrupt the design. To prevent this, it’s crucial to recognize when an element is accidentally overridden.
Ensure you hold down Cmd+Shift (Mac) or Ctrl+Shift (Windows) while clicking the element if you intend to release it from the master. If changes happen accidentally, clear overrides by reapplying the master page, which can correct unintentional alterations to key elements.
It’s helpful to check that the layers containing master elements aren’t locked. By doing so, users can easily reset the layout to its original state. Consistent use of layers can minimize accidental overrides.
Fixing Layout Inconsistencies Across Pages
Layout inconsistencies can be frustrating, especially when master page elements don’t appear uniformly.
To address this, first check the application of master pages. Confirm that the correct master is applied to each relevant page to ensure consistency.
Make sure elements are aligned properly using InDesign’s alignment tools found in the panel. Adjusting the alignment can solve many layout problems, such as elements not matching across pages.
Verify that the size and position settings remain the same on each page.
Use parent pages when creating templates for different sections. This allows for nested master pages, providing a consistent framework while accommodating specific design variations within each section.