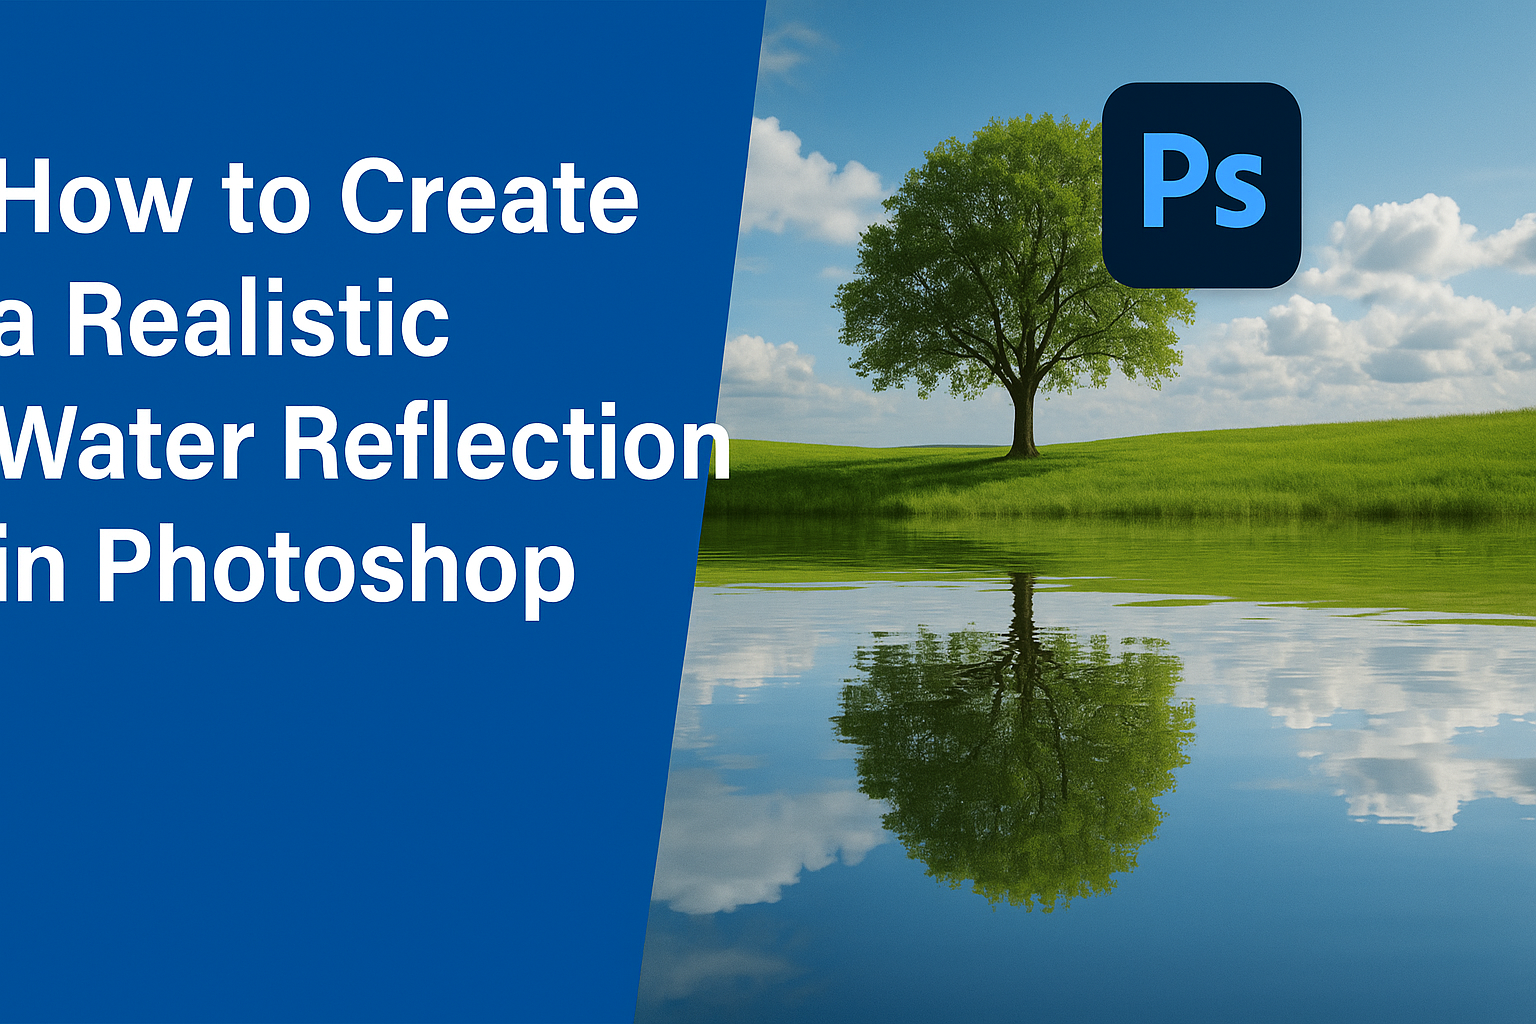
Photoshop is a powerful tool for creating stunning visual effects, and one of the most captivating is a realistic water reflection. Creating a realistic water reflection in Photoshop involves using techniques like layer duplication and transformation to simulate the reflection. This effect can add depth and interest to any photo, transforming an ordinary image into something extraordinary.
Water reflections can be a fun project for anyone interested in digital art. By experimenting with tools such as the Transform tool and adjustments for ripples and lighting, one can achieve a reflective effect that looks natural. Whether it’s a serene lake or a bustling cityscape, reflections can bring a scene to life.
Some tutorials provide step-by-step guidance on mastering this effect. As photographers and designers explore water reflections, they can learn different strategies to enhance their skills. Adding these techniques to a design toolkit can significantly elevate the quality of photo edits, offering endless creative possibilities.
Understanding the Basics of Photoshop
Photoshop is a powerful tool for editing images. It is essential to familiarize yourself with the interface and learn how to manage layers effectively. Mastering these basics will provide a solid foundation for more advanced techniques like creating realistic water reflections.
Navigating the Photoshop Interface
Photoshop can seem complicated at first, but understanding the interface makes it easier to use. The Toolbar on the left contains essential tools like the Move Tool, Brush Tool, and Eraser. By clicking on each tool, users can see options change along the top bar, adjusting how the tool behaves.
The Options Bar at the top changes based on the selected tool, allowing for different settings like size and opacity. On the right side, the Panels can be customized. Key panels include Layers, Adjustments, and History. Users can arrange or hide panels depending on what they need for a project.
Becoming comfortable with the layout and knowing where to find each tool and panel can save time. Users should explore menus and experiment with different tools to see what works best for them.
Working with Layers
Layers are a core part of Photoshop work, letting users edit specific parts of an image without affecting others. Each layer stacks on top of the other, like sheets of paper. The Layers Panel shows all the layers in a document and their order.
Users can create a new layer by clicking the New Layer icon at the bottom of the Layers Panel. Naming layers is also a good practice, as it helps keep things organized. Adjustment layers are non-destructive and allow changes like brightness or contrast without altering the original image.
Layer masks are used to hide parts of a layer without erasing them permanently. Mastering layers unlocks a lot of creative possibilities.
Setting Up Your Project
To create a realistic water reflection in Photoshop, it’s essential to start with a well-prepared workspace. This involves setting up the document and importing the image you want to transform.
Creating a New Document
Start by launching Photoshop and creating a new document. Set the dimensions based on your project needs; typically, it’s good to match the size of your source image. This ensures that the water reflection will fit naturally under your photo.
Adjust the resolution to 300 pixels per inch if you’re looking to create a high-quality image, especially for printing. You can do this in the New Document window where you set dimensions such as width, height, and resolution. For most web projects, a lower resolution like 72 pixels per inch will suffice, reducing file size and loading time.
Remember to also select the RGB Color Mode for digital purposes, or CMYK if the final project involves printing. Name your document something meaningful, like Reflection Project, to keep things organized. This initial setup is a small but crucial step in ensuring your project goes smoothly.
Importing Your Source Image
After setting up your new document, it’s time to bring in the photo you want to reflect. This might be an image of a landscape, a building, or anything you desire to transform with a water effect.
First, go to File > Open and select your source image. Once opened, use the Move Tool to drag the photo into the new document you created earlier. Alternatively, you can copy and paste the image directly into your document.
Position the image at the top of the canvas to leave space below for the reflection. If you need more space, you can resize the canvas using Image > Canvas Size, adjusting the height as necessary. This final placement sets the stage for crafting a believable water reflection.
Creating the Reflection
Creating a realistic water reflection in Photoshop involves duplicating your image, flipping it, and then positioning it correctly. These steps help produce a convincing reflection effect that enhances the overall image appearance.
Duplicating the Image Layer
The first step is to duplicate the existing image layer. This provides a foundation for the reflection. Users should select the photo layer in the Layers panel. By pressing and holding the Alt (Windows) or Option (Mac) key, and dragging the selected layer to the New Layer icon, they create a copy.
It’s essential to ensure the duplicate is positioned directly beneath the original. This maintains alignment and prepares for the subsequent steps. The new layer serves as the reflection base, maintaining all features of the original image.
Duplicating the layer exactly helps preserve both texture and color, which are vital for creating a natural-looking reflection.
Flipping the Duplicate Vertically
Next, it’s crucial to flip the duplicated layer to mimic a reflection. Users should select the duplicated layer. Choosing Edit > Transform > Flip Vertical will rotate the image upside down.
This flipping ensures that the reflection mirrors the original image’s orientation. Once flipped, the image might look a bit odd at first, but rest assured, it’s all part of the process. It is vital that the features align perfectly, as misalignment can break the illusion of the reflection.
Consistency in alignment between the original and the flipped image is key to maintaining a realistic effect.
Positioning the Reflection
After flipping, position the reflection appropriately beneath the original layer. Use the Move Tool to drag the flipped layer into place. The reflection should appear seamless and aligned with the bottom edge of the original image.
Adjustments to the layer position ensure that the reflection behaves as naturally as possible. At this stage, blending modes or opacity adjustments may be used to tone the reflection realistically.
Positioning is complete when the bottom edges of both layers are touching, creating a believable water reflection. Proper alignment will ensure a professional and polished final image.
Refining the Reflection
Creating a realistic water reflection in Photoshop requires careful attention to detail. This process involves techniques like adding a layer mask and using the gradient tool to blend elements seamlessly.
Adding a Layer Mask
Adding a layer mask is key to adjusting how the reflection appears. First, select the reflection layer. Then, click the Add Layer Mask button at the bottom of the Layers panel. This step allows control over which parts of the reflection are visible.
A layer mask works by using white, black, and gray to show or hide parts of the layer. Paint with black to hide the reflection in spots where it shouldn’t be visible. Use a soft brush with lowered opacity to blend the edges smoothly. This gradual blend gives the reflection a natural look, making it appear as though the water gently fades into the distance or merges with shadows.
Layer masks provide flexibility. If too much reflection is hidden, switch the brush color to white and paint back areas that should be shown. This allows for fine-tuning without permanently altering the image.
Using the Gradient Tool
The gradient tool is perfect for creating a smooth transition between the original image and its reflection. Select the gradient tool from the toolbar. Then, click on the layer mask of the reflection.
Choose the black-to-white gradient option. Click and drag from the bottom of the reflection upwards. The gradient will show more of the reflection at the bottom, fading it out as it rises. This mimics how reflections appear in real water, strong near the surface but becoming less defined further away.
Adjust the gradient length to control the amount of visible reflection. A longer gradient means a gradual transition, while a shorter one is more abrupt. Play with these settings to achieve a realistic look that matches the original background.
Adding Realism to the Reflection
To make water reflections in Photoshop look more realistic, it is important to adjust settings like opacity and blend modes. Techniques such as applying motion blur and distorting the reflection also add depth, making the final image more convincing.
Adjusting Opacity and Blend Modes
Adjusting the opacity of the reflection layer is crucial. It softens the image and helps it blend with the original photo. By doing this, the reflection appears more natural. Usually, keeping the opacity around 50% works well, but it’s good to experiment a bit to find the right balance.
Blend modes also play a significant role. Modes like Multiply or Overlay can change how the reflection interacts with the background. They enhance the effect by altering colors and shadows. The Multiply blend mode darkens the reflection, while Overlay can make bright areas pop, offering different stylistic outcomes.
Applying Motion Blur
Motion blur adds a realistic touch by mimicking the natural blurring of water. To apply it, select the reflection layer and go to Filter > Blur > Motion Blur. Adjust the angle and distance settings to align with the water’s direction in the image. This step helps create the impression of movement.
The distance setting controls how strong the blur will be. Lower values offer a slight ripple effect, while higher values can create the look of flowing water. Testing different settings gives a more authentic appearance, mimicking real-life water behavior.
Distorting the Reflection
Distorting the reflection adds another layer of realism. It involves slightly deforming the reflection to simulate waves or ripples. To do this, use the Liquify tool by navigating to Filter > Liquify. Gently drag parts of the reflection to create subtle curves and undulations that mimic water distortion.
For more control, try using the Ripple filter under Filter > Distort > Ripple. Adjust the size and amount to get the desired effect. These distortions replicate how real water would alter the reflection, adding depth and complexity to the image. This technique enhances realism by making the scene look as if it reflects off moving water.
Enhancing the Final Image
After creating a water reflection effect in Photoshop, refining the image ensures it looks realistic and appealing. Enhancements like color correction, sharpening, and detailing help achieve a polished and professional appearance.
Color Correction
Adjusting colors can significantly improve the overall look of the reflection. Use the Adjustment Layers in Photoshop for non-destructive editing.
Consider tweaking the brightness and contrast to ensure the reflection matches the rest of the image.
Use the Hue/Saturation tool to align the colors of the reflection with the source image. If needed, adjust the levels or curves to make the reflection appear more natural. A balanced color correction makes the reflection blend seamlessly.
Sharpening the Image
Sharpening adds clarity and enhances details in the reflection. Use the Smart Sharpen filter in Photoshop to focus on the edges and fine details.
Adjust the amount, radius, and reduce noise sliders to avoid making the image look too sharp or unnatural.
Applying a subtle sharpening effect helps to highlight the features of the reflection without introducing too much noise. For precise control, use Layer Masks to target specific areas that need sharpening.
Final Touches and Details
Adding final details can make the reflection stand out. Consider using Blur Tools to soften any harsh edges, making the water effect more realistic.
For added texture, apply a small amount of Grain or use Noise filters. This helps in mimicking natural water ripples. Experiment with Blending Modes to create unique visual effects.
Checking the overall balance and harmony between the reflection and the original image ensures a cohesive look. By focusing on these small adjustments, the final image will achieve a professional and polished appearance.