For those diving into graphic design, creating seamless patterns in Inkscape is a fun and useful skill. Inkscape’s Pattern Tool makes this process straightforward by allowing users to turn any object into a repeating design. This tool provides a creative way to enhance projects with custom patterns that seamlessly tile and are unique to the designer’s vision.
With a few clicks, users can transform illustrations or shapes into beautiful patterns that can be used for various projects like textiles, wallpapers, or digital art. Inkscape offers templates and guides that make it easy for beginners and seasoned designers alike to create intricate designs.
The process begins with selecting an object and using the tool to convert it into a pattern. By crafting seamless patterns, designers can add an artistic touch to their work, making everyday designs stand out. Whether it’s for personal projects or professional designs, Inkscape gives users the flexibility and control to bring their imaginative ideas to life.
Understanding the Basics of Inkscape’s Pattern Tool
Inkscape’s Pattern Tool allows users to create seamless patterns that can be used for various design projects. The tool is user-friendly, making it simple for beginners to start designing.
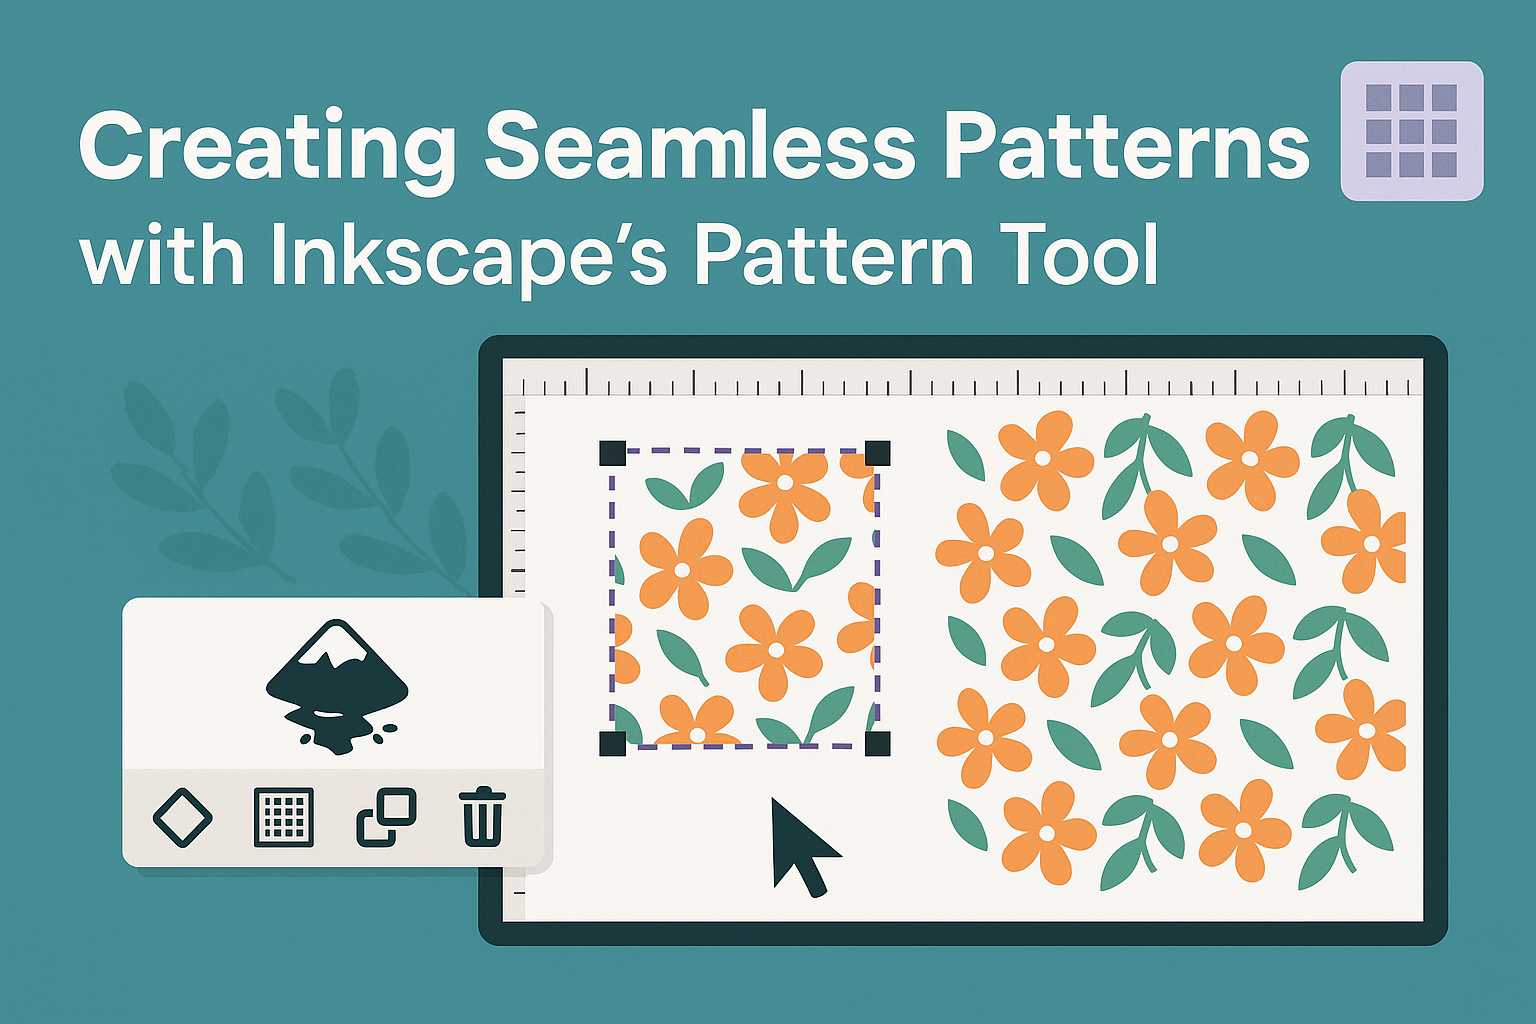
Users can access the pattern feature by selecting objects they wish to transform. Once selected, they can navigate to the Object menu and choose Pattern > Objects to Pattern. This action converts selected shapes into a newly created pattern, which can be repeated as needed.
Patterns are adjustable in Inkscape. Users can modify the size, rotation, and position of their pattern by using the Edit tool from the Pattern section in the tool controls bar. This flexibility allows for creative and unique design options.
Key Features of Inkscape’s Pattern Tool:
- Easy Access: Found under the Object menu.
- Adjustability: Alter pattern size and orientation.
- Flexibility: Works with various shapes and designs.
Getting Started Tips:
- Use simple shapes at first to understand how patterns repeat.
- Experiment with different patterns to see various effects.
- Modify existing patterns to create something unique.
For those looking to create a seamless fill pattern, tutorials can guide them through the process step-by-step. Inkscape’s pattern tool not only enhances creativity but also simplifies the design process.
Getting Started with Inkscape
Inkscape is a versatile tool for creating seamless patterns. To begin, you’ll need to install the software and familiarize yourself with its interface.
Installing Inkscape
To use Inkscape, download it from the official website, available for Windows, macOS, and Linux. Select the correct version for your operating system and follow the installation prompts.
For Windows, run the installer file, and follow the on-screen instructions. On macOS, download the disk image and drag the Inkscape icon to the Applications folder. Linux users can install Inkscape using their package manager.
After installing, open Inkscape to ensure everything is set up correctly. If it launches successfully, proceed to explore its features. Installing is straightforward, ensuring even beginners can start quickly without hassle.
Exploring Inkscape’s Interface
When Inkscape opens, you’ll notice the main workspace with a canvas in the center. The toolbar on the left holds various tools for drawing and editing, like the selection tool and shape tools.
Above the canvas is the command bar with options like file operations for opening or saving projects. On the right, the Fill and Stroke panel helps adjust colors and lines of your designs.
Get familiar with these elements by exploring their functions, as they are crucial when creating patterns. Spend some time playing around with the tools and settings to see how they adapt to different design needs. This hands-on practice can greatly improve your workflow.
Creating Your First Pattern
Creating a seamless pattern in Inkscape involves setting up your workspace and designing simple shapes to start your project. Understanding these basics will pave the way for more intricate designs in the future.
Setting Up Your Canvas
To begin, open Inkscape and start a new document. It’s recommended to use a template for seamless patterns, which you can find by clicking on File and selecting New from Template. Look for the “Seamless Pattern” option, which provides guides and layers that help in arranging your design elements accurately.
Turn on the snapping feature. This tool ensures shapes align perfectly, which is crucial for seamless design. Also, adjust the grid settings if you need more control. The grid provides a reference for placing your shapes evenly.
Lastly, make sure your layers are organized. Use separate layers for different elements to make adjustments easier later. Each layer can hold different parts of the pattern and help in maintaining order throughout the design process.
Drawing Basic Shapes
With the canvas set, start drawing simple shapes using the tools within Inkscape. Basic shapes like squares or circles are great starting points. These forms can later be modified and combined to create more complex patterns.
To draw, select the shape tool from the toolbar. Clicking and dragging will create the shape desired. You can adjust the size and position by using the handles that appear around the shape.
Once you’ve created your shapes, consider grouping them. Grouping helps manage multiple elements as a single unit. Use Ctrl+G to group shapes together, allowing easy repositioning and duplication. These techniques will help in creating patterns that are both uniform and visually appealing.
Using Inkscape’s Pattern Tool
Inkscape’s Pattern Tool offers a way to fill objects with custom designs. Users can create a pattern once and apply it to various shapes across projects.
Accessing the Pattern Tool
To begin using the Pattern Tool, open Inkscape and start a new document. Users should proceed to the Fill and Stroke panel, which can be found under the Object menu or on the right side of the screen.
Once there, select an object in the work area. Go to the Fill tab in the panel and use the dropdown to choose “Pattern”. The menu will display a list of available patterns. If users wish to create their own, they can design an object and use Object > Pattern > Objects to Pattern to turn it into a pattern.
This approach allows users to see their created pattern immediately in the pattern list. It’s a fast and intuitive way to apply custom patterns.
Creating a Simple Pattern Fill
Once users have accessed the pattern menu, they can create pattern fills. Begin by drawing a shape or choosing one from an existing design. This shape acts as the building block for the pattern.
Next, convert this object into a pattern using Objects to Pattern. After the object is converted, select any shape or space where the pattern will be applied. Return to the Fill and Stroke panel and select the new pattern from the list.
The pattern will appear inside the chosen shape. Users may adjust size and positioning using the Node tool. This tool lets them move nodes, allowing for custom placement and scaling.
Creating simple pattern fills in this manner gives users flexibility and control over their projects, enabling them to create appealing designs efficiently.
Design Principles for Pattern Creation
Creating seamless patterns involves using the pattern tool in Inkscape to develop designs that are both visually appealing and functional. Key aspects include understanding how repeat patterns work and selecting a harmonious color scheme.
Understanding Repeat Patterns
Repeat patterns refer to the design elements that consistently recur across a surface. When creating these, it’s important to ensure that the elements align precisely, avoiding any visible seams or breaks. This requires careful placement and attention to detail.
Repeating patterns can be simple or complex but should maintain a consistent flow across the surface. A well-designed repeat keeps the viewer’s eye engaged and can be used on various surfaces like textiles, wallpapers, or digital backgrounds.
Achieving continuity is crucial. The elements should transition smoothly across the pattern without disruption. Using tools like grids and snapping in Inkscape aids in positioning elements correctly, ensuring that the pattern repeats seamlessly.
Choosing a Color Scheme
Choosing the right color scheme is vital for pattern appeal. Colors should not only complement each other but also fit the intended use of the pattern. A textile design might use bold colors for impact, while digital patterns might require softer tones for screen display.
It’s important to consider color contrast and harmony. High contrast can make designs stand out, while harmonious colors can create a soothing effect. Inkscape allows users to experiment with various colors, providing a preview of how the pattern will appear once completed.
A successful color scheme enhances the pattern’s theme and mood. Consider using a color wheel to explore different combinations and test how they influence the design’s overall look.
Advanced Pattern Techniques
Exploring advanced pattern techniques in Inkscape can enhance creativity. Learning how to create complex patterns and apply clipping and masking will help users design detailed and unique artworks.
Creating Complex Patterns
Inkscape allows artists to push their boundaries by crafting intricate designs. By utilizing the software’s Pattern Editor, users can layer multiple shapes and colors. This adds depth and diversity to a design.
A helpful tip is to begin with basic shapes and gradually build complexity. Combining shapes and adjusting their alignment creates intricate layouts. Many designers find using the alignment tools crucial. These tools ensure patterns maintain a seamless look as complexity increases.
Additional effects, such as blurs and shadows, can heighten the intricacy of the pattern. Such techniques transform simple elements into eye-catching designs.
Using Clipping and Masking
Clipping and masking are advanced techniques that refine pattern designs. They help focus on particular areas by hiding or highlighting specific sections. This technique is perfect for artists aiming for precision.
Inkscape lets users clip objects by defining a shape that acts as a container. Anything outside this shape gets hidden. This action creates clean and defined pattern edges.
Masking, on the other hand, is like using a stencil. The mask adds transparency and unique blending effects. Users can apply gradients to the mask and create patterns with various levels of opacity. This method is essential for adding depth and texture to designs without altering the underlying work.
Editing and Refining Patterns
When working with patterns in Inkscape, making precise adjustments is key. Users can alter the size and orientation of a pattern to fit their design requirements. Node editing helps in achieving detailed refinement.
Adjusting Pattern Size and Orientation
To change the size of a pattern in Inkscape, users can select the pattern fill and open the “Fill and Stroke” panel. In the pattern options, scaling the pattern is possible using X and Y scaling values.
Orientation adjustments are also straightforward. By selecting the object with the pattern, users can rotate it just like they would with any shape. Holding the shift key while dragging the rotation handle allows for finer adjustments. Rotating the pattern can provide a fresh perspective and enhance the overall design.
Fine-Tuning with Node Editing
Node editing allows for more precise control over a pattern’s shape and structure. By accessing the Node tool, users can click on the pattern object to reveal its nodes and handles. Adjusting these nodes can change the pattern’s path or outline for more intricate designs.
Filling Objects with Patterns
To fill an object with a pattern in Inkscape, start by selecting the object using the Selection tool. Then open the Fill and Stroke panel. This panel contains options to change how the object looks. Click on the Pattern icon in the Fill panel, which lets you apply a pattern fill instead of solid color or gradient. Choose a pattern from the dropdown list. You can also adjust the pattern’s size and orientation to fit the object as desired.
By doing this, patterns become a part of the object’s style. Users can choose from pre-made patterns or create their own. This method is simple but adds great visual interest to designs. To explore more on this process, how to create and apply patterns in Inkscape offers guidance.
Applying Patterns to Paths
Applying patterns to paths is a bit different than to simple objects. First, create a path using tools like the Pen or Bezier curves in Inkscape. Once the path is selected, open the Fill and Stroke panel. Just like with objects, select the Pattern icon to fill the path with a preferred pattern. This feature transforms ordinary paths into stunning visuals by adding texture and depth.
The pattern follows the path’s shape, making it a useful tool for creative designs. Users can manipulate the path’s structure and see how the pattern adapts. This flexibility is especially useful for intricate designs that need a textured appearance. Inkscape’s powerful pattern tool enhances paths and makes them stand out. For more advanced steps, users can check out creating custom patterns.
Saving and Exporting Patterns
Inkscape offers tools to save and export patterns efficiently. Users can save patterns for future projects and export them for use on different platforms, both for print and digital media. Each approach helps ensure designs remain accessible and versatile.
Saving Patterns for Later Use
To keep a pattern for future projects, users should transform an object into a reusable pattern. Inkscape allows turning selected objects into patterns via the Object menu, converting it into a pattern that can be stored and used later. This is ideal for those who frequently revisit their designs.
After creating a pattern, designers can save it by exporting it or embedding it within the document. This saves the pattern’s base design, making it accessible for other projects within the same document.
Naming the pattern distinctively helps in easily identifying and accessing it from Inkscape’s pattern library. The software organizes saved patterns under this library for efficient retrieval. It benefits users managing multiple patterns across different designs, reducing time spent searching.
Exporting Patterns for Print and Web
When exporting patterns, resolution and file format are key. Inkscape supports exporting patterns in formats like PNG and SVG, with PNG being optimal for web use due to its compatibility with many platforms.
To export, navigate to the export menu and select the desired file type. Adjust the resolution to match the intended use: higher for print, lower for web. This ensures quality is retained in printed materials and web images load faster.
Consider color formats during export. CMYK is preferred for print, while RGB is suitable for digital and web images. This choice can impact how colors appear on different media, maintaining consistency in visual representations.