Creating a custom product price list for an online store can seem daunting, but it doesn’t have to be. Using PicMonkey, anyone can design an attractive and organized price list that showcases products effectively while appealing to potential customers.
With easy-to-use tools and templates, it’s simple to make a price list that fits the brand’s style.
In today’s competitive market, having a clear and engaging price list is essential. This not only helps customers understand the products better but also enhances the overall shopping experience.
By following a few straightforward steps, sellers can create something visually appealing and informative.
Whether for a startup or an established online shop, a well-crafted price list can inspire trust and encourage purchases. With PicMonkey at their fingertips, online sellers can easily customize details and graphics that represent their unique offerings.
Getting Started with PicMonkey
Getting started with PicMonkey is simple and user-friendly.
First, users need to set up their accounts, and then they can learn to navigate the platform efficiently.
Setting Up Your PicMonkey Account
To begin using PicMonkey, a user must first create an account. They can do this by visiting the PicMonkey website and clicking on the “Sign Up” button.
After entering their email and creating a password, an activation link will be sent to their email.
Once the account is activated, users can explore different subscription plans. PicMonkey offers a free trial, allowing users to test features before committing.
To choose a plan, they can visit the pricing page and compare what each plan includes, such as access to premium templates and graphics.
Navigating the PicMonkey Interface
Once the account is set up, users will find the PicMonkey interface easy to understand. The main dashboard features several options, including tools for photo editing, designing, and creating custom labels.
On the top bar, users will see buttons like “Create New” and “My Projects.” This area allows them to start a new design or continue working on previously saved projects.
The left-hand side displays design tools and features like templates, graphics, and text options.
Using these tools, users can drag and drop elements onto their canvas, making it simple to create unique price lists for their online stores.
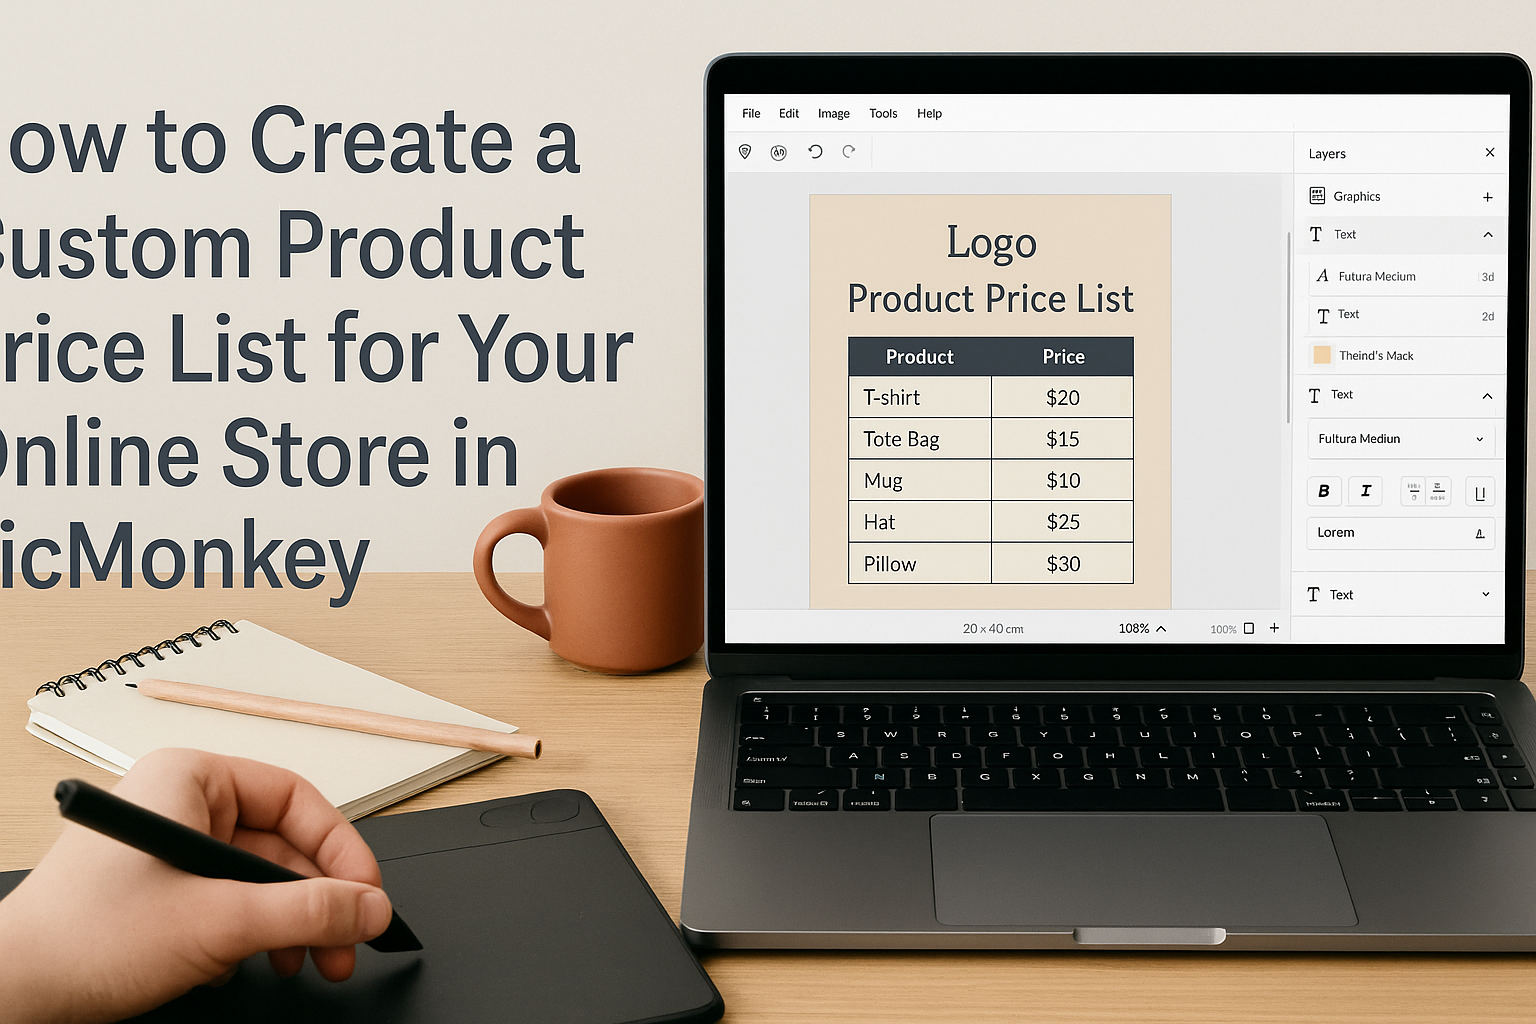
Designing Your Product Price List
Creating a professional price list for an online store can enhance customer experience. The design should be eye-catching yet informative, allowing customers to easily find product details and prices.
Selecting the Right Template
Choosing the right template is crucial. Platforms like PicMonkey offer various templates tailored for price lists. It’s important to pick one that matches the brand’s style.
Look for templates that have clear sections and sufficient space for each product. Users can explore options that highlight products effectively. A clean, organized layout allows customers to scan through items quickly.
Customizing the Template Design
After selecting a template, the next step is customizing it. PicMonkey provides tools for changing colors, fonts, and images, helping users align with their brand identity.
For a cohesive look, choose colors that reflect the store’s theme. Fonts should be easy to read and professional.
Adding the store’s logo enhances brand recognition, making the list more official and trustworthy.
Adding Product Details and Prices
Finally, product details and prices must be added. Users should include essential information like product names, descriptions, and prices clearly.
Organizing this information in a table format can be very effective. Each entry should include:
- Product Name
- Brief Description
- Price
This layout helps customers find what they need with ease. It’s also smart to update prices regularly to keep information accurate.
Enhancing Your Price List
To make a price list stand out, it’s key to incorporate unique brand elements and take advantage of advanced editing features. This attention to detail helps capture customer interest and promotes brand loyalty.
Incorporating Brand Elements
Branding is essential when creating a price list. It builds recognition and trust among customers.
Start by adding your logo at the top. This simple step places your identity front and center.
Using brand colors is another effective way to enhance the list. Choose colors that align with your business’s identity and use them consistently throughout the design. It creates a cohesive look.
Fonts also play a vital role. Select typefaces that reflect your brand’s personality—bold for dynamic businesses or elegant for luxury products.
Ensure the font is easy to read, as clarity is key for customers to understand prices.
Using Advanced Editing Features
PicMonkey offers a variety of advanced editing tools that can make price lists visually appealing.
Users can access features like layering and transparency to create depth in the design.
Consider utilizing shapes and icons to highlight certain products or sections. This can draw attention and make the price list more user-friendly. For example, a small star icon can mark promotions or bestsellers.
Text effects such as shadows or outlines can enhance the visibility of pricing information. When customers easily see prices, they feel more comfortable making a decision.
Adjusting the spacing between items can also improve flow, helping customers find what they need quickly.
Finalizing and Publishing
After creating a custom product price list in PicMonkey, the next steps are important to ensure that everything looks polished and is ready for sharing. Taking time to review details and understand the export options will help in achieving a professional final product.
Reviewing and Editing Your Work
Once the price list design is complete, reviewing it for accuracy is crucial. This means checking all product descriptions, prices, and images.
Errors can lead to misunderstandings with customers, so careful inspection will pay off.
Using PicMonkey’s editing features, one can easily make adjustments.
It’s helpful to check font sizes, colors, and layout alignment. Make sure everything is clear and visually pleasing. This might involve adjusting spacing or repositioning elements to enhance readability.
Another useful tip is to get feedback from others. Sharing the draft with a colleague can provide fresh perspectives and catch mistakes that might have been overlooked.
Exporting and Sharing Options
When ready to share the price list, PicMonkey offers several exporting options.
Users can choose to save their work as a PDF for easy printing or share it directly via social media.
For online stores, exporting as an image file can also be beneficial. This format allows easy uploading to a website or sharing via email.
Additionally, ensuring the file size is appropriate is important.
Large files may take longer to load, which can frustrate potential customers.
Users should aim for a balance between quality and file size for optimal sharing.