Creating stunning designs in Canva is easier than it seems. Using rounded end points can elevate the look of any project and add a polished feel.
This simple technique can enhance lines, shapes, and borders, making designs more appealing to the eye.
Canva provides user-friendly tools that allow anyone to achieve this effect quickly. By selecting the right elements and adjusting the corner rounding, designers can transform basic shapes into more inviting visuals.
With just a few clicks, he or she can add a stylish touch to their graphics.
Whether for personal projects or professional designs, knowing how to create rounded end points can make a significant difference. Readers will discover easy steps to incorporate this detail into their work, setting their creations apart from the rest.
Getting Started with Canva
Canva is user-friendly and perfect for both beginners and experienced designers. Knowing how to navigate the platform and understanding its basics will help anyone create beautiful designs quickly and easily.
Signing Up and Navigating the Interface
To start using Canva, one must sign up for an account. This can be done using an email address or social media login.
Once the account is created, users are directed to the main dashboard. Here, they can see templates, projects, and various design options.
Navigating the interface is simple. The left sidebar features options like “Templates,” “Photos,” and “Elements.” The top toolbar has essential tools for editing and customizing designs.
Familiarity with these sections helps streamline the design process.
Understanding the Basics of Designing with Canva
Canva offers a variety of design elements to use in projects. Users can choose from templates, shapes, icons, and fonts.
Before starting a project, it’s helpful to think about the type of design needed.
Basic design actions include resizing elements, changing colors, and adding text. Each object has a toolbar that allows customization without any complex skills.
Users can easily drag elements, change backgrounds, or upload their own images.
Using layers effectively can enhance a design’s look. Layers determine which elements appear on top or bottom. Understanding this concept can significantly improve the overall design quality.
Creating and Customizing Shapes
Creating shapes in Canva allows for greater design versatility. Users can seamlessly add shapes and adjust their properties to enhance their projects, giving them a polished and professional look.
Adding Shapes to Your Design
To start adding shapes, users can navigate to the left side panel and click on the “Elements” tab. Here, she will find a variety of shapes such as squares, circles, and more.
- Choose a Shape: Click on “Shapes” to see the options available.
- Drag and Drop: Users can drag the chosen shape directly onto the design canvas.
- Resize: Clicking and dragging the corners allows for easy resizing.
Shapes can be layered with other elements for a more unique design. Experimenting with different shapes helps create a visually appealing layout.
Adjusting Shape Properties
Once a shape is added, users can customize it to fit their design needs. Clicking on the shape brings up adjustment options in the top toolbar.
- Color: Users can change the shape‘s color by selecting the color box.
- Borders: Adjust the border style and weight for added depth. This option also includes corner rounding for a softer look.
- Position: Use the alignment tools to perfectly place the shape within the design.
Fine-tuning these properties ensures that the shape complements the overall design. Experimentation is key to achieving the desired look and feel.
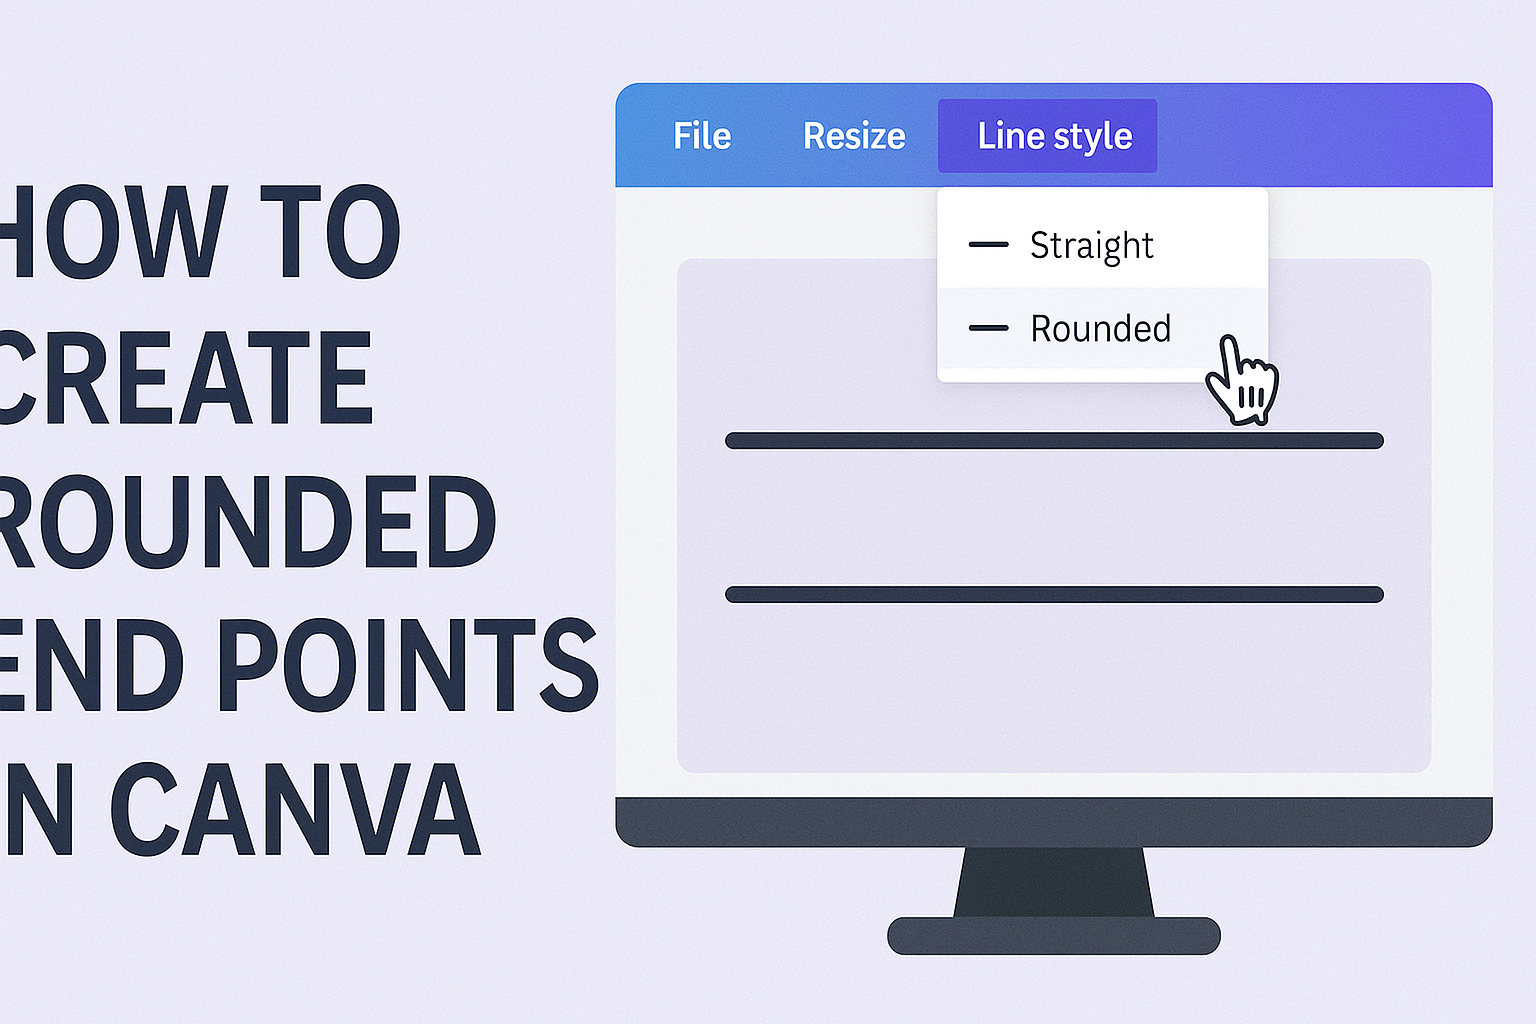
Applying Rounded Ends to Lines and Strokes
Creating rounded ends on lines and strokes in Canva helps improve the visual appeal of designs. This feature adds a polished and professional touch to various graphic elements.
Selecting the Right Elements
To begin, users need to choose the correct shapes or lines. First, click on the shape or line to which they want to apply rounded ends. Canva allows for multiple selections, so multiple lines can be modified at once.
Next, it’s important to ensure that the elements are appropriate for rounded ends. Shapes like rectangles or ovals work well when adding rounded strokes. Lines should be straight or smooth for the effect to be noticeable.
Once selected, users can move on to the next step, where the actual modification will take place.
Modifying End Points
After selecting the right elements, users can modify the end points. They do this by clicking on the “Border” button in the toolbar. Once there, find the options for stroke style.
Users should see a choice for “Cap Style.” Here, they can select the option for rounded caps. This adjustment will immediately apply rounded ends to the selected lines and strokes.
Finally, users can adjust the thickness of the lines as needed. This can enhance the overall look, making the rounded ends stand out even more. The combination of rounded caps and line thickness can significantly elevate the design.
Perfecting Your Design
Creating rounded end points in Canva can significantly enhance the overall look of a design. By focusing on design principles and experimenting with different styles, users can achieve a polished and appealing result.
Utilizing Design Principles
Good design follows certain principles that make it visually appealing. Balance is key. Users should ensure that shapes with rounded end points are distributed evenly across their canvas. This creates harmony and draws the eye.
Contrast also plays a major role. By using different colors or varying the thickness of lines, users can make rounded ends stand out. For instance, a bold line with rounded ends on a lighter background can create an engaging focal point.
Another important principle is alignment. Keeping elements neatly aligned improves the design’s readability. Canva provides gridlines to aid in aligning shapes and text, helping users maintain a professional appearance.
Experimenting with Different Styles
Canva offers various options for styles that can change the feel of a design.
Users can start by selecting different color palettes. A bright, vibrant palette gives a cheerful vibe, while muted tones evoke calmness.
Textures and patterns can also add depth.
Users can fill rounded shapes with textures to make them more interesting. For example, a wood texture inside a rounded rectangle can fit a rustic theme.
Lastly, trying out different fonts and sizes can complement the design.
A playful font next to a rounded shape can evoke fun, while a sleek font can create an elegant look.
Exploring these different styles allows users to add their unique touch to the design.