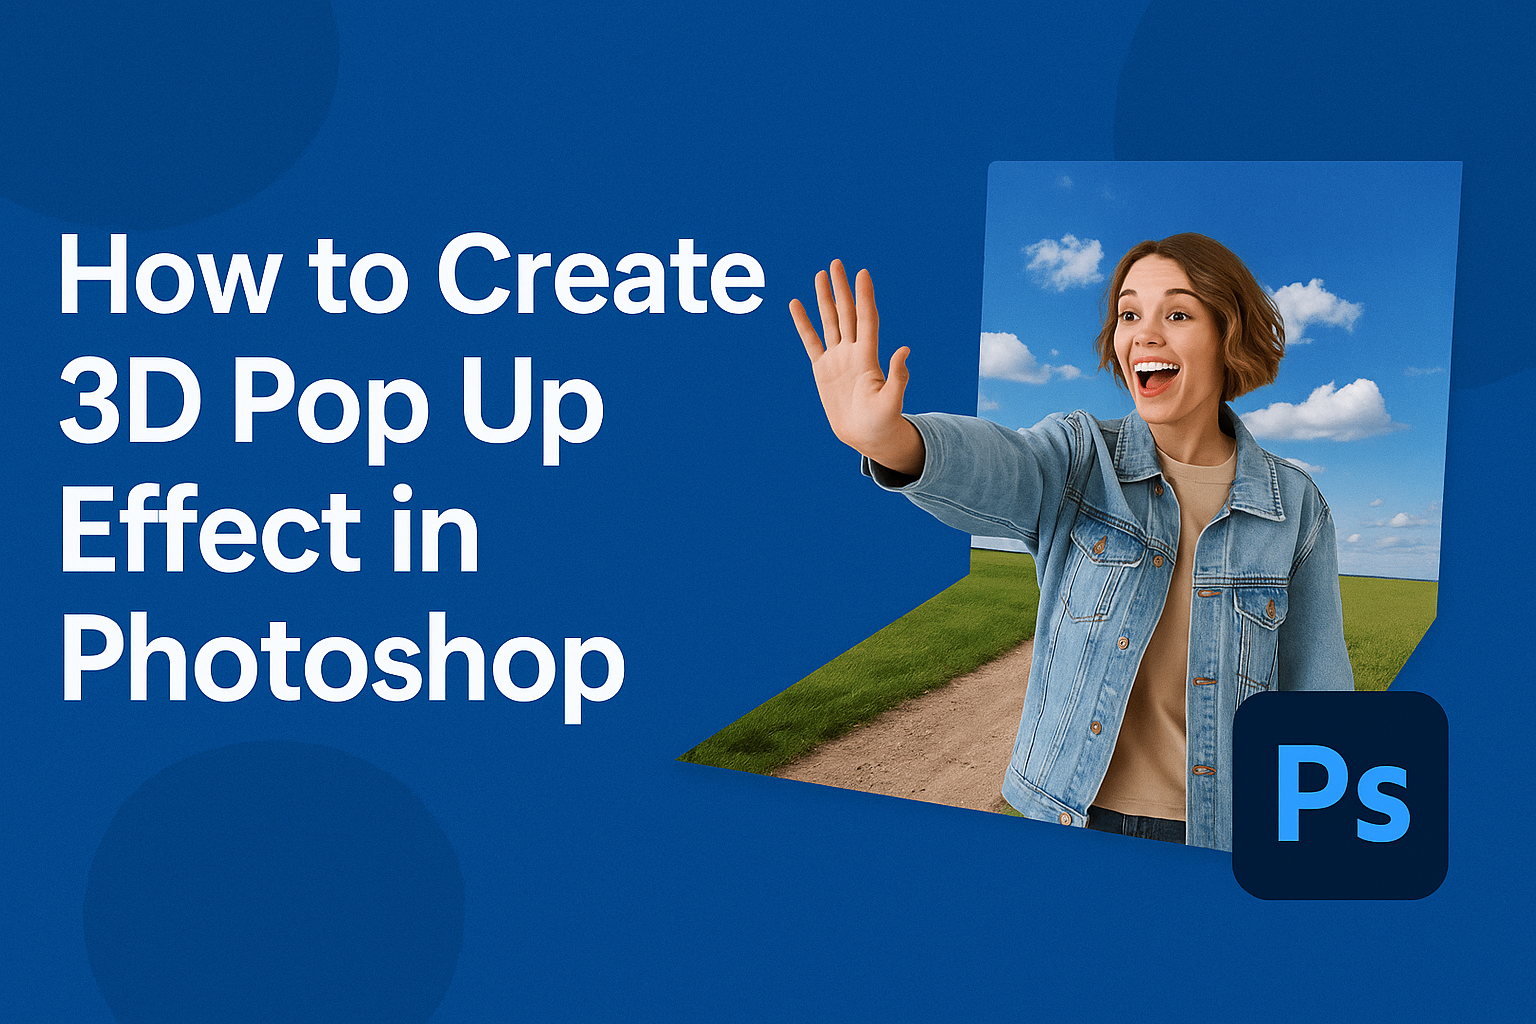
Creating a 3D pop-up effect in Photoshop can bring your images to life by making parts of them appear to jump right out of the frame. This effect is not only visually striking but also surprisingly simple to achieve with the right guidance.
Transforming ordinary photos into dynamic visuals is just a few steps away with this method.
By mastering the 3D pop-up effect, anyone can add depth and excitement to their graphic projects. This technique captures attention and elevates the quality of presentations, social media posts, and more.
Many tutorials are available online, like this step-by-step guide on Photoshop Essentials.
The process involves using layer masks and other basic Photoshop tools to achieve the desired look. The result is a compelling effect that draws viewers in and adds a professional touch to any project.
For those eager to learn, a helpful tutorial can be found in this YouTube video, which takes you through the process with ease.
Understanding the Basics of 3D Pop Up Effects
3D pop up effects in Photoshop bring a new level of excitement to images. They add depth and make pictures appear as if they are coming out of the page. These effects are popular in digital art and photography.
What Is a 3D Pop Up Effect?
A 3D pop up effect creates an illusion where elements of an image seem to jump out of the flat surface. This involves adjusting layers and shadows to give a sense of depth and realism. Artists often use layer masks and various Photoshop tools to achieve this.
This technique is not just for fun—it’s used by graphic designers, advertisers, and artists to grab attention and create memorable visuals. Creating a 3D effect can transform a flat picture into a dynamic scene. The effect can be applied to almost any subject, from portraits to landscapes, to give them a unique, eye-catching twist.
Examples of 3D Pop Up Effects
There are several inspiring examples of 3D pop up effects. One common example is taking a photo of a person and making it look like they are leaping out from the background. This type of effect is often seen in magazine ads and digital artworks.
Another example involves nature scenes, where animals or plants pop out, bringing an immersive experience. Graphics like posters can also benefit, with elements like text or objects extending beyond their normal boundaries.
Websites such as Photoshop Essentials and Photoshop Cafe offer tutorials on achieving these effects, providing a step-by-step guide to make images stand out dramatically.
Preparation and Setup
Creating a 3D pop-up effect in Photoshop begins with choosing the perfect image and organizing your workspace. A well-chosen image will make your project pop, while a tidy setup will streamline your process.
Choosing the Right Image
When selecting an image, consider how the main subject will stand out from the background. A high-contrast picture where the subject is clearly distinguishable can add dramatic impact. If the subject blends too much with the background, the 3D effect might not work as effectively.
Think about images with interesting angles or subjects that have a natural movement. Images like a skateboarder mid-jump or a dog leaping over an object can create a compelling sense of depth and realism.
Also, ensure the image has a high resolution. A crisp, clear picture ensures the details are enhanced in the final effect, making the details of your 3D pop-up effect sharper and more engaging.
Setting Up Your Workspace in Photoshop
Before diving into effects, set up your Photoshop workspace for maximum efficiency.
Start by opening your image in Photoshop and ensure you are using Photoshop 2021 or newer. This version supports the features needed for creating a 3D pop-up effect.
Arrange your panels for easy access. Place Layers and Properties panels within reach, as you’ll need to work with layer masks. Keeping these panels open will save time as you adjust the image.
Utilize guides for precise placement when cropping or editing your image. Guides help maintain the alignment and proportion of elements, ensuring the 3D effect looks natural and not distorted.
Creating the Background
When crafting a 3D pop-up effect in Photoshop, one of the first steps involves working on the background. This involves carefully separating it from the main subject, then adding depth to create a more dynamic look.
Separating the Background from the Subject
To begin, separate the subject from the background. This can be done using tools in Photoshop like the Pen Tool or the Quick Selection Tool. These tools help in precisely outlining the edges of the subject.
After selecting the subject, create a new layer. This allows the background to be edited independently without affecting the main subject.
It’s helpful to use layer masks for this. They let users refine edges smoothly and make adjustments without permanently altering the image.
Remember to zoom in and adjust edges carefully. This attention to detail makes the separation look natural and clean. By using feathering, edges can look softer and blend more seamlessly into the scene, enhancing the overall appearance of the effect.
Adding Depth to the Background
Once the background is separated, the next step is adding depth.
Achieve this by applying a slight blur to the background. This technique mimics the depth of field effect seen in photography, making the subject pop.
Use the Gaussian Blur filter in Photoshop for this. Adjust the blur radius to achieve the desired effect, ensuring it looks realistic.
Adding shadows can also enhance the sense of depth. Consider casting a soft shadow behind the subject to give it a 3D feel.
Using gradients or subtle lighting changes can add richness to the background. They provide increased contrast between the background and subject, enhancing the pop-up effect and drawing focus to the main element.
Working with the Subject
Creating a 3D pop-up effect in Photoshop involves a few key steps that help the subject stand out. It’s important to properly isolate the subject and then enhance it with shadows and highlights for a realistic effect.
Isolating the Subject
The first step in creating a 3D pop-up effect is isolating the subject from the background. This is crucial because the subject needs to appear lifted from the rest of the image.
Tools like the Quick Selection Tool or the Pen Tool in Photoshop can help with this task.
Using the Quick Selection Tool is faster but may require refining the selection afterward. With the Pen Tool, it’s possible to draw more precise edges around the subject.
After creating a selection, use the Layer Mask feature to remove the background so that only the subject remains. This ensures that any adjustments, such as adding shadows or highlights, affect only the subject and not the entire image.
Adding Shadows and Highlights
Once the subject is isolated, adding shadows and highlights can enhance the 3D effect.
Shadows can give depth and make the subject appear as if it’s popping out of the screen. Use the Drop Shadow layer style for a basic shadow, but feel free to customize it for a more natural look.
For highlights, the Dodge Tool can be used to lighten certain areas, making them appear closer to the light source.
Conversely, the Burn Tool can darken areas to create deeper shadows. Adjusting these elements carefully will create a dynamic, eye-catching effect that draws in the viewer.
Always ensure shadows and highlights match the light direction in the image for consistency.
Adding the 3D Effect
To create a 3D pop up effect in Photoshop, you need to focus on building layers effectively and adjusting the perspective for a realistic look. These key steps ensure your images stand out with a three-dimensional feel.
Creating Layers for the Pop Up Effect
Layers are crucial in creating the pop up effect.
Start by opening your image in Photoshop. Duplicate the background layer by selecting it and pressing Ctrl+J (Windows) or Cmd+J (Mac). This creates a working layer, leaving the original intact.
Next, use the Quick Selection Tool or Pen Tool to cut out the subject you want to pop out. This might require some patience and precision.
Once selected, convert it into a new layer by right-clicking and choosing “Layer Via Copy.”
Turn to the Layer Mask feature to blend the layers seamlessly. Applying a mask allows for non-destructive editing, so you can refine edges later.
Adjust the layer order so the cutout is on top, creating a clear outline for the pop up.
Manipulating Perspective for Realism
To make the pop up effect convincing, perspective adjustments are needed.
Start by selecting the subject layer and using the Transform Tool (Ctrl+T or Cmd+T) to resize and position it as desired.
For more realism, engage the Warp function. This allows you to bend and twist parts of the subject, following the natural curves of the main image.
Aim to have sections of the subject overlapping key elements in the background, enhancing the 3D effect.
Adjust shadows and highlights to match the lighting in the scene.
Creating a shadow layer beneath the pop up subject can add depth. Use the Brush Tool with a soft edge to paint shadows, tweaking the opacity until it looks natural.
The key to success lies in subtlety; small tweaks can make a big difference in achieving a true-to-life appearance.
Final Touches
Once the basic 3D pop-up effect is created, refining the image can make it truly stand out. This includes enhancing colors, applying textural filters, and sharpening the final image for crispness.
Enhancing Color and Contrast
Adjusting color and contrast can give the 3D pop-up effect more depth and vibrancy.
Using the Levels or Curves adjustments in Photoshop helps in achieving the right balance.
By slightly increasing the contrast, the pop-up part will appear more pronounced against the background.
Adjusting the hue and saturation can bring out more vivid hues, ensuring the pop-up is eye-catching.
For those looking to create dramatic effects, increasing the saturation slightly can make the image pop even more.
Applying Filters for Texture and Depth
Filters can add interesting texture and depth to the image.
Filters like Sharpen, Emboss, or Gaussian Blur can enhance specific areas.
Applying a subtle Drop Shadow helps in blending the pop-up effect with the background, giving it a realistic feel.
The Emboss filter can give the pop-up effect a metallic finish, adding an extra dimension.
When using filters, it’s crucial to apply them in moderation to avoid overwhelming the viewer.
Experimenting with different layers and blending modes is encouraged to find the perfect combination for your image.
Sharpening and Final Adjustments
Sharpening is key for clarity in any image, especially in 3D pop-up effects. The Unsharp Mask or Smart Sharpen tools can enhance the edges, making the pop-up element visibly distinct and crisp.
Making sure that any lines or details in the image are clean will ensure a professional look.
Finally, take a step back and evaluate the entire composition.
It’s vital to check for any last adjustments needed, such as fixing any misaligned layers or refining any overly bright areas.
These small tweaks can greatly enhance the final output, giving you a striking 3D pop-up effect that engages viewers.