The Foreground Select Tool in GIMP is a powerful feature for creating precise cutouts, especially in tricky areas like hair and fur. By learning to use this tool, users can separate the main subject from the background with greater accuracy. This tool makes it easier to highlight complex details in images, which is often challenging with simpler selection tools.
To begin, users must roughly outline the desired foreground using the lasso icon. This is followed by refining the selection, allowing GIMP to distinguish between the foreground and background. For anyone looking to enhance their photo-editing skills, mastering this tool is an essential step.
Whether working on personal projects or professional designs, understanding how to effectively utilize the Foreground Select Tool can significantly improve the quality of image editing. This skill enables more creative freedom and flexibility in the editing process by accurately capturing intricate parts of images, such as low-contrast areas like hair or fur.
Understanding the Foreground Select Tool
The Foreground Select Tool in GIMP is designed for making precise cutouts from images. It’s ideal for separating the subject from the background, ensuring clean and accurate selections.
What Is the Foreground Select Tool?
The Foreground Select Tool is a feature in GIMP that helps users create exact selections around a foreground object. By roughly outlining the desired area, users can then refine their selection to isolate the primary subject. This tool is particularly useful when working with complex images where traditional selection methods might fall short.
The tool works similarly to the Fuzzy Select tool but allows more control over distinguishing between the background and the foreground. To use it, one can activate it through the Toolbox or by navigating through Tools → Selection Tools → Foreground Select. With its ability to help achieve clean cutouts, it greatly aids in photo editing and graphic design tasks.
When to Use the Foreground Select Tool
The Foreground Select Tool is best used when there’s a need to extract subjects from busy backgrounds. It excels in situations where attention to detail is crucial, such as editing portraits or product images. The tool is valuable when the background contrasts clearly with the subject, which can be adjusted within the tool’s settings.
For those working regularly with images that need precise edges, this tool is a game-changer. Whether enhancing photo quality or preparing images for digital art, it provides powerful options for achieving professional results. Its use is highly recommended for anyone aiming to make clean and clear cutouts, avoiding the jagged edges often produced by other tools.
Preparing Your Workspace
Before diving into using the Foreground Select Tool in GIMP, it’s important to set up your workspace properly. This involves both configuring GIMP and selecting the right image to work on, ensuring a smooth workflow.
Setting Up GIMP
When starting GIMP, they should ensure it is updated to the latest version. This will provide them with the best features and tools. The toolbox should be clearly visible, containing essential tools for editing.
They might want to adjust the window layout. Having the Layers, Channels, and Brushes dialogs accessible can save time. If the default layout is not preferred, they can customize the interface under Edit > Preferences. They should also make sure to set the desired language and shortcuts.
Opening the Image
Once GIMP is ready, it’s time to open the image they plan to work on. Selecting an image with clear details and contrast will make the cutout process smoother. They can open an image by going to File > Open and browsing to the desired file.
After opening, it’s helpful to duplicate the layer of the image. This way, the original remains untouched, and all edits are done on the copy. They may also want to zoom in on detailed areas for more precision when using the Foreground Select Tool.
Using the Foreground Select Tool
The Foreground Select Tool in GIMP helps users make precise cutouts by separating the subject from the background. This process involves creating an initial selection, outlining the foreground, and refining the selection edge.
Making the Initial Selection
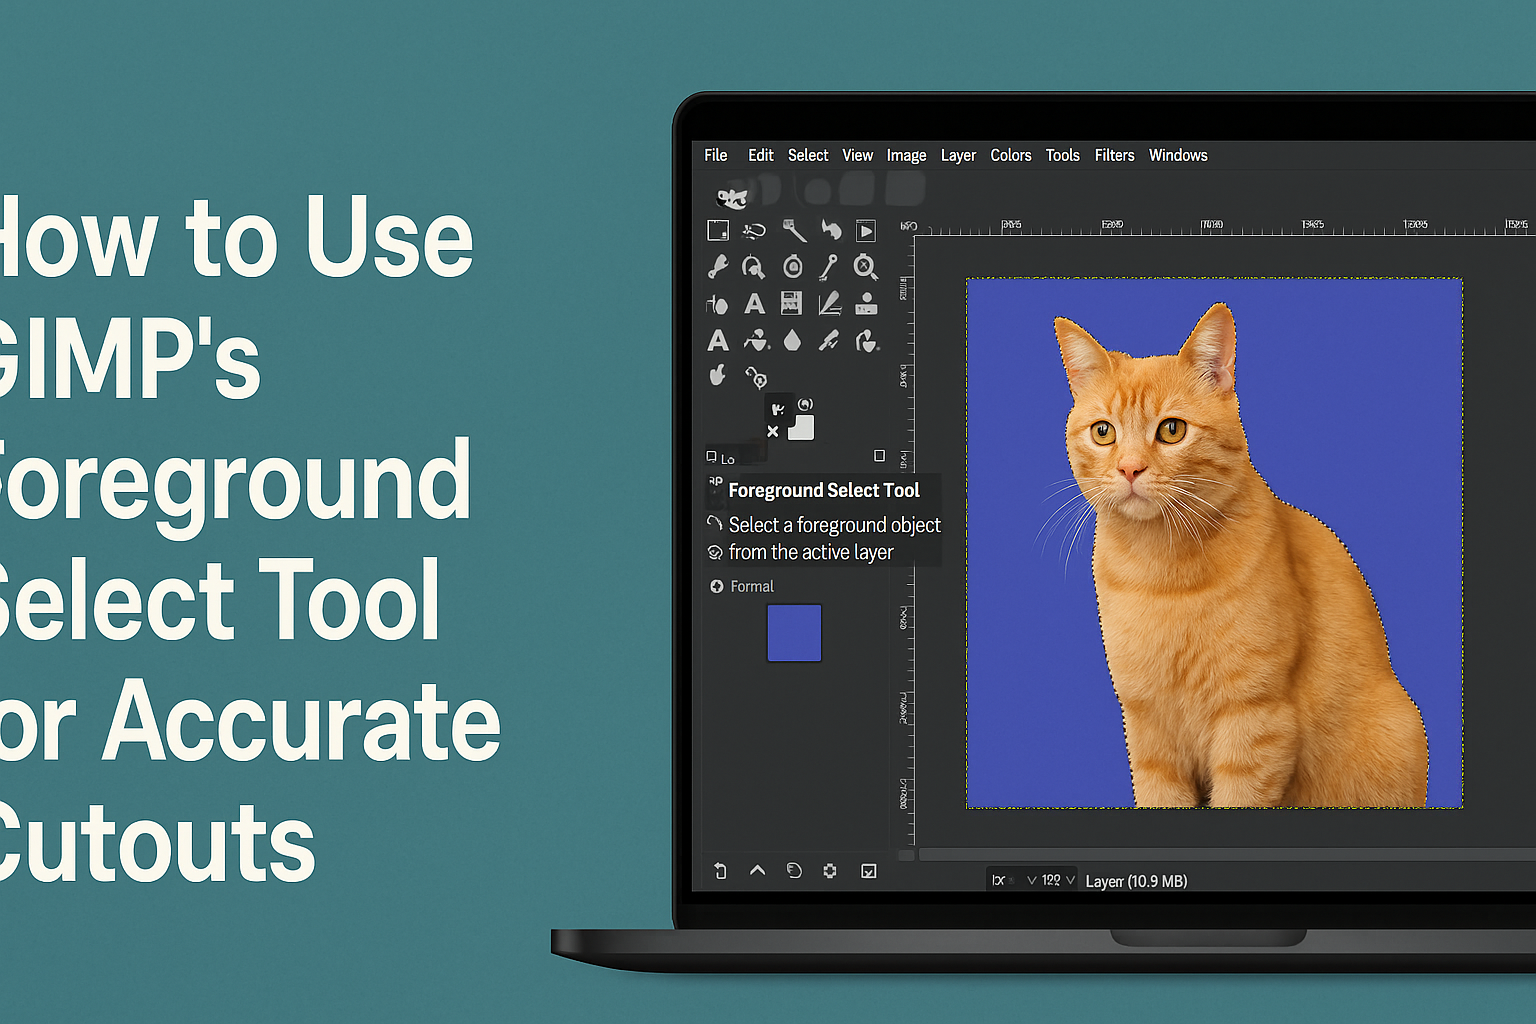
To start, activate the Foreground Select Tool. This can be done by clicking its icon in the Toolbox or through the menu under Tools → Selection Tools → Foreground Select. With the tool active, roughly outline the area containing the subject you want to cut out.
The initial selection doesn’t need to be perfect, as you will refine it later. Aim to include as much of the subject as possible while excluding most of the background. This step sets the stage for a more detailed outline.
When the rough selection is complete, press the Enter key to switch the tool to “Refine” mode. In this mode, you can specify the foreground parts by drawing an outline over them. Move to the next step for more precision.
Drawing the Foreground Outline
Begin by drawing over the parts of the image you wish to keep as the foreground. The cursor changes to a brush, signifying that it’s now time to paint over these areas. Paint over the subject’s surface with a contrasting color to enhance visibility.
It’s crucial to cover all the parts of the subject that should remain visible in the final cutout. If any parts of the subject are still mixed with the background, ensure to paint over them in this step.
Don’t worry if some parts appear to spill over into the background; this will be corrected in the adjusting stage. Being thorough here ensures a more accurate result, especially when dealing with complex images.
Adjusting the Selection Edge
For a polished result, adjust the selection edges to make them as crisp as possible. This can be done by going to the selection editor and refining the boundary between the subject and the background.
Make use of additional tools within the selection editor like feathering or edge sharpening. They help to blend the selection seamlessly without harsh lines. Zooming in may aid in spotting minor imperfections along the edge.
By adjusting these aspects, the outcome will look professional, making it suitable for various projects. Take the time to perfect these edges to ensure the cutout appears natural and clean.
Refining the Selection
Refining the selection in GIMP ensures precise and clean cutouts. This involves using features like Quick Mask, brushes, and tools for feathering and smoothing edges.
Using Quick Mask to Refine Edges
Quick Mask is a powerful tool for improving selections. To activate it, click on the Quick Mask button at the bottom left of the image window.
The selected area appears clear, while unselected areas show a red overlay. Painting on the mask with a brush can add or remove areas from the selection.
Using a soft brush can help blend the edges smoothly. Adjust the brush size and opacity for accuracy. Once satisfied, click the Quick Mask button again to convert the mask back to a selection.
Fine-Tuning with Brushes
For more detailed adjustments, brushes are effective. After making the initial selection, switch to the brush tool.
Change the brush settings such as size, hardness, and opacity to match the complexity of the outline. Smaller brushes work well for intricate areas like hair or fine details.
Use the brush to carefully paint over the selection edges. This method allows for precise control, making it possible to fine-tune even complex shapes.
Feathering and Smoothing Selection
Feathering and smoothing create softer edges, which can make the selection look more natural. To feather a selection, go to the Select menu and choose Feather.
Enter a radius value to set how much to blur the edge. A larger radius results in a softer edge.
For smoothing, use Select > Smooth to eliminate jagged lines. Enter a value to define the amount of smoothing. Both techniques help blend the selection seamlessly into new backgrounds.
Finalizing the Cutout
Once the Foreground Select tool in GIMP has isolated the desired part of the image, the next steps involve creating a mask, applying it, and saving your hard work. These steps ensure a clean and precise cutout, perfect for professional-looking results.
Creating a Mask from Selection
After selecting the foreground, it’s time to turn this selection into a mask. Masks allow users to hide or reveal parts of an image without permanently altering it. In GIMP, the selection can be transformed into a mask by going to the Layers menu and choosing Add Layer Mask. When the dialog appears, users can select Selection to initialize the mask based on the current selection.
Using masks instead of deleting parts provides flexibility. If the mask doesn’t look perfect, it can be adjusted. Painting with black on the mask will hide parts, while painting with white will reveal them. This technique allows for fine-tuning and ensures that the selection edges are smooth and natural-looking, especially around complex areas.
Applying the Mask for Final Cutout
Applying a mask is straightforward. After creating the mask from the selection, users can view its effectiveness by looking at how the exposed areas align with the original selection. Sometimes, adjustments might be needed if certain parts didn’t get masked properly.
To refine the mask, use soft brushes for a more natural blend. For difficult areas, like hair or fur, adjusting the brush opacity can help in achieving smoother transitions. The Creative Pad Media tutorial suggests techniques like these to handle tough selections effectively.
Saving Your Work
Once satisfied with the cutout, preserving it is crucial. Saving the project file in GIMP’s default format, .xcf, ensures that layers and masks remain editable. This allows for future changes without starting from scratch.
For sharing or using the cutout, export the image. Choose File > Export As and select preferred formats like JPEG or PNG. If transparency is important, such as for logos, PNG is ideal because it supports transparent backgrounds.
Advanced Techniques
These advanced techniques help users master the Foreground Select Tool in GIMP. Learn how to tackle tricky backgrounds, achieve precision with hair and fine details, and enhance accuracy using color palettes.
Handling Complex Backgrounds
When dealing with complex backgrounds, the Foreground Select Tool can be a lifesaver. Start by making a rough selection around the subject. This tells GIMP to focus on the area of interest.
Next, carefully refine the selection. Use the brush to mark sections of the foreground, which helps the tool distinguish between the subject and background. Adjust the size of the brush to better handle areas with busy or textured backgrounds.
Regularly zoom in and out to ensure accuracy across different parts of the image. This technique helps prevent the selection from including unwanted background elements, which ensures a cleaner cutout.
Dealing with Hair and Fine Details
Detail work, such as selecting strands of hair, demands patience. Begin by drawing a rough outline around the subject. Ensure that enough surrounding area is included so the tool can factor in the fine details.
Use a smaller brush size to carefully mark the hair or intricate parts of the subject. This signals to GIMP that these areas are part of the selection, allowing for better precision.
The feathering option can be adjusted to smooth the edges and avoid harsh lines. Reviewing the selection by enabling the selection mask view helps to see which areas need more attention, enhancing the final result.
Using Color Palettes for Higher Accuracy
Using color palettes can greatly improve the accuracy of your selection. Identify the predominant colors in the foreground and background.
Adjust the settings of the tool to prioritize these colors. This means tweaking the sensitivity of the tool toward certain shades. By doing so, it becomes easier for GIMP to separate the foreground from the background based on color differences.
In challenging areas, manually marking additional colors helps refine the selection further. This can be especially useful when the subject has colors similar to those in the background.
Tips for Better Results
Using GIMP’s Foreground Select Tool can enhance your image editing projects. Knowing a few tricks, like keyboard shortcuts and learning from common mistakes, will make the process smoother and give you more precise results.
Keyboard Shortcuts for Efficiency
Using keyboard shortcuts speeds up the editing process. For example, pressing Shift while drawing your selection can help refine edges. The Ctrl key is useful for adding to or subtracting from your selection, giving more precise control.
Familiarize yourself with these shortcuts to reduce time spent on repetitive tasks. It might take a little practice, but once mastered, it becomes second nature. The right combination of keys can save time, so keep a list of shortcuts handy when working on detailed edits.
Common Pitfalls to Avoid
One common mistake when using the Foreground Select Tool is not properly defining the foreground. It can lead to patchy or inaccurate cutouts. Taking the time to clearly draw around your object initially saves a lot of editing time later.
Another pitfall is not zooming in enough when working on small details. It’s vital to zoom in and get a clear look at the edges that need perfecting. Also, ignoring the feathering options can result in harsh transitions. These settings help blend edges smoothly.
Practicing with Different Images
Experimenting with various types of images can improve skills with the tool. Practice on images with contrasting backgrounds and then move to more complex backgrounds. This helps in understanding how the tool works in different scenarios.
Trying out images with different textures, like hair or fur, can improve proficiency. These are often tricky areas, and mastering them improves overall cutout quality. Keep experimenting with diverse subjects and study the outcomes. This will build confidence and skills essential for professional-quality edits.
Creative Applications
The Foreground Select Tool in GIMP opens up a world of creative possibilities. It allows users to blend images seamlessly, create dynamic photo montages, and design unique graphics by altering and combining various elements.
Combining Cutouts with Other Images
Using the Foreground Select Tool, users can extract precise parts of an image and blend them into another. This technique is useful in creating complex compositions.
For instance, one might take a subject from a beach photo and place it in front of an urban skyline. This process often involves resizing and adjusting colors to make the combination look natural. To achieve this, users may need to experiment with layers and opacity levels. Adjusting these can help in achieving a smooth transition between images, making the final composition more realistic.
Creating Collages and Photo Montages
Photo montages and collages are vibrant ways to tell a story or capture a theme. The Foreground Select Tool enables selecting intricate elements, such as strands of hair or delicate fabric.
After making a selection, users can arrange multiple cutouts on a new canvas. These pieces can overlap or be arranged in a grid or random pattern. This method not only highlights individual elements but also creates a cohesive piece where diverse images blend to convey a unified message. The ability to work with layers means each piece can be edited independently, allowing for endless creativity and customization.
Designing Custom Graphics
Designers can use the Foreground Select Tool to create custom graphics, tailoring each element to fit specific design needs. This is particularly beneficial in creating logos, banners, or custom artwork.
A designer might extract a logo from a packed background for a brand refresh. Once isolated, the logo can be altered in color, resized, or combined with text to craft a fresh graphic. The Foreground Select Tool helps in maintaining the integrity of the original design while allowing modifications. This tool is instrumental in producing polished graphics that stand out and meet unique project requirements.