Creating a 3D model in Canva is an exciting way to enhance designs and make them pop.
Using Canva’s user-friendly tools, anyone can design stunning 3D models that capture attention and spark creativity.
Whether for social media, presentations, or personal projects, these skills can bring a fresh look to everyday visuals.
With just a few simple steps, users can choose templates, add 3D elements, and adjust features to fit their unique style.
Exploring the different textures and effects available can make a big difference in the final outcome. This flexibility allows for endless possibilities, making design both fun and effective.
Learning how to use these tools can transform average projects into eye-catching masterpieces. As they dive into the world of 3D design, they will discover how to combine basic elements to create impactful visuals.
Embracing this creative journey can lead to impressive results that stand out.
Getting Started with Canva
Canva is a user-friendly design tool that makes it easy to create stunning visuals.
Getting started involves setting up an account and familiarizing oneself with the interface to make design tasks simpler.
Creating a New Canva Account
To use Canva, the first step is to create an account. This can be done by visiting the Canva website.
Users can sign up using an email address, Google account, or Facebook account.
After entering the required information, they will receive a confirmation email. Clicking the link in that email will activate the account.
Once logged in, users can choose between the free version and the premium subscription. The free version offers plenty of features for beginners. Premium plans provide access to more templates and design elements.
Navigating the Canva Interface
The Canva interface is intuitive and designed for ease of use. When users log in, they will see a dashboard with various design options.
On the left, there’s a panel to create designs or explore templates. Users can select different categories like social media, presentations, or posters.
The top toolbar includes options to upload images, add text, and access tools. Users can start new projects or edit existing designs by clicking on them.
Familiarizing oneself with elements such as grids and layers will enhance the design process. Canva also features helpful tutorials for additional guidance.
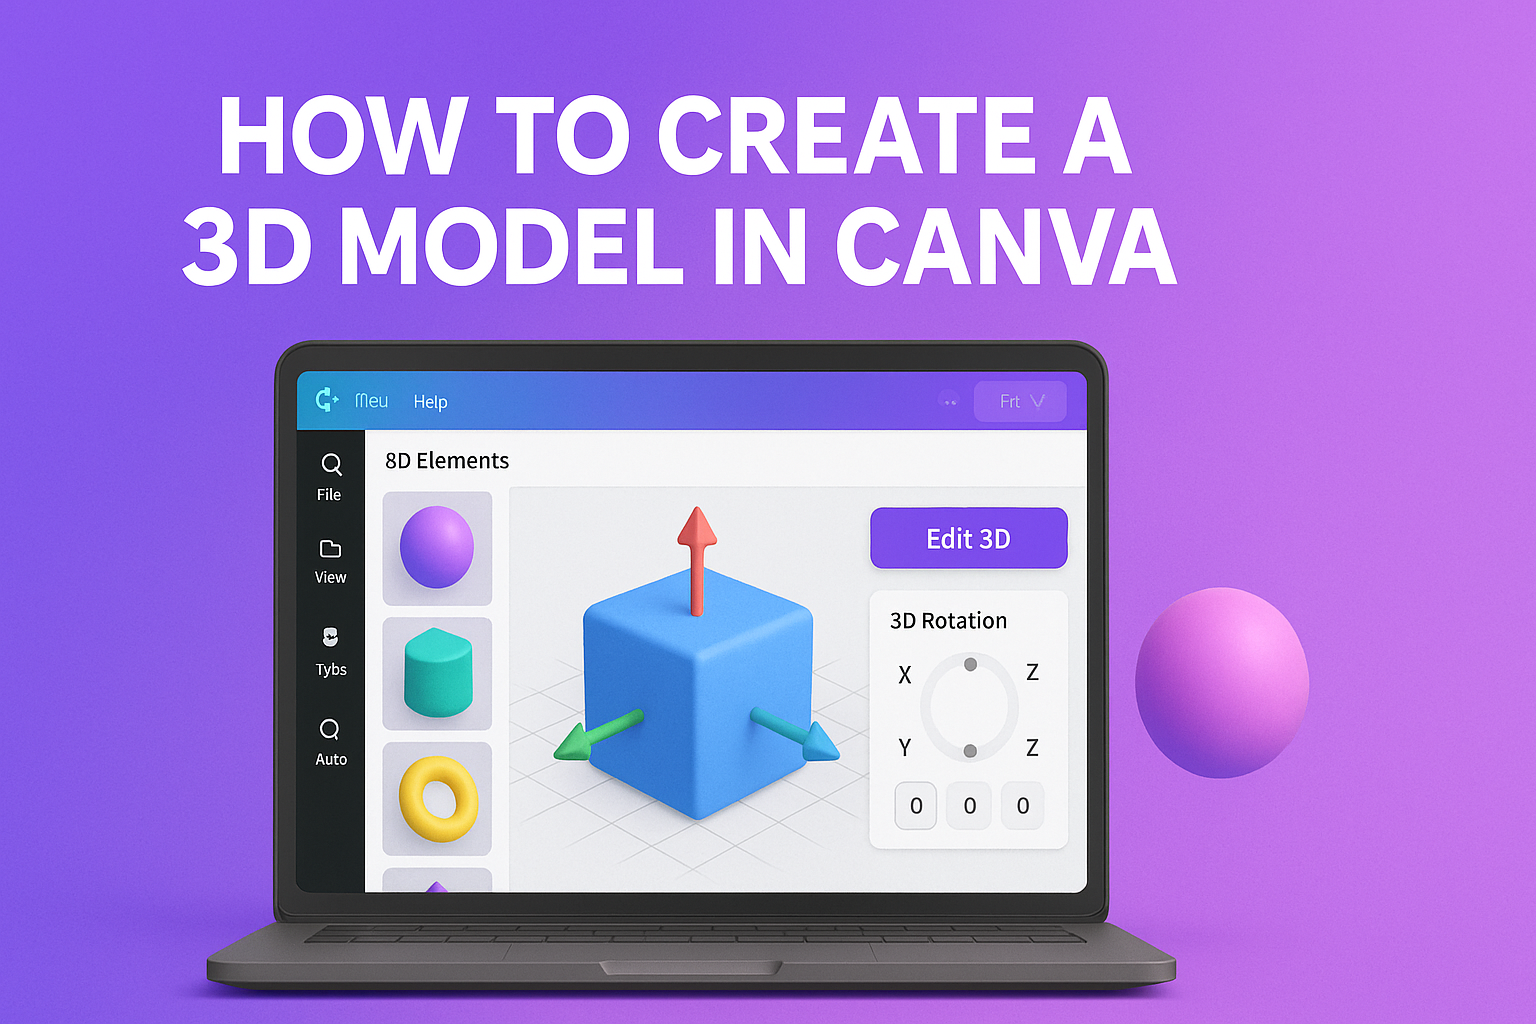
Designing Your First 3D Model
Creating a 3D model in Canva can be a fun and rewarding experience. By selecting the right template, utilizing built-in features, and adding custom text and graphics, anyone can bring their ideas to life.
Choosing the Right Template
The first step in designing a 3D model is picking a suitable template. Canva offers various templates that can serve as a foundation for the project.
He or she can browse through categories like “Products,” “Characters,” or “Scenes” to find inspiration.
Once a template is chosen, it can be customized to fit specific needs or preferences. This choice sets the stage for creativity and helps streamline the design process.
Utilizing Canva’s 3D Model Features
Canva provides several unique features to enhance 3D designs. Users can rotate, resize, and position objects easily in the 3D space.
It’s also possible to toggle shadows and lighting effects, which can add depth and realism to the model.
Getting familiar with these features can help ensure a polished final product. He or she should experiment with these tools to see what works best for their vision.
Adding Text and Graphics
Incorporating text and graphics is crucial for personalizing a 3D model. Canva allows users to add text elements in various fonts and styles.
They can adjust the size, color, and position to match the overall theme.
Adding shapes, icons, or even images can enhance the design further. It is a great way to communicate messages or highlight specific areas in the model.
By mixing these elements effectively, the designer can create a unique and eye-catching 3D model.
Customizing and Editing
Customizing a 3D model in Canva allows for a unique touch. This section covers how to adjust colors and textures, along with manipulating shapes and sizes to enhance the design.
Adjusting Colors and Textures
To begin adjusting colors, users can select the 3D model and access the color palette. A variety of colors is available, allowing for flexibility in design.
Steps to Change Colors:
- Click on the model.
- Choose a color from the palette.
- Explore gradient options for added depth.
Textures can also enhance the appearance. Canva provides textures like glossy or matte finishes, which can be applied to surfaces. Users can find texture options in the same menu as colors.
By mixing and matching colors with different textures, the 3D model can reflect the desired mood or theme effectively.
Manipulating Shapes and Sizes
Manipulating shapes and sizes is crucial for creating a balanced design. When a user clicks on a 3D object, it can be resized by dragging the corners. This allows for precise adjustments.
Tips for Size Adjustments:
- Hold the Shift key to maintain proportions.
- Use the alignment tools to position objects correctly.
Users can also change the shape by selecting different models from the element library. These models can be rotated or flipped to achieve the perfect look.
Combining various shapes allows users to create unique designs that stand out. By experimenting with different sizes and shapes, creativity can flourish in their projects.
Sharing and Exporting Your 3D Model
When it’s time to share or export a 3D model created in Canva, there are simple methods available. Users can easily export their model as an image or PDF, or share it directly on social media. Each option offers unique benefits for different needs.
Exporting as an Image or PDF
To export a 3D model from Canva, the user should locate the “Download” button in the top right corner of the editor. After clicking on it, they can choose between various file formats.
For images, selecting PNG or JPG is ideal for high-quality visuals. PDF is great for presentations or printed materials. After choosing the format, the user clicks “Download” to save the file to their computer. This process ensures that the model retains its quality and can be easily accessed later.
Sharing on Social Media
Sharing a 3D model on social media is straightforward. Once the model is ready, the user can click the “Share” button found in the top right corner of Canva.
They will then see options to post directly to platforms like Facebook, Twitter, or Instagram.
Before sharing, the user can add captions or descriptions to give context to their model. This adds a personal touch and engages viewers.
Once satisfied, they simply hit the share button to post. This method allows the user to showcase their work and connect with friends or potential clients easily.