Flipping an image in Canva is a simple process that can greatly enhance any design project. With just a few clicks, users can change the orientation of their images horizontally or vertically, giving their work a fresh look.
Whether for social media graphics, presentations, or personal projects, knowing how to flip an image can add a creative touch.
Many users find that flipping an image can improve its composition or emphasize a different part of the visual. It’s an easy technique that anyone can master within minutes, making it an essential skill for anyone using Canva.
This guide will walk through the steps to flip an image effectively and unlock new possibilities in design.
By using the built-in Canva features, designers can quickly transform their images without needing advanced skills. Understanding how to utilize the flip tool can lead to more engaging and visually appealing content.
Readers are invited to explore the easy steps and tips for flipping images in Canva.
Getting Started with Canva
Canva is a user-friendly design tool that helps users create beautiful visuals for various purposes. Getting familiar with its basics will make the design process smooth and enjoyable.
Creating a New Canva Project
To start a new project in Canva, the user can visit the Canva website or app. After logging in, they will see the option to create a design.
- Choose a Template: Users can select from a variety of templates like social media posts, presentations, and flyers. This makes it easy to find the right fit for their project.
- Custom Dimensions: For those who want something unique, entering custom dimensions is an option. They simply click on the “Custom Size” button and input their desired width and height.
- Personalized Designs: Once in the design canvas, users can add elements such as text, images, and backgrounds.
This flexibility allows for a personalized touch to every project.
Understanding Canva’s Interface
After opening a new project, becoming familiar with Canva’s interface is crucial. The layout is designed for ease of use.
- Toolbar: At the top of the screen, users will find the main toolbar. This is where they can access tools for adding text, images, and other design elements.
- Left Menu: On the left side, there is a menu that includes options for templates, photos, elements, and more. Users can click through these categories to find what they need.
- Canvas Area: The center of the screen is the canvas where the design comes to life. Users can drag and drop elements here easily.
With its simple layout, Canva makes designing straightforward and enjoyable for everyone.
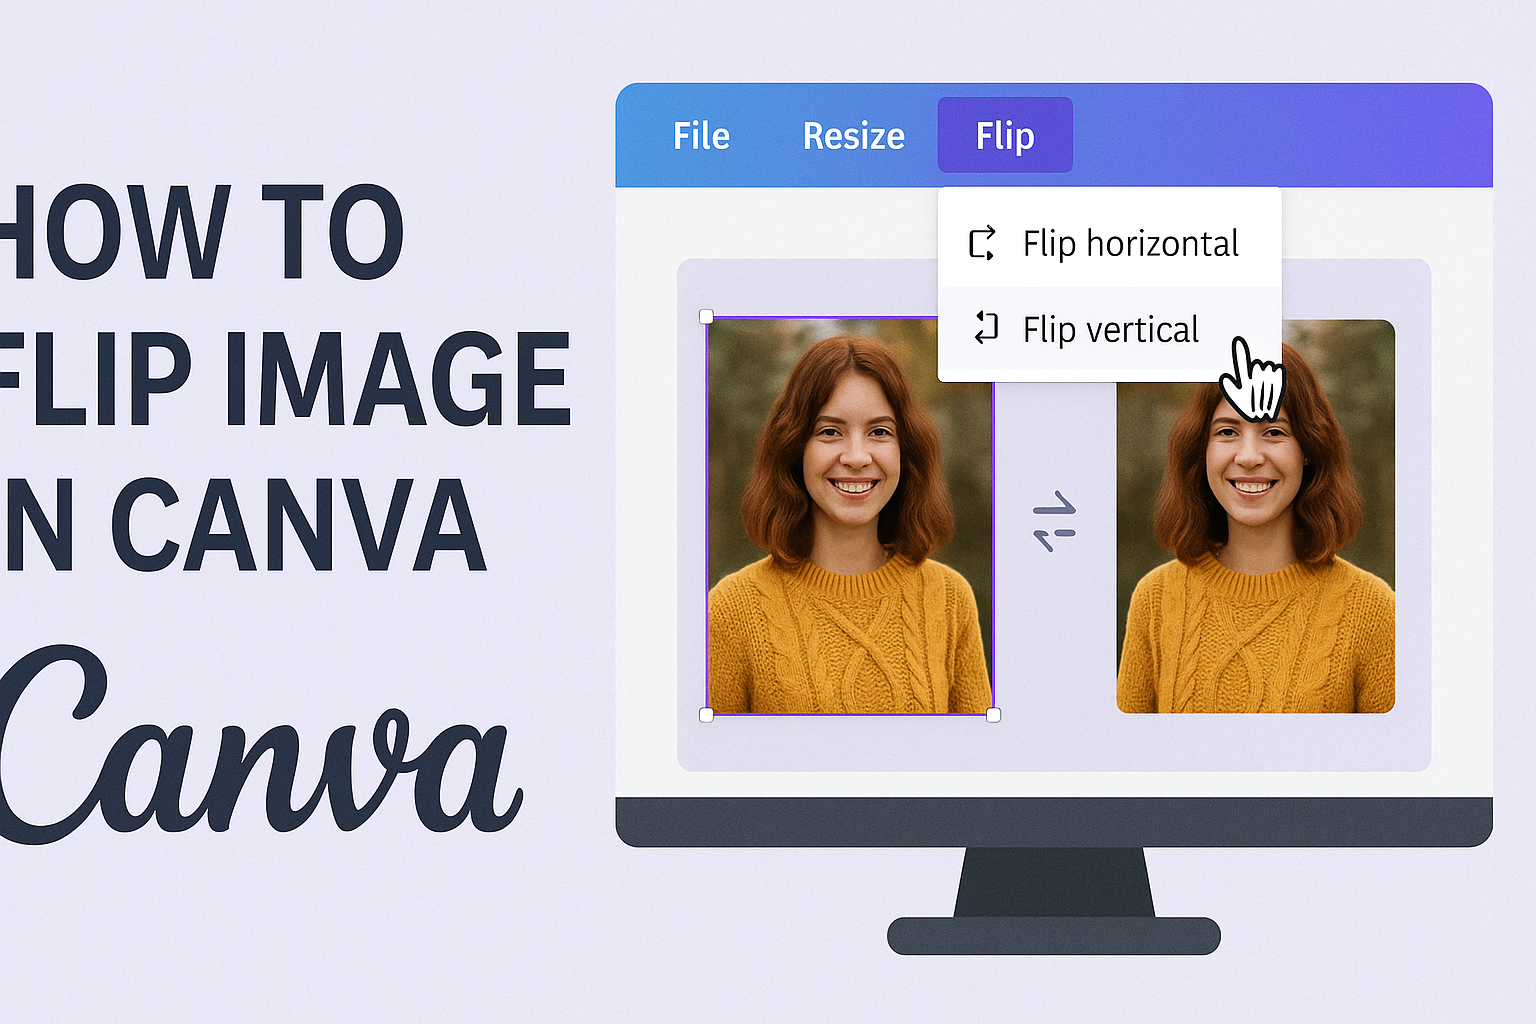
How to Use the Image Flipper Tool
Flipping an image in Canva is easy and quick. This section explains how to select an image and flip it both horizontally and vertically.
Selecting Your Image
To start, the user needs to open Canva and either create a new design or select an existing one. Once in the editor, they should navigate to the left panel where the “Uploads” section is located. Here, it’s possible to upload a new image or use any images already saved in the account.
After choosing the image, they simply need to click on it to add it to their design. The image will then appear on the canvas, ready for adjustments.
Selecting the right image is crucial since it will determine the final look after flipping.
Flipping Your Image Horizontally
Once the image is selected, the user needs to look for the toolbar at the top of the screen. There, they will see a button labeled “Flip.” Clicking on this button will present options for flipping.
To flip the image horizontally, the user should choose the “Flip horizontal” option. This action will mirror the image from left to right. It’s a useful feature for creating a balanced design or changing the perspective.
After flipping, users can position the image as needed.
Flipping Your Image Vertically
For a different effect, flipping the image vertically is also an option. After selecting the image, they again access the “Flip” button in the toolbar. This time, the user should choose “Flip vertical.”
This will mirror the image from top to bottom. It can create a striking visual effect or correct the orientation of elements in a design.
Users can easily adjust the flipped image’s placement on the canvas as needed.
Adjusting Your Flipped Image
After flipping an image in Canva, it is important to adjust its size and appearance to fit within the desired layout. Key adjustments include resizing, cropping, and applying helpful filters. These steps ensure the image meets specific design needs.
Resizing and Cropping
To resize an image, the user can click on the corners of the image and drag it to increase or decrease its size. This method provides a straightforward way to make the image fit perfectly within the design.
Cropping can also help focus on the desired parts of the image. Users should select the image and then click on the crop button in the toolbar. They can adjust the borders by dragging to remove unwanted areas. This is useful for creating a clean and focused look.
Applying Filters and Adjustments
Canva provides various filters and adjustments that can enhance the appearance of a flipped image. After selecting the image, one can open the “Adjust” panel from the toolbar. There, options such as brightness, contrast, and saturation can be modified.
Users can also apply filters to change the overall tone of the image. They simply click on the “Filter” section and explore different styles available.
Each filter alters the image’s look, helping it blend better with the surrounding design elements. Experimenting with these features adds a personal touch to the final result.
Saving and Exporting Your Edited Image
After flipping an image in Canva, it’s important to know how to save and export it properly. This allows for easy access and sharing of the edited images across different platforms.
Exporting Options for Different Platforms
Canva provides various exporting options to cater to different needs. Users can choose to export their images in formats like PNG, JPG, or PDF.
- PNG is great for preserving quality and includes transparent backgrounds.
- JPG is ideal for photographs and offers a smaller file size.
- PDF is useful for printing or sharing designs with multiple pages.
To choose an option, users simply click the “Download” button after selecting the image. Then, they can pick the desired format from a dropdown menu.
This flexibility ensures that the exported images can be used effectively in any project or platform.
Downloading the Image to Your Device
Once the desired format is chosen, downloading the image to a device is straightforward.
After clicking the “Download” button, Canva will prepare the image. Users will see a progress notification, and the image will automatically download to the default download location on their device.
They can also find it in the designated file folder, making it easy to locate later.
For mobile devices, Canva prompts users to save the image directly to their photo library or file storage.
This seamless process allows for quick access whenever needed, whether for social media or presentations.