Creating a unique look for digital artwork can be a fun challenge. Krita provides users with a powerful tool known as the Pattern Fill Tool. This tool allows artists to fill layers with custom patterns, giving their artwork a distinctive texture and feel.
To start designing a custom pattern, users can explore the Pattern Fill feature in Krita. This feature helps artists bring depth to their work by mimicking materials like watercolor paper or canvas. By exploring different textures, artists can easily enhance their compositions.
For those looking to add their own touch, Krita offers the ability to design and implement new patterns. Using the Pattern Editing Tool, users can modify vector shapes, adjusting size and origin to suit their needs. This flexibility ensures every piece of art is unique, making the design process both creative and rewarding.
Exploring Krita’s Interface
Krita offers a range of tools to create and customize patterns. These features can be accessed through the Pattern Fill Tool, the comprehensive toolbox, and advanced settings for more intricate designs. Users will find it convenient to explore these tools to enhance their creative projects.
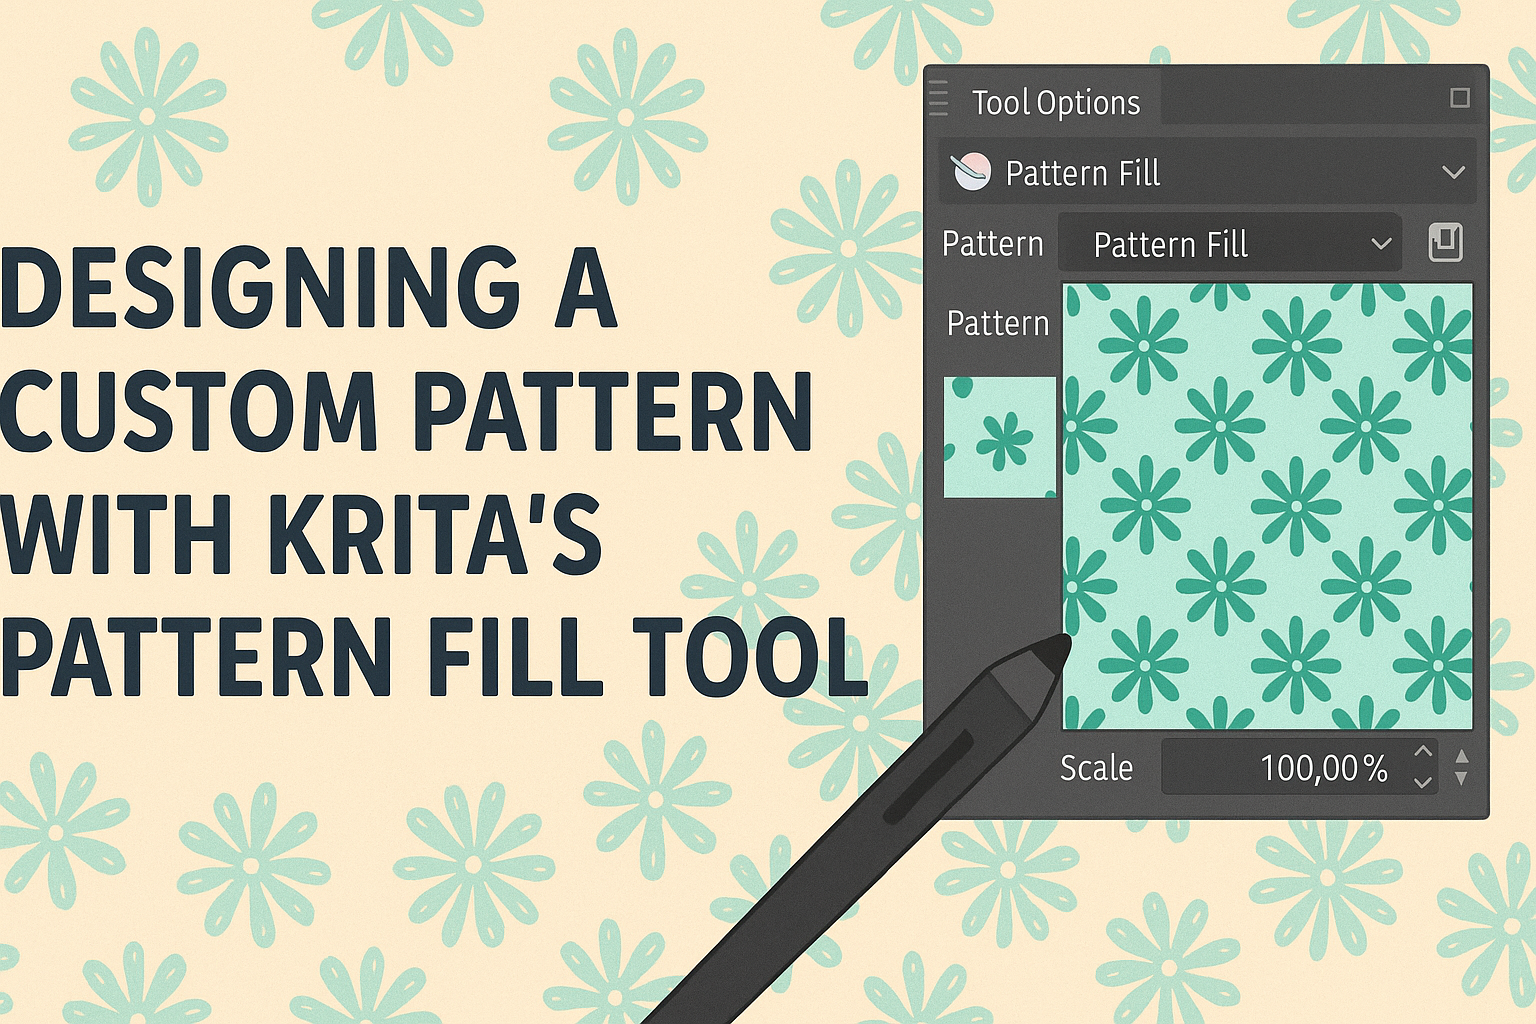
Discover Pattern Fill Tool
The Pattern Fill Tool in Krita is a handy feature for anyone looking to add textures or designs to their artwork. It allows users to select from a variety of pre-loaded patterns or create their own. To access it, open a new project and navigate to the Fill Layer option.
Once in the Pattern Fill settings, users can browse through a wide array of textures, from watercolor paper to canvas. It provides flexibility by offering choices for scale and rotation. With its intuitive interface, artists can easily adjust these parameters to suit the artistic vision of their project.
Additionally, users have the option to import their own designs, making it possible to personalize every detail of their artwork. This tool is perfect for both beginners and advanced digital artists looking to integrate unique textures into their work. More details can be found in the Pattern Fill documentation.
Understanding the Toolbox
Krita’s toolbox is an essential hub for accessing different tools and features. Located on the left side by default, it includes brushes, selection tools, and the color picker. It’s a straightforward setup that makes finding and using various tools easy.
Each tool in this panel can be customized to fit specific needs. For instance, brush settings allow users to tweak size and opacity, giving control over every stroke. Selection tools like the rectangle and polygonal lasso enable precise work on specific areas.
Beginners will appreciate the simplicity, while experienced users can delve deeper into the settings to optimize their workflow. Exploring tool properties is encouraged to fully utilize Krita’s potential in producing high-quality digital art.
Accessing Advanced Settings
Krita also offers advanced settings for artists who seek more control over their creations. These settings can be found in the Preferences menu and cover various aspects, such as canvas input settings and resource management.
Through these advanced options, users can tweak performance settings to better handle large files. There is also the ability to configure shortcuts, which can speed up the workflow significantly. The resource manager allows users to organize brushes and patterns efficiently.
For those working with complex projects, these advanced features provide the capability to customize the software to fit personal workflow preferences, enhancing both productivity and creativity.
Preparing to Create Patterns
Before diving into creating patterns in Krita, it’s essential to prepare by setting up the right canvas size, selecting suitable brushes, and choosing colors that will complement your design. Each step helps ensure a smooth workflow and a successful end result.
Setting Up Your Canvas
The first thing is to decide on the canvas size. A typical pattern in Krita could range from 256×256 pixels to 1024×1024 pixels, depending on the level of detail needed. Smaller sizes are usually easier to work with and allow for seamless tiling.
It’s important to enable the grid feature. The grid helps in aligning elements, ensuring they fit together perfectly when repeated. This visual guide can be adjusted in size to match the dimensions of the pattern tiles.
Another step is to utilize guides. These provide visual markers, adding precision when placing elements. Guides can be positioned around the edges or any specific section of the canvas where elements need precise alignment.
Selecting Appropriate Brushes
Choosing the right brush is vital for creating quality patterns. Krita offers a wide range of brush presets. These can include textures like watercolor, charcoal, and custom shapes that can add interesting effects to the pattern.
Brush size should be in harmony with the canvas size. Too large of a brush can overpower small canvases, while too small of a brush might take too long to cover larger areas.
Custom brushes can also be imported or created to meet specific design needs, adding uniqueness to the pattern. Remember, brushes with texture or varied opacity can create depth and detail, enriching the overall pattern.
Choosing Color Palettes
Color selection can greatly influence the mood and style of a pattern. Krita allows the creation of custom color palettes, which are useful for maintaining color consistency throughout the design.
It’s helpful to start with a limited color palette. This can include 3 to 5 primary colors that complement each other well. Limiting colors makes the pattern more cohesive.
Using shades and tints of these main colors can add variety without disrupting the unity of the pattern. Tools in Krita can help generate color schemes based on selected hues, making the process smoother.
Designing Patterns Step by Step
Creating custom patterns in Krita can add a unique touch to your digital artwork. By following a structured approach, like sketching your design, applying base colors, and detailing the pattern, you can achieve professional-looking results.
Sketching Your Design
Start with a blank canvas in Krita and focus on your initial sketch. Think about the shapes and forms you want in your pattern. Keeping your design simple at first will make it easier to refine. Use a light color or an almost transparent brush for sketching. This helps in making adjustments without losing visibility of the overall design.
Remember, patterns often involve repetition, so consider how elements will tile. Functions like mirror or wrap-around in Krita can be useful. They help you see how your pattern fits together when repeated. Keep your sketches flexible, as you might want to adjust the size, orientation, or spacing later.
Applying Base Colors
Once your design is sketched, it’s time to add base colors. Selecting a limited color palette can make your design cohesive and visually appealing. Krita allows you to create swatches that simplify this process. For example, a vibrant color can draw attention, while muted tones can add subtlety.
Use the fill tool to quickly color large areas. Adjust the opacity to layer colors and create depth. Avoid overloading the design with too many colors, as it can become overwhelming. Try experimenting with gradients to add a professional look to your work.
Detailing the Pattern
Now it’s time to add details to your pattern. Focus on enhancing features that make each element stand out. For instance, use different brush textures to give parts a unique feel that adds interest. Shading and highlights are crucial here, as they give dimension and a realistic look.
Pay attention to the edges of your design, especially where it will tile. Ensure that elements seamlessly connect when repeated. That way, it doesn’t appear disjointed. This is where Krita’s wrap-around mode can assist. Use it to see how your pattern stitches together, ensuring continuity across tiles.
Using the Pattern Fill Tool
Krita’s Pattern Fill Tool is a versatile feature that allows artists to fill layers with unique textures and designs. Understanding how to navigate this tool can greatly enhance creativity and the overall quality of digital illustrations.
Navigating the Fill Options
The Fill Tool in Krita is user-friendly and accessible. It provides various fill options to suit different artistic needs. To begin, the tool is located in the toolbox on the left side of the screen. Clicking on it reveals several settings in the Tool Options docker.
Artists can choose between filling with the foreground color, pattern, or gradient. Opting for the pattern fill lets users access a list of preloaded patterns. For a wider range, additional patterns can be added through the Resource Management interface.
Adjusting Pattern Scale and Rotation
Customizing the scale and rotation of a pattern is crucial for adapting it to an artwork’s specific needs. In the Tool Options docker, sliders allow for modifying the pattern’s scale. This means an artist can make the pattern appear larger or smaller within the selected area.
Rotation adjustments provide the ability to tilt the pattern at various angles, adding a dynamic effect to the design. This option can be particularly useful when trying to achieve a natural look in textures such as fabric or landscapes.
Artists have the freedom to experiment with these settings, ensuring each project has its own unique touch.
Filling Areas with Patterns
Filling an area with patterns in Krita is straightforward yet highly customizable. By selecting a desired pattern, artists can click on the canvas to fill a specific section. This area will be instantly covered with the chosen design.
For more control, users can apply patterns to selections made with tools like the Lasso or Rectangle Select. This method provides the opportunity to fill only the intended parts of the image, enhancing precision in detailed work.
Using pattern fill, artists can effectively replicate textures like stone, wood, and more, bringing depth and realism to their illustrations.
Finalizing and Saving Patterns
During the final steps of designing a custom pattern in Krita, refining edges, testing on various objects, and exporting the pattern are crucial. These steps ensure the pattern looks polished and functions well in different contexts.
Refining Edges and Overlays
Refining the edges of a custom pattern is essential for achieving a seamless look. This involves ensuring that when the pattern tiles, the edges align perfectly. Krita provides tools that allow users to stretch and manipulate pattern images, enabling precise alignment. Users can also adjust the pattern origin, which is critical in getting the perfect tiling effect.
Overlays can add complexity and depth. By layering different textures or adjusting the transparency of the pattern layer, designers create a more dynamic design.
Testing the Pattern on Various Objects
Testing a pattern on different objects is important to see how it interacts with various surfaces and dimensions. In Krita, users can apply patterns to layers that represent different shapes and textures. This helps identify if any adjustments are needed.
Different objects might highlight flaws or unexpected behavior in the pattern. For instance, a pattern might look great on a flat surface but could warp on curved objects. This testing phase ensures that the pattern maintains its aesthetic appeal in all situations.
Exporting Your Custom Pattern
Once the pattern is refined and tested, exporting it is the final step. Krita allows for exporting in several formats, suitable for various purposes like printing or digital use. Patterns can be saved in formats like PNG or JPEG, depending on the intended use.
It’s also possible to save patterns directly in Krita’s pattern library for future projects. This provides easy access and ensures consistency across different designs. Saving the pattern generally involves using Krita’s Resource Management tools, which makes the process straightforward and efficient.
Advanced Techniques and Tips
Exploring advanced techniques can greatly enhance the use of Krita’s Pattern Fill Tool. Creating seamless patterns, managing layers effectively, and incorporating textures are important aspects to master.
Creating Seamless Patterns
Developing seamless patterns ensures that designs repeat perfectly without visible borders. Users may start by designing a square canvas filled with elements. It’s crucial to pay attention to the edges; they should align or connect smoothly when repeated.
A tip is using Krita’s built-in wrap-around mode. This mode helps visually align patterns by showing how images repeat. It’s found in the “View” menu. Adjusting edges becomes easier, ensuring perfect repetition. Adjust elements within this mode to close gaps and refine the design for a flawless seamless pattern.
Managing Layers for Complex Patterns
Managing layers is key when working on more intricate patterns. Layers help organize different elements, such as shapes and colors, that contribute to the overall design. Users can utilize groups to organize these layers efficiently.
Naming layers clearly is important. It prevents confusion and speeds up the design process. Krita offers the ability to apply layer masks as well, enabling non-destructive edits to specific parts of a pattern.
Using fill layers can also optimize memory usage. These layers handle large areas of color efficiently, reducing memory load.
Incorporating Textures and Effects
Adding textures can bring depth to a pattern, enhancing its artistic value. Krita allows artists to use the pattern fill tool to add various textures like watercolor, linen, or stone.
Start by filling a layer with a texture, then adjust the opacity or blend modes to create varied visual effects. Employing layer styles like shadows or highlights can add more complexity. Experimenting with these will lead to discovering unique styles that offer texture and depth.
These advanced techniques, when mastered, can transform simple patterns into complex, visually appealing designs. Preparing and utilizing these tips efficiently streamlines the process while creating stunning artwork.