Creating beautiful wedding invitations sets the tone for the entire event.
With Gravit Designer, one can craft elegant invitations that reflect personal style and unique themes. This user-friendly design platform offers a range of templates and tools that make the process enjoyable, even for beginners.
The power of customization is at the user’s fingertips, allowing for the addition of personal images and text. Incorporating special touches can transform a simple invite into a memorable keepsake.
By using Gravit’s drag-and-drop features, anyone can easily design an invitation that impresses guests and captures the essence of their special day.
In this blog post, readers will discover practical steps to create stunning wedding invitations with Gravit Designer.
They will explore tips for choosing the right templates and adding personal elements to make their invitations truly unique. This journey into design not only simplifies the process but also enriches the overall wedding planning experience.
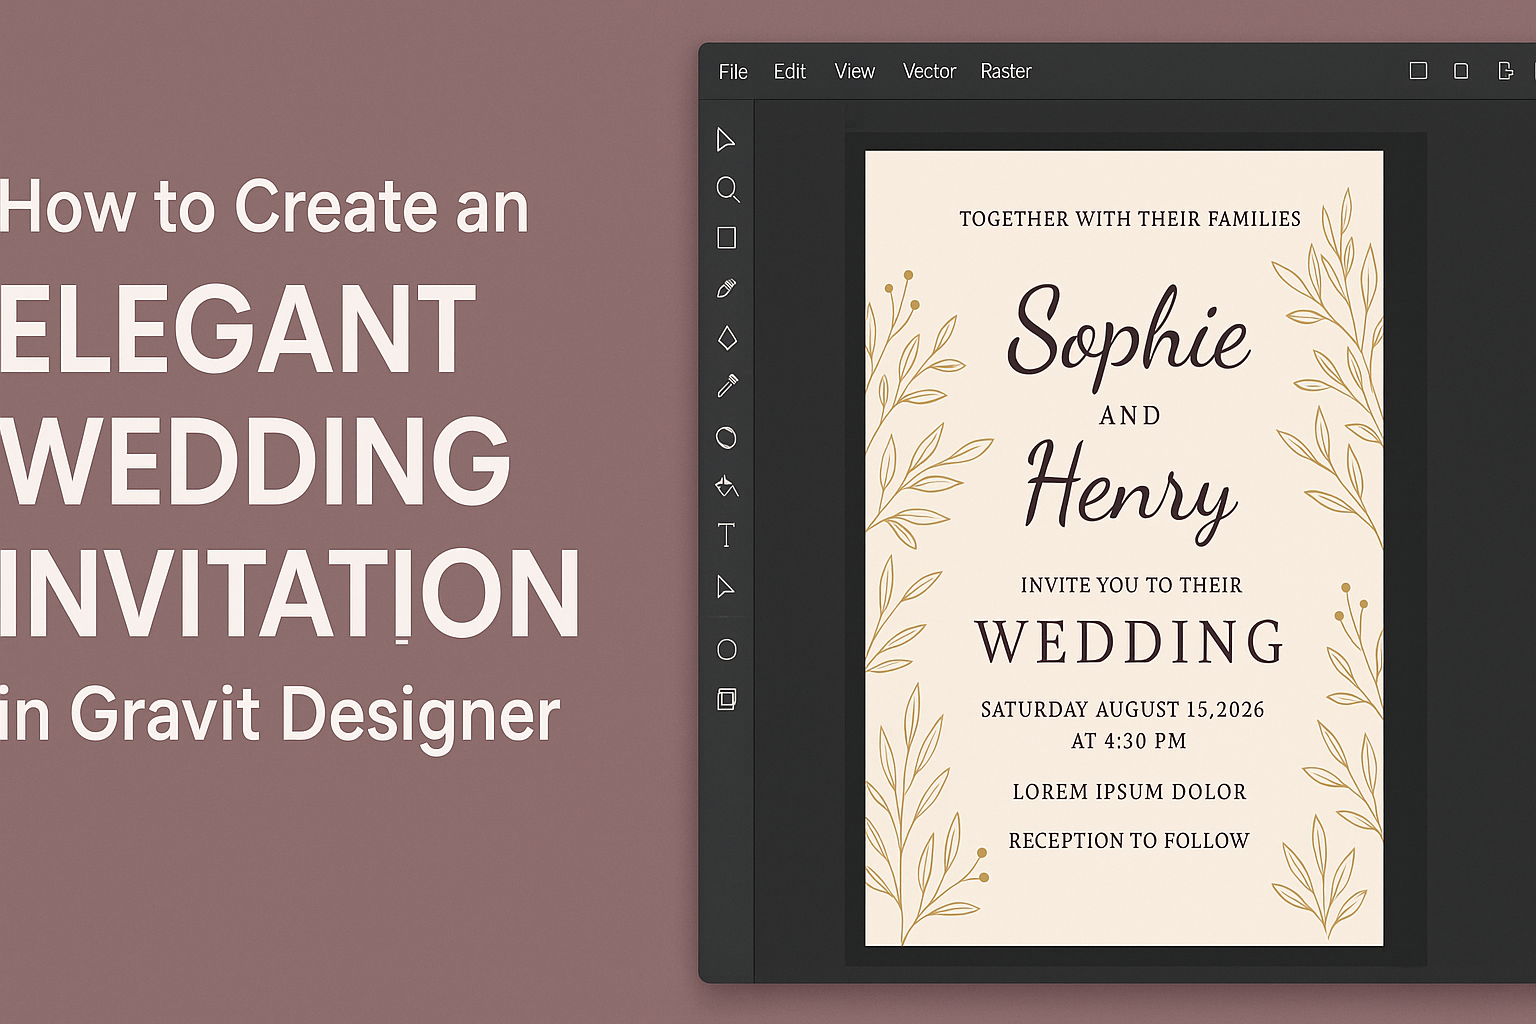
Getting Started with Gravit Designer
Gravit Designer is a user-friendly tool ideal for creating elegant designs, particularly for wedding invitations.
This section will cover its basic overview and how to set up an account for the first time.
Overview of Gravit Designer
Gravit Designer is a free vector graphic design application. It runs on multiple platforms, including Windows, Mac, Linux, and ChromeOS.
Users can access it directly through a web browser or download it for offline use.
The software offers a wide range of features. These include tools for drawing, text editing, and shape manipulation. The interface is designed to be intuitive, making it easier for beginners to navigate.
Gravit Designer supports various file formats, including SVG, PDF, and JPG. This flexibility allows users to save their work in the format that best suits their needs. The application is continuously updated, ensuring users have access to the latest tools and improvements.
Setting Up Your Account
To get started with Gravit Designer, the first step is to create an account.
Users can visit the Gravit Designer website and click on the “Sign Up” button.
They will need to provide an email address and create a secure password. After submitting the information, users should check their email for a confirmation link. Clicking this link activates their account.
Once registered, users can access Gravit Designer for free. They can also choose to explore premium features for an enhanced experience. With the account set up, users can start designing their wedding invitations right away!
Designing Your Wedding Invitation
Creating an elegant wedding invitation involves careful selection of templates, layouts, fonts, and colors. Each detail contributes to the overall look and feel, ensuring it reflects the couple’s unique style.
Choosing a Template
When choosing a template in Gravit Designer, the couple should start by browsing through the available options. Gravit offers a variety of templates that cater to different wedding themes, from classic to modern.
It’s important to consider the tone of the wedding. For a formal event, a more traditional template may be appropriate. For a casual gathering, playful designs can be more fitting.
Couples should also keep usability in mind; select a template that allows easy customization, making it simple to add personal touches.
Customizing the Layout
After selecting a template, customizing the layout is crucial. Couples should pay attention to the arrangement of elements like text and images.
Gravit allows users to drag and drop elements, ensuring that the layout appears balanced and visually appealing.
A few tips for layout customization include using alignment tools for symmetry and ensuring enough white space to avoid clutter.
It’s best to prioritize key information, such as names and dates, by placing them prominently. The layout should guide the reader’s eye smoothly from one piece of information to another.
Selecting Fonts and Colors
Choosing the right fonts and colors can dramatically impact the invitation’s elegance.
Couples should select fonts that match the theme of their wedding while ensuring readability. Script fonts can add a touch of sophistication, while sans-serif fonts offer a modern look.
Colors should complement each other and fit the wedding’s overall palette. For example, soft pastels may work well for a spring wedding, while deep jewel tones could suit a winter celebration.
It’s helpful to create a small palette of colors to maintain consistency throughout the invitation.
By carefully considering these elements, the couple can create a stunning and memorable wedding invitation.
Adding Personal Touches
Creating an elegant wedding invitation means making it special for the couple. Personal touches can enhance the design and make it uniquely theirs. Here are two important areas to focus on: graphics and typography.
Incorporating Graphics and Icons
Graphics and icons play a vital role in adding personal flair to wedding invitations.
Couples can choose images that represent their love story or shared interests. For instance, they might use a graphic of their favorite flower or a symbol that reflects their hobbies.
Using Gravit Designer, couples can easily integrate these visuals. They should opt for high-quality images to ensure everything looks polished. Simple icons can also be effective; a small heart or wedding rings can be a nice touch.
Remember, balance is key. Too many graphics can be overwhelming, so select a few meaningful ones.
Inserting Text and Typography
Text is crucial in setting the tone of the invitation. The right font can convey elegance and personality.
Couples should consider mixing a formal script for their names with a clean sans-serif font for the rest of the text. This combination often looks attractive and sophisticated.
Gravit Designer offers various typography options. Couples can adjust size, color, and spacing to create an inviting layout.
It’s essential to ensure that the text is clear and easy to read. Custom messages, quotes, or even a personal note can make the invitation feel more intimate.
Finalizing and Exporting
At this stage, the wedding invitation is almost ready. The focus now is on perfecting the design and ensuring it fits the intended look before getting it printed or shared digitally.
Previewing Your Design
Before exporting, it’s important to preview the invitation. This step allows the designer to spot any last-minute adjustments.
Gravit Designer provides a preview option that displays how the invitation will look when printed.
To preview, follow these steps:
- Click on the preview button.
- Review colors, text alignment, and layout.
- Check for any spelling errors or design inconsistencies.
While viewing, the designer should consider asking for feedback from others. Fresh eyes can often catch issues that the original creator may have overlooked. Adjustments can be made to improve the overall elegance of the invitation.
Exporting the Invitation
Once the design is finalized, exporting is the next key step. Gravit Designer makes this process simple.
The designer should click on the export option in the menu.
Here’s how to export:
- Choose the desired file format, such as PDF or PNG.
- Set the resolution to ensure the invitation maintains its quality.
- Specify the dimensions to match standard invitation sizes, like 5×7 inches.
After making these selections, they will click export and save the file to their computer.
It’s good to double-check the exported file to ensure everything looks perfect before printing or sending digitally. This will help avoid any surprises later on.